7. Magneto
Lucas KVFTT Magneto
Background
Vincent Black Lightning's were fitted with one of the rarest magnetos
that Lucas ever made, the Lucas KVFTT. As the name suggests this magneto
was a racing version of the Lucas KVF magneto, the standard magneto fitted
to Vincent twins, not disimilar to a K2F magneto with some subtle differences
and a 50 degree cam ring fitted. Vincent twin magneto's also differed
from most twin magnetos in that they were clockwise in rotation.
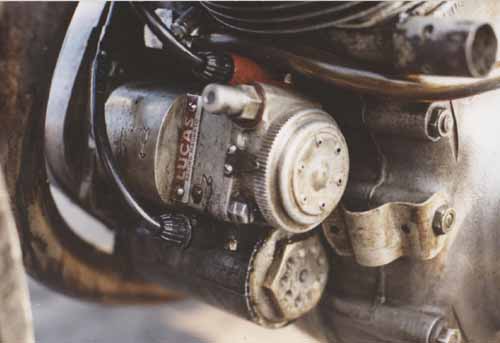
KVFTT Magneto fitted to George Brown's Nero Sprinter
I have absolutely no idea how many of these magnetos were made in total but I would guess that probably no more than 50 - 100 in total. I have talked various people who, like myself, have tried to research the magneto and to my knowledge no one has found any literature produced by Lucas mentioning them or listing their components.
Identifying a KVFTT
Visually, there are numerous distinctive features that identify KVFTT
magnetos from their KVF relation, as follows:
· Magneto body made of lightweight alloy (sometimes magnesium
based). Armature pickups parallel to each other (K2FC's had one pickup
at an approximate 10 degree angle to the other).
· Stainless Steel armature?
· On some magneto's the words 'LUCAS' cast into the top of the
armature body. I believe these were the earlier bodies
· Magneto body had a flat land between the pickups with cylinder
numbers stamped onto casing and a brass plate screwed on, inscribed 'Lucas
Racing Magneto', the background highlighted in red.
· A clockwise direction arrow stamped into the top of the magneto.
· Magneto Type(KVFTT)/Model Number (42201)/Date of Manufacture
stamped into top face of mounting flange. This was unlike most other Lucas
magnetos of the same period, which were fitted with an aluminium identification
plate in the same area, with the details stamped on the plate. I do not
know of any examples of KVFTT magnetos with a similar plate fitted, even
though red competition plates were made for K2FC magnetos.
· Manual advance/retard casting, with cable pickup on left hand
side (looking end cap on). As far as I know this magneto was the only
magneto fitted with this casting, it being almost a mirror image of the
casting fitted to a Lucas NR1 magneto.
· Hexagonal competition bolts with wiring holes, as fitted to other
Lucas competition magnetos.
· A very distinctive screw on end cap with six breather holes spaced
evenly around a central hump. I have never seen this end cap fitted to
any other magneto so assume it was made specifically for the KVFTT. I
am not sure if it was fitted to every KVFTT as I have seen some magnetos
fitted with the more normal competition cap, fitted to K2FC's.
· Early magnetos were painted gold, I believe this was to protect
the magnesium alloy from the atmosphere. Later magnetos seem to have been
painted silver, although it seems the last (alloy) bodied magnetos might
have been left unpainted.
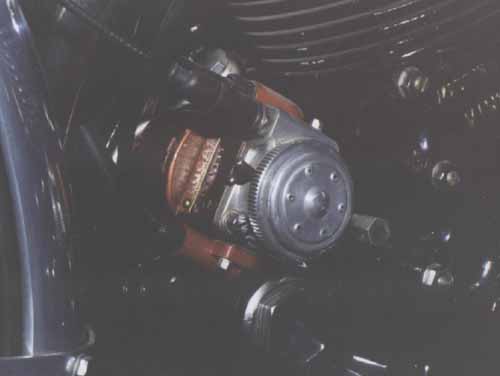
KVFTT fitted to Black Lightning in National Motorcycle Museum
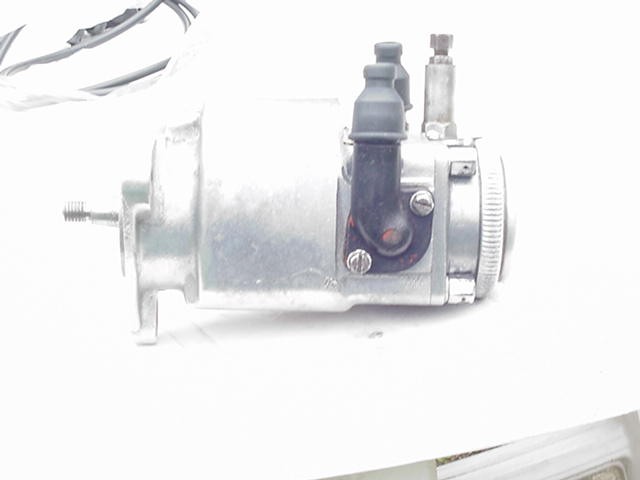
Plan view of a late alloy KVFTT (1953).
I think because of their rarity, I have always been interested in the KVFTT magneto, therefore I decided very early on that it was important to fit one to my bike, as it was a very distinctive feature of the Lightning specification. Indeed, you see very few Vincent's racing today with one fitted.
I spent many years scouring autojumbles and the classifieds in the hope I would find one, but they definitely resemble the proverbial 'hens teeth'. Even if I had found one, it is very doubtful I could have afforded it, bearing in mind some of the prices I had heard been paid to obtain one.
When I was sprinting in the late eighties I took a close look at Tony Brown's Nero, and noticed it was fitted with a KFVTT, which I photographed. Examining it closely I decided that it might be possible to create my own KVFTT using a more standard competition magneto as a starting point.
I know that some people object to building replica's, as they are easily be passed off as the real thing. However in the end I saw this as being the only alternative, and I intended that this replica would be as close to the original specification as I could make it.
As a final point for those interested, I have stamped it underneath as a replica and my initials, so no mistake can be made.
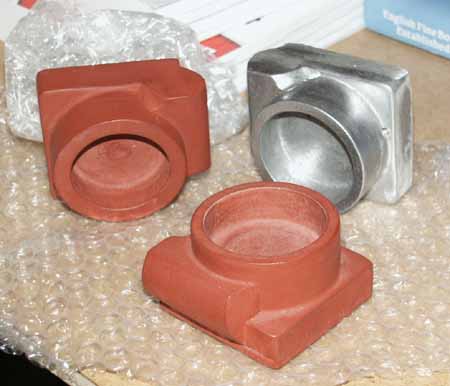
The body started life as a (comparatively rare) K2FC competition magneto. It came my way because one of the three mounting flanges was cracked and it was considered unusable (for those that have tried, most will tell you it is almost impossible to TIG weld a magneto body as the cast in magnet's deflect the arc). Fortunately, I was able to de-magnetise the body enough for my local welder and friend, Arthur Sosbe, to successfully repair the cracked flange and also weld up the left HT pickup hole and top face, which are different to the very distinctive KVFTT model. To anyone in the Leicester area who does not know Arthur, he is probably the finest welder in Leicestershire, his business repairs all kinds of exotic car/bike engines, including rare racing cars from the Donington collection. He is also very fairly priced and a motorcycle enthusiast to boot!
Once the body had been welded up, I was able to re-machine the left HT hole parallel to the right, as per photos and pictures I have taken from the genuine article. At the same time, I also machined the top face flat, to take the Lucas Racing plate. The only other magneto that I think could have been fitted with a similar nameplate could possibly be the rotating magnet variety, fitted to late Norton Manx's, however I would be interested to know if there were any others. I do actually possess another Lucas Racing label, slightly longer, that was obviously designed to be fitted on the flange, presumably in place of the normal Lucas plate, giving model and serial number details. The genuine KVFTT examples I have seen do not have a nameplate on the flange, instead having the model type/model number/year of manufacture stamped directly on to the flange. As you can hopefully see from the photograph I have replicated this as faithfully as I can.
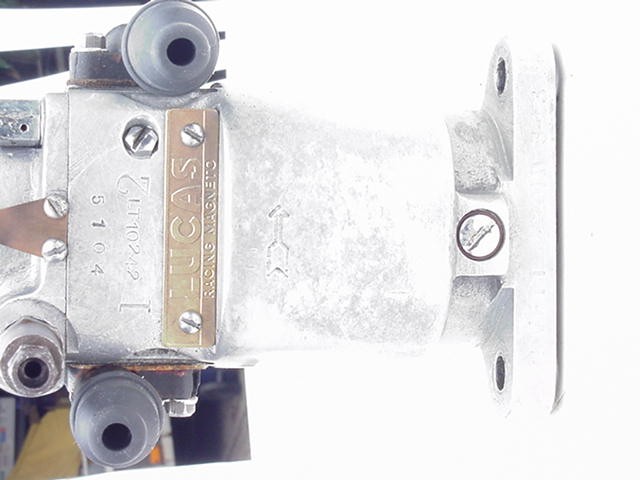
Side view of a genuine KVFTT.
This was replicated on my body by welding then re-machinging an alloy
K2FC body
Another point worth menitioning is that the safety gap screws on a KVF magneto are on the opposite side to a K2F magneto (again, clockwise rather than anti-clockwise). While having the above work done I also had the original holes welded up and then drilled/tapped new holes on the opposite side.
Finally I stamped the direction indicator arrow on the top of the magneto, and very fiddly it was to replicate as well! To achieve this I had to make about 4 very small chisels using Silver Steel rods, each one representing a different length of straight line, I then stamped each component of the arrow seperately. Obviously, the arrow signifies a clockwise rotation which does not seem to be stamped on standard K2F and K2FC magnetos, presumably as this was the only magneto at the time with that rotation. (Actually, I also own a Royal Enfield Constellation which, although of a slightly later period, also has a clockwise magneto direction).
The manual advance/retard casting is (as far as I know) exclusive to KVFTT magnetos. A similar casting was made for other racing magnetos but I believe these were all anti-clockwise in rotation, and therefore the cable exited from the left, looking endcap on. The other difference between this and an anti-clockwise casting is that the depth of the casting that abuts with the magneto body (ie the bit that has the copper spring screwed to it) is shallower in depth. I only found this out much later, when talking to Dave Linsdley, who has worked on many genuine ones.
With this wood I spent the next two nights carefully turning and carving a very close copy of the NR1 casting, making it slightly oversize to allow for shrinkage. As I was doing the job anyway, I took the opportunity to make an anti-clockwise pattern up as well as the clockwise, as the NR1 casting is quite rare in itself.
Wooden Patterns. KVFTT at rear and NR1 (with casting) in foreground
I also made a simpler jig to ensure that the 3 mounting points were drilled true to the magneto.
Final job was to drill and tap holes to take the small copper leaf spring that is used on competition magnetos to secure the endcap.
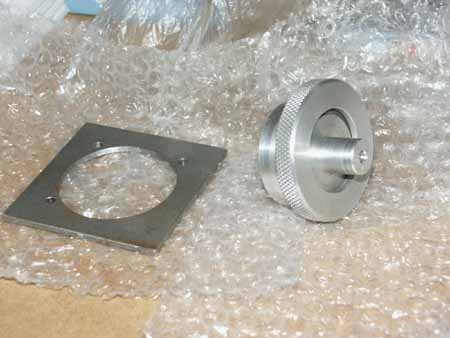
Jig on right for holding casting in lathe once cam ring recess machined. Jig on left ensures mounting holes correct
End Cap
The end cap was machined from solid and was modelled on the photograph
I have of Nero's KVFTT magneto, complete with breather holes. I have to
say it is the most unusual looking cap, and as I said before, is one I
have not seen fitted to any other magneto. I confess I have not seen what
the real cap looks like on the inside, but imagine that there is a second
backplate to capture condensation. Although screwcutting the large internal
thread was a delicate task I am quite pleased with the results, I hope
you will agree it looks quite a good copy of the original.
(Incidentally, my lathe is a Smart and Brown Model A toolroom lathe, which I think dates back to the 1950's. It is a beautiful lathe, massively built and very accurate for its size. I have some old engineering friends who fondly remember it as the Rolls Royce of lathes. That apart though, for a lathe of this quality it is not fitted with a clutch, which makes screwcutting a test of nerves! Because of this I have set the belt to slip at quite low torque, however it is still a very easy thing to break the workpiece/tool/lathe gears . . .
Magneto Internals
A few years ago when I first set out to build the bike I had every intention
to race the bike seriously. Like many people racing Vincent's today I
was going to switch over to a more modern ignition system, most probably
Kirby Rowbotham, with the magneto body just acting as a means to hold
the points breaker. It was only much later on that I decided that, as
I was no longer going to race the bike in anger, a well built magneto
would probably suffice. (For those not familiar with Vincent sparks, the
problem with using magnetos is that the second spark only comes 50 degrees
after the first, leaving little momentum to build a strong spark).
I already had a K2F armature in good condition and was just in the process
of sending it off to be rebuilt when I decided to check it in the magneto
body. Good job I did, as it turned out that the drive side armature shaft
was a smaller diameter than the inner race of the bearing.
I rang Dave Lindsley for advice, who informed me that they changed this
shaft on later K2F's and K2FC's as the earlier ones had frequently suffered
failures. Luckily Dave was very helpful and had a freshly built armature
of the later variety, which could be fitted with a KVF slip ring. This
was particularly good news as the cost was very little more than I was
expecting to pay for a re-wind anyway. Job done!
The idea of the mandrel was to hold the outer bearing, paper insulator and oil seal in the position they need to be mounted. Then a sleeve is placed over the paper insulator, pushing it against the outer face of the bearing and holding it in place. The mandrel is then carefully inserted all the way down the magneto body, until the bearing comes up against the bearing housing. A gently tap and the bearing/seal presses into place, while at the same time the sleeve is pushed further up the mandrel body, revealing the paper washer which insulates the bearing from the bearing housing.
It required quite a large piece of aluminium bar with numerous different diameters machining on it, but it worked superbly. Again, it was one of those occasions that most engineers know well where it takes 2 hours to make the tool but 5 minutes to do the job. Thanks very much Dave, excellent advice!
In comparison, inserting the other bearing into the manual advance/retard housing was very simple, and was achieved in the normal manner without the need of any special tools. (I think I might have used my bench press actually to ensure the bearing went in square).
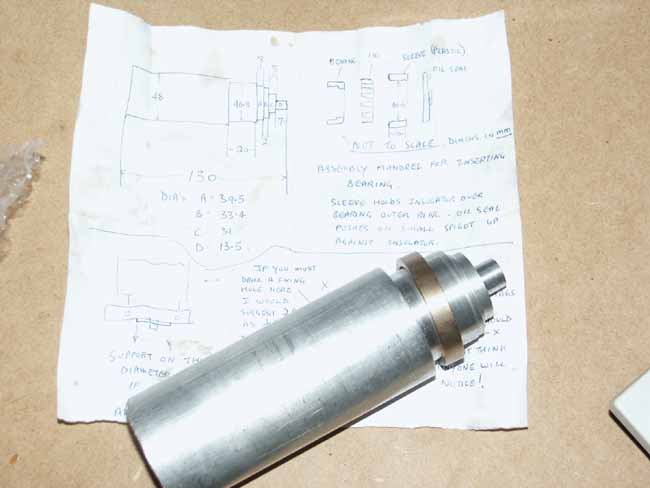
Mandrel and ring for inserting bearing into magneto body. Dave's drawing in background
I had decided to paint the magneto body gold, partly because this I am told was done with the earlier magnetos, but also because I think this colour looks great on competition magnetos!
Painting was not too difficult, starting first with a 2-pack aluminium etch primer, then a gold topcoat and finally a clear laquer to protect it. It certainly looked very smart when complete.
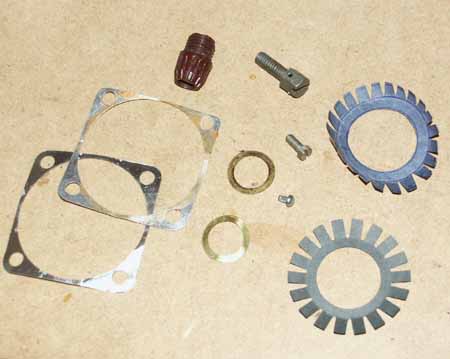
A selection of bolts, screws and shims. Paper bearing insulators are on right
I fitted new bakelite pick up housings and brush's and the correct competition hexagonal screws. The advance/retard retaining screws were also of the hexagonal competition type, drilled for lockwiring. As with the carburettors, all reclaimed parts were replated in my dull nickel bath.
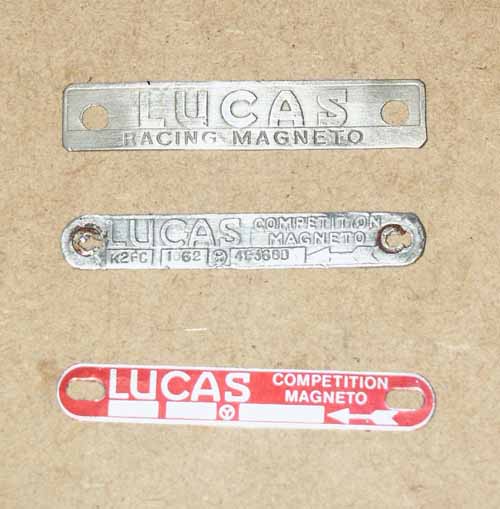
Magneto Flange labels. From
top:
1. rare 'LUCAS Racing Magneto'
label, slightly longer than fitted to KFVTT (see text)
2. Original K2FC label, stamped
3. Reproduction K2FC label. Painted, not stamped
I have fitted new Lucas points but unfortunately the rare platinum variety
are no longer available. If anyone has a set I would be interested to
buy them!.
The only item I am still waiting for is the special KVF 50 degree slip
ring, as Dave was waiting for a new batch when I last spoke to him.
Final icing on the cake was to fit original 1940's yellow and black competition
HT lead. As some might remember, in those days HT lead outer sheafing
was cloth covered rather than plastic. This is now available again from
specialist suppliers and certainly adds a genuine period touch.
At the same time as I was nickelling the other parts I also dull nickelled
the 'LUCAS Racing Magneto' plate that would be screwed to the top of the
body, between the HT pickups. I had been very fortunate to aquire this
original item from a magneto rebuilder many years ago, but it had lost
its plating and was now in the original brass. Once plated, I painted
in the red inlay, using enamal paint and a fine brush. Incidentally, in
the photograph opposite, you can see a second 'LUCAS Racing Magneto' plate
which came from the same man. The only difference with this second plate
is that it is slightly wider and looks like it was designed to fit on
the flange of a competion magneto. I never did work out which magneto
this was designed for, but I am pretty sure it was not for a KVFTT.
The Finished Article
All in all, there has been an awful lot of work to build this magneto,
and there have definitely been times when I wish I could just have bought
an original, irrespective of price! However, now I can see the finished
job, I feel it has been worth it, and am very pleased with the results.
I only hope it works as well as it looks!
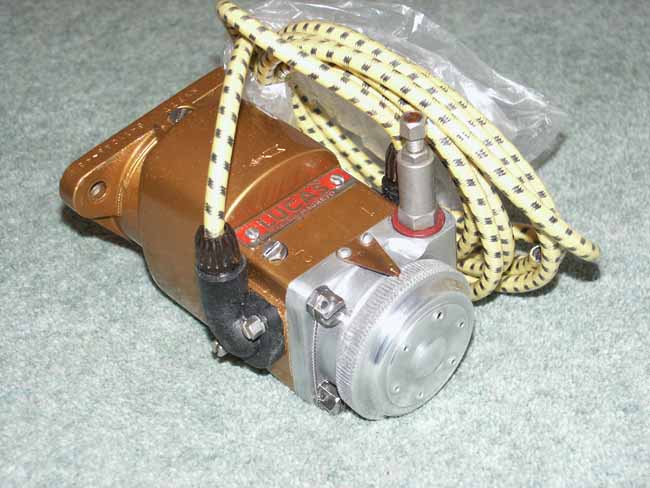
The Finished Magneto