Ducati
916 Part 2 - Fitting a Slipper Clutch
(April-May 2004)

Return To Previous Page
Well it is now November 2004 and it seems a long time
ago since I originally wrote this section (that's because it is a
long time you lazy fool).
The Ducati is still going well, I'm still in love with it and I feel
like I am getting to know it in that same comfortable way that I got
to know the Fireblade. You know, that feeling you get when everything
feels connected and in tune with you, and you don't even need to think
about where you are going, it just goes there itself, luvvly.
Unfortunately, the pain in the hip from the accident has not subsided and there have been times when I have seriously wondered if it is outweighing the pleasure of riding it, but then I find a nice twisty section and listen to the deep throaty rumble you only get with Italian V-Twins (not offending anyone am I Vincent owners?!), and it all seems clear. Who needs alcohol or drugs when you have one of these?? (yes, well maybe at least one of the others will stay on the itinerary as well).
Final Upgrades?
Well, the main reason for me writing this last section is to tell
you what I have done to it since I last updated this section, back
in February '04. However, before doing that I would like to point
out that I have now reached that plateau that I often find myself
at with a new vehicle, where you feel the need to lavish money on
it and constantly update it, then all of a sudden you decide that's
it, enough's enough.
I am now at that stage, the bike looks great and I enjoy riding it
and looking at it all the time, but like any new love (substitute
with your own experiences at this point as appropriate), there comes
a point when the novelty of new love changes to warm acceptance -
then shortly afterwards to taking for granted . . .
But lets back track a few months, to April-May time.
I knew when I bought the bike that its clutch was worn, a common complaint
of 916's in general, so not terribly suprising but a good bartering
point never the less.
Checking out the cost of new standard components and looking at what
was for sale on E-Bay, I could see that it might actually be just
as economical to look for a racing Slipper Clutch, rather than buying
new standard components from Ducati.
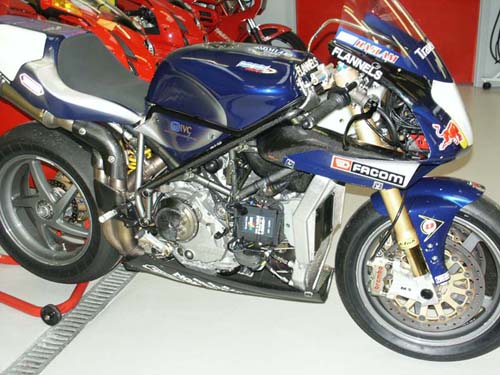
Corsa Slipper Clutch fitted to Leon Haslams 2003 Ducati 998. Look at the rest of the bike - everything on it is special!
Slipper clutchs have been fitted to Ducati's for World Superbike Racing for a few years now, the principle being that they allow faster entry speeds into corners because you can change down the gearbox without fear of locking the rear wheel, because if the torque differential of the engine braking is too high, it will simply 'slip' the clutch until the two are better matched. The net result of this is that engine braking is less violent and therefore they are easier to handle.
Anyway, that's the theory. I have to say that since I had been riding the bike I had indeed found that when coming up to a bend at speed (not illegal speeds obviously 'gov . . . ) going down through the gears too fast did cause the back wheel to lurch slightly and unsettle the suspension, so I was curious to see how this would work. Added to all this of course, is that nothing looks sexier on a 916 than a racing slipper clutch peeking through an open clutch cover.
There are quite a few types of slipper clutch available for the Ducati,
but all seem to use mechanical 45 degree ramps on the inner clutch drum
to give the 'slip'. The best quality ones uses ball bearings on the
ramps to give the least friction.
Generally regarded as the favorites are those made by Bucci or STM (they
look identical but I gather are from separate companies), both of which
use 6 ramps with ball bearings. If you read the Ducati and various websites,
it seems that it was the Bucci clutch Ducati Corse racing team adopted,
but in exotic metals.
With this information I started making enquiries. A couple of phone
call's to Ducati dealers quickly ruled out buying a brand new one, unless
I mortgaged the house, so I went a searching on that old friend - E-Bay.
A colleague at work joked with me last week that he heard you could
buy E-Bay patches now, similar to the nicotine variety!
Three weeks and a few missed opportunities later I had purchased an
'almost new' genuine Ducati Corse slipper clutch, minus clutch plates.
Admittedly, it was not cheap but I can't deny that the sight of the
'Corse' shield on the gold anodised cover pulled me in, ahh well - the
price of vanity. I am not sure if it is true but I was told the Corse
version is magnesium based and retails at over £1000, ahem.
To go with this I purchased a full set of clutch plates from my new
friends at JHP Ducati , with the friction plates being the alloy versions.
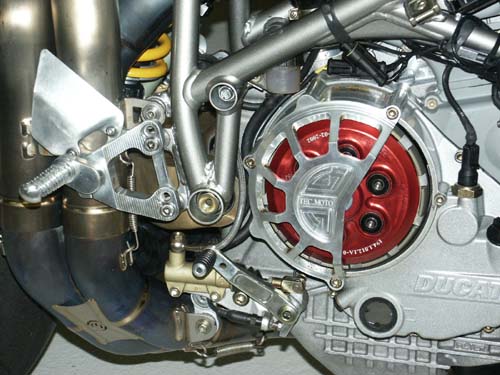
A standard Bucci Slipper Clutch fitted to a customer bike at JHP. Note the minimalist milled clutch cover
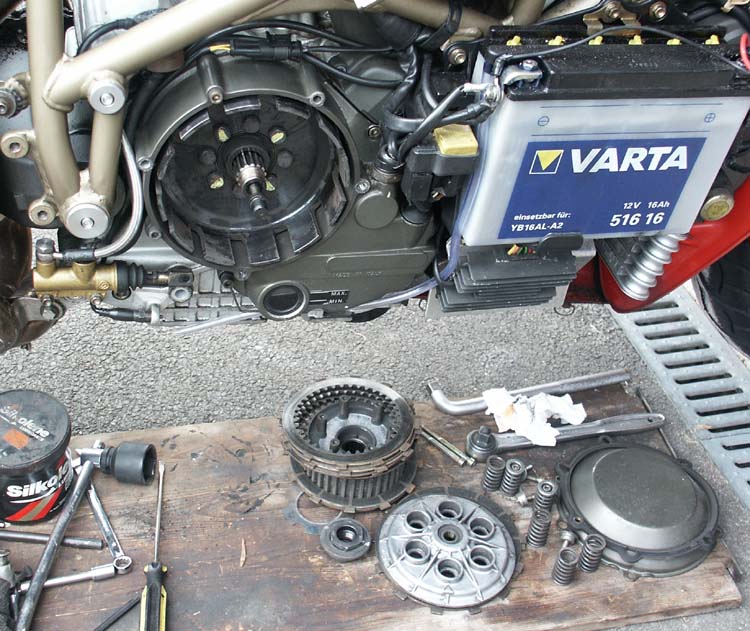
Old clutch finally stripped after struggling with securing nut for days
Foolishly, I thought fitting the clutch would be a straightforward job, probably taking no more than a couple of hours. The job started well enough, it being a dry clutch, requiring only the cover to be removed, then removing plates springs etc, like any other multi-plate clutch.
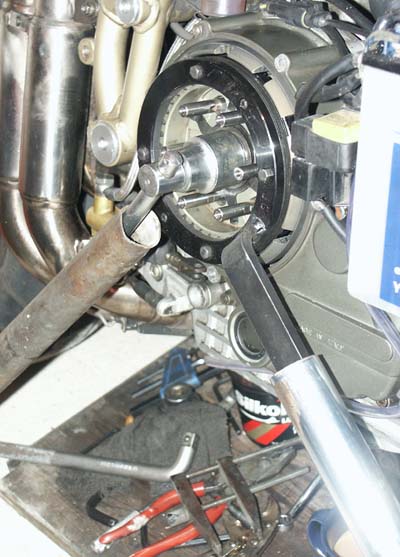
The problems only started once I tried to undo the main clutch nut securing the inner clutch drum to the gearbox shaft. There is a special tool for this job, that consists of many clutch plates bolted to a long handle, that can be used to lock the clutch drum up, while applying a socket and long tommy bar to the centre nut.
As this is similar to many British bikes in principle, I thought I would get away without the special tool and just do it by putting the bike in gear and 'chocking' the rear wheel with a brick. This started well enough, with the strain been slowly taken up and the brick wedging itself firmly in place, but as I started to apply more and more pressure - to the point where the veins on my head were beginning to resemble vultures claws!, the wheel started climbing over the brick (full weight of bike regardless), and the nut was showing no signs at all of giving. Over the period of a couple days, I tried every trick I could think of to release the nut, which although of high quality looked to have nothing other than the thread holding it to the shaft. I had a 3 foot extension over the tommy bar (giving terrific leverage). I even contorted myself and my mate Andy Phillips over the frame (no, not what you think!) in an effort to keep the back wheel from spinning against the brick and I even, very carefully got a blowtorch to the nut to try and expand it slightly from the shaft.
Nothing worked, and I was beginning to doubt myself that there was something less obvious or devilishly clever from Ducati's that I had missed. Perhaps the thread was left handed? (No), perhaps there was a hidden lock washer or key? (No), Perhaps there was a special split pin, which I was unknowingly in the process of shearing (No). What was clear to me, with a sympathetic view to all things mechanical (sort of) was that the huge pressure I was exerting through the gearbox, was all being placed on one or two very small gear teeth, and I was beginning to worry that perhaps the wrong part would eventually give!
Eventually I conceded defeat and contacted the service manager, Jeff, at JHP Ducati Coventry to confirm if I was missing something? Jeff reassured me that these were indeed put on with great pressure, especially if never removed from the factory, and very kindly offered to lend me his own personal Clutch removal tool, Hoorah!.
Once the tool was fitted and suitable extension bars added to extend the leverage, it was finally possible to loosen the nut. It still took two of us to do it and required every bit of grunt we had, but we both breathed a collective sigh of relief as it finally gave up the struggle. I don't know what kind of impact driver Ducati use, but its certainly better than the one I have!
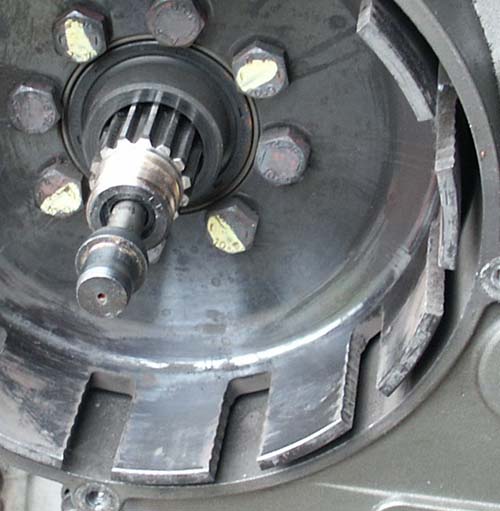
Close up of old steel drum shows bad wear to slots with very noticeable notching (click on photo for closeup)

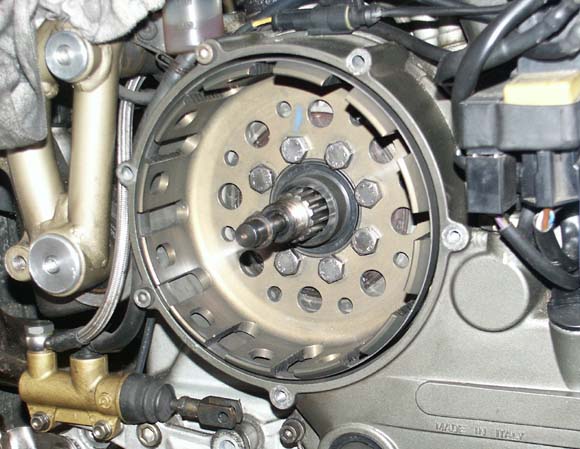
Clutch casing with old clutch fully removed. Clutch drum bolted to rear face, which is part of primary drive assembly within timing case
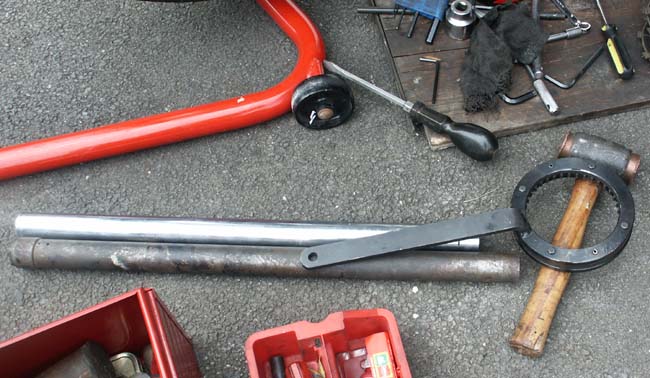
Heavyweight clutch fitting tool shown here, as well as old fork stanchion 'Tommy Bars'
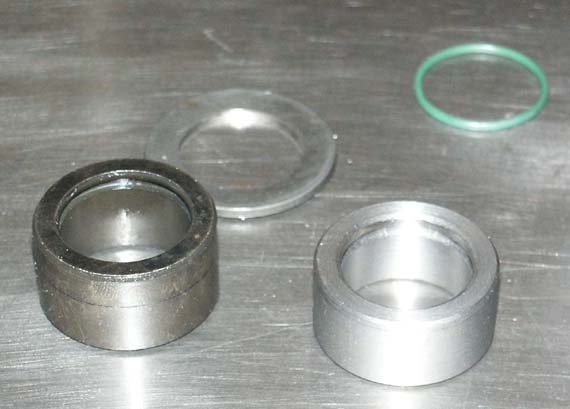
Original Ducati spacer on left and my new narrower spacer on right. Note groove in both for oil seal (top right)
Re-Assembly
The rest of the job was pretty straightforward after the drama of the
clutch nut. The only other challenge was trying to determine what the
correct distance piece width should be behind the clutch, to give the
correct pressure on the plates. Everntually, I ended up making a new
distance piece from EN28, which did the job admirably and allowed the
slipper clutch nut to tighten at the right spot.
It was then simply a case of bolting everything backup up, or at least that was what I thought until I decided to read the instructions in the Haynes manual after having already re-assembled it! It was then that I read that the bolts holding the clutch drum to the primary drive sprocket should have a sealer placed on the threads, to ensure that oil dident leak out from behind, onto the clutch plates. An hour later and it was all reassembled again, but this time with sealer in place! Well, as my wife always points out, 'men don't need to read instructions do you . . .'
I fitted a complete new set of Ducati clutch plates, with the friction plates being of the alloy variety, reducing reciprocating weight slightly and also helping to reduce wear on the outer drum. It is important with 916 clutch's to take careful note of the order the plain plates are assembled in. This is because one of the plates is different to the others, being dished slightly. It is important to ensure this plates is placed in the correct place, and is the right way round. It is marked with a white spot for this purpose. I think this is to reduce chatter (well yes, I'm often told I talk too much).
I did find that following assembly, the clutch springs were not tightening
up to the tension they were at on the original clutch. This seemed to
be as a result of minor differences in the spacing of the slipper clutch/original
clutch in relation to the mainshaft. Unfortunately, this did not look
an easy one to resolve and a very simple solution was to machine lightweight
alloy spacers (i.e. thick washers) to go behind each spring. This provided
a quick and easy cure, and with that the clutch was assembled. Final
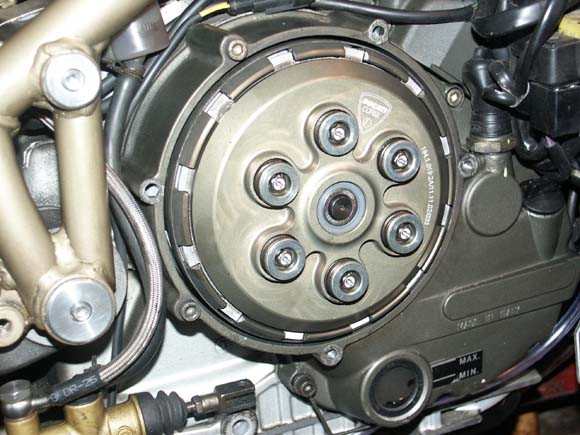
job was to fit a beautiful lightened clutch cover I had purchased on
E-Bay, which really sets it off - well when you have a clutch like that
fitted you don't want to hide it away, do you?!
New Magnesium Drum Fitted. Drum has steel band around circurmference to avoid belling
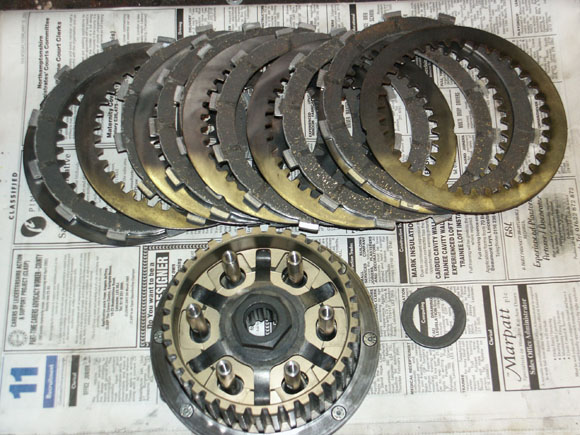
Slipper Clutch centre (showing ramp spring) and new clutch plates (alloy friction)
Re-Fitting the clutch nut with the special tools and very long extension bars
So with the new clutch fitted I could contain myself no longer and it was off for a thrash round the rural roads of Leicestershire to give it a tryout. The first and most obvious sensation you become aware of is not the 'slipping' of the clutch, but the strange clicking of the clutch lever as you start to use the clutch in anger. It is a difficult sensation to describe but I gather is normal with a slipper clutch and you soon get used to it. If nothing else, it tells you the clutch is working properly.
As for the 'slipping' action of the clutch itself, well at first it is a very strange sensation (almost like driving an automatic), but wow, what a difference!
Coming up to a bend, you drop the clutch (at higher revs than you normally would), and you can almost imagine the clutch thinking to itself 'mmm, don't like the idea of this much' and so it slips gently to itself until the rear wheel and engine are at speed more akin to each other, at which time the clutch bites fully home. Obviously, this all happens much quicker than the time it takes me to describe the process. For any of you reading with experience of old racing cars, it seems to have an air of pre-selector gearbox about it, although I am not sure why I think this.
Anyway, the back end feels so much more settled going into bends now
and you can slam it down the gears with gay abandon, knowing the rear
wheel is not going to lock solid and leave a darkie 30 foot long into
the approach to every bend. In fact, after a while you get quite blasé
about it, and I feel guilty that I think it has started to make me lazy
in my riding style. I better remember not to use the same style when
riding one of my British big singles, or I might leave my own darkie
in a different place.
Slipper Clutch finished, just waiting for cover to be fitted . . .
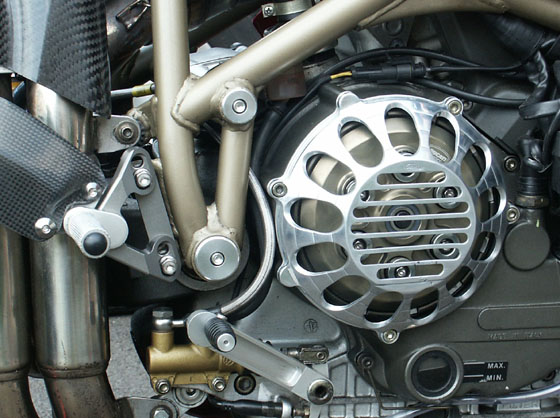
. . . and here with alloy cover fitted. Lovely to look at but not very good at keeping the rain out!
By the time I had purchased the clutch I was on a roll and could not stop myself! I'm always like this with a new toy - like one of those addictive shoppers that has a bedroom full of unworn cloths, with the labels still attached. In my case, even before I had the clutch fitted I was thinking to myself how good the bike would look with a pair of billet adjustable footrests fitted, especially if held on with Titanium bolts! I persuaded myself that as well as looking good, it would allow me to have the left footrest slightly lower than standard, as this was proving very uncomfortable on my stiff knee and damaged hip.
A quick trawl of all the regular Ducati web sites (I was an old hand by this time) gave me a good idea of the type I wanted, and also told me enough to know that, again, I had better start looking on E-Bay because £300 for a new set was not going to happen!
The set I eventually purchased were just the sort I wanted and came
complete with adjustable billet gear/brake lever, but were of the racing
variety. By this, I mean that the gear lever fitted directly to the
gearbox selector, rather than having a linkage attached to the footrest
bracket, as per the standard item. The net result of this is that the
normal direction of gear changing is reversed from the road bike. Although
this was not my preferred solution, I consoled myself with the knowledge
that it should mean a more direct gearchange with less slop.
Also, I purchased them for around a third of the price it would have
cost to buy them new.
Fitting them was pretty straightforward, but it was only when I came
to do this that I realised that they did not have any means to fit heelplates,
which is strange, because even the standard bike comes with these fitted.
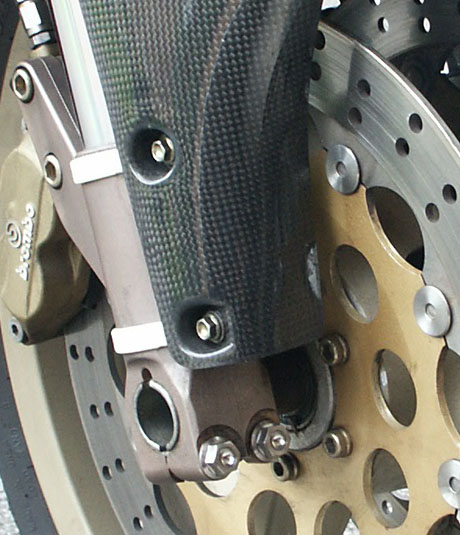
As it happens, one of the nicest items on my bike as bought, were the
lovely Carbon heelplates (which I think are genuine Corsa Ducati) so
I definitely did not want to lose these.
Unfortunately there did not seem anywhere obvious to fit these on the
new footrest hangers, so much head scratching ensued until I finally
settled on the idea of drilling the footpeg itself to take a single
hex head bolt from the rear. . I then fabricated a simple lightweight
alloy bracket to hold the heelplates off the footpeg
The whole assembly was then fitted, using titanium fastenings, which
I reckon sets the bike off beautifully. I don't know what you think,
but I reckon as a finished job they look great, and also have the advantage
of being multi - adjustable.
On the subject of Titanium, I love the stuff! I know that for a road bike it is a bit over the top, as well as being horrendously expensive (about £2.50 for a hex head bolt normally costing about £0.40p in steel!) but they look great and have the major advantage of not going rusty - very important on a Ducati!
With many of the major visible fastenings now replaced in Titanium and all the bells and whistles fitted, I am now using the bike in earnest and have done a couple of thousand miles on it this summer, pretty much trouble free I hasten to add.
As always, I have now hit that point with any new bike I own, where
I have satisfied the urge to upgrade it, so as far as tinkering is concerned
I have moved on to my next project - cammy Nortons. I shall no doubt
update the website shortly to include a section on these, before returning
to the Vincent..
I also took the opportunity to fit Titanium pinch bolts and mudguard bolts, both prone to rust on the originals
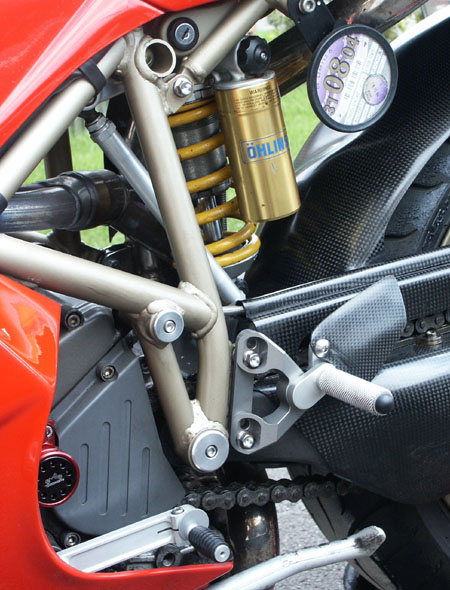
Drive side billet footrest and adjustable gear lever. This is direct now, instead of using a linkage and is therefore reversed
Go Back To Top