|
|
|
|
|
|
|
|
|
|
|
|
|
|
|
|
|
|
|
|
|
|
|
|
|
|
|
|
|
|
|
| |
Threading
Bolts Using Coventry Die Heads |
|
|
Published
: 12/08/11 |
|
| |
Off
at a Tangent Again – Coventry Die Head’s and Thread
Cutting
For anyone reading who is not familiar with Coventry Die Heads
- which are a commercially used device for cutting threads,
these are fascinating tools, and although they originate back
to a different engineering age (at least 50 years I would imagine),
they are still widely used in the industry. They come in a variety
of head sizes, and are cylindrical in shape, with an opening
on one end to feed onto the blank rod to be threaded, and a
hollow shaft on the other end, that can be held in a suitable
toolstock. They are manufactured by a company called Alfred
Herbert Ltd. and I believe they were originally used primarily
on machines such as the Ward Capstan lathe – which was
the closest thing to a modern CNC machine, in that it allowed
for a modicum of automated repetitive machining. These machines
– not unlike a normal centre lathe, but with a collet
quick release chuck, and a feed for a long length of steel to
be continually fed through the chuck from the back, then parted
off, also had a large rotating tailstock that allowed for a
number of different tool attachments to be fitted. The idea
was that a machinist could keep feeding bar through the chuck,
then quickly rotate tools, allowing for each operation, including
threading the bar, to be carried out, to ensure that there was
as little time as possible wasted between each operation. Not
much good for one-off jobs out of the ordinary, but great for
large production jobs, where every extra second of a job is
multiplied by the number you need to make. |
|
|
|
|
|
|
|
|
|
|
|
|
|
|
|
|
|
|
|
| |
|
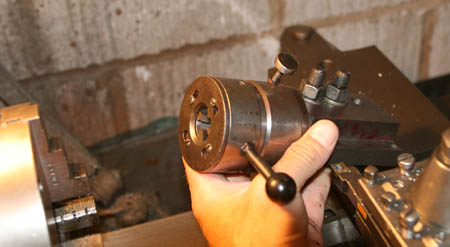 This
photo shows one of my Coventry Die Heads, which is mounted in
the jig that allows it to be mounted to the toolpost of my Smart
and Brown lathe. The 'trigger' with the black handle, which
allows the diehead to be 'cocked' can be seen in the foreground
This
photo shows one of my Coventry Die Heads, which is mounted in
the jig that allows it to be mounted to the toolpost of my Smart
and Brown lathe. The 'trigger' with the black handle, which
allows the diehead to be 'cocked' can be seen in the foreground |
|
|
|
|
|
|
|
|
|
|
|
|
|
|
|
|
|
|
|
|
|
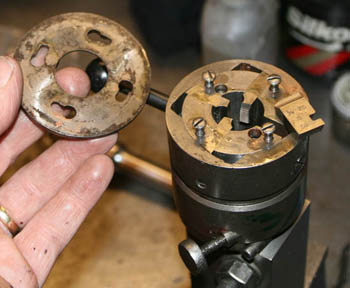 And
here, with the face of the Die Head removed it is possible to
see how the four chasers are loaded. These chasers are each
marked with a number from 1 to 4 and are loaded sequentially
And
here, with the face of the Die Head removed it is possible to
see how the four chasers are loaded. These chasers are each
marked with a number from 1 to 4 and are loaded sequentially |
|
|
|
|
|
|
|
|
|
|
|
|
|
|
|
|
|
|
|
|
|
|
|
|
|
|
|
|
|
|
|
|
|
|
|
|
|
|
|
|
|
Anyway, the Coventry Die Head, uses a set of 4 hardened teeth,
each numbered sequentially, that are inserted radially around
the head then a cover plate retains them. Every set of cutters
is unique for a particular teeth form – i.e. BS Cycle, BSW,
BSF, Metric etc, and a particular diameter, i.e, 5/16”,
7/16”, 1/2” etc, which is why there are different
size die, heads, as diameters get large.
The clever principle of a Coventry Die Head is that it has a small
lever (trigger) coming out of the side of the head cylinder which
allows the device to be ‘cocked’. Once cocked, the
cutting chasers close down to the correct cutting diameter and
then the cutting can begin. The teeth engage with the bar to be
cut, and to an extent the die head is pulled along by the pull
of cutting the thread. You then place a fixed stop at a suitable
point where the die head is stopped from progressing any further,
at which point the head stops, the inner body continues to travel
forward for another fraction of an inch which pulls the ‘trigger’
and the teeth open up again and release from the bar being threaded.
By doing this it allows for a stop to be placed to exactly correspond
where you want the thread to end, then the work can be threaded
very quickly, knowing it will automatically stop at the correct
point.
Because these die heads are meant for high quantity production
work, the quality of the threads is excellent, and the teeth (providing
they are not abused) last a very long time without losing sharpness
– something that cannot be said for many inferior quality
tap and die sets. |
|
|
|
|
|
|
|
|
|
|
|
|
|
|
|
|
|
|
|
|
|
|
|
|
|
|
|
|
|
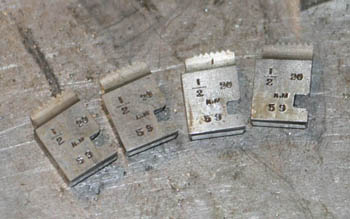 A
complete set of chasers, ready to be inserted. In this case
1/2" by 20 TPI, one of the more unusual BS Cycle threads
used by Nortons
A
complete set of chasers, ready to be inserted. In this case
1/2" by 20 TPI, one of the more unusual BS Cycle threads
used by Nortons |
|
|
|
|
|
|
|
|
|
|
|
|
|
|
|
|
|
|
|
|
|
|
|
|
|
|
|
|
|
|
|
|
|
|
|
|
|
|
|
|
|
|
|
|
|
|
|
|
|
|
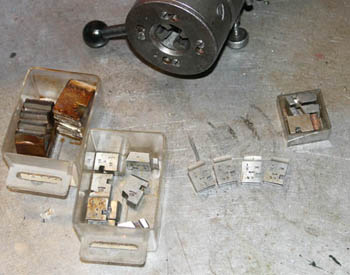 The
chasers are expensive to buy new, but can often be picked up
very reasonably second hand, if you dont mind hunting for your
specific size or can get to Engineering auctions. Many of those
I have acquired have been through this route. Beware broken
teeth when bought second hand
The
chasers are expensive to buy new, but can often be picked up
very reasonably second hand, if you dont mind hunting for your
specific size or can get to Engineering auctions. Many of those
I have acquired have been through this route. Beware broken
teeth when bought second hand |
|
|
|
|
|
|
|
|
|
|
|
|
|
|
|
|
|
|
|
|
|
|
|
|
|
|
|
|
|
|
|
|
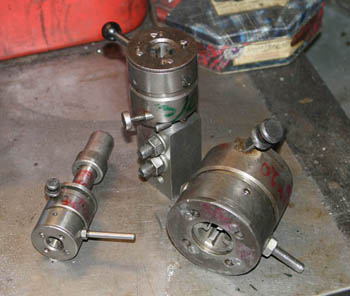 The
3 most common and useful size of Die Heads for the home workshop
- 1/4" on left, 5/16" in centre and 3/8" on right.
I find 5/16" the most useful for our average diameters
of bolts
The
3 most common and useful size of Die Heads for the home workshop
- 1/4" on left, 5/16" in centre and 3/8" on right.
I find 5/16" the most useful for our average diameters
of bolts |
|
|
|
|
|
|
|
|
|
|
|
|
|
|
|
|
|
|
|
|
|
|
|
|
|
|
|
|
|
|
|
|
|
|
|
|
|
|
|
The
downside of these tools is that they are extremely expensive,
I seem to remember the last time I checked, about 5 years ago,
a standard 5/16” Coventry Die Head cost about £600
each, and the cutting teeth cost about £35 for a single
set of 4. If the teeth get damaged or worn they can be reclaimed
by the use of a very special jig that allows for all the teeth
to be held together at a particular angle and be cut back on a
horizontal grinder |
|
|
|
|
|
|
|
|
|
|
|
|
|
|
|
|
|
|
|
|
|
|
|
|
|
|
|
|
|
|
|
|
|
|
|
|
|
|
|
|
|
|
|
|
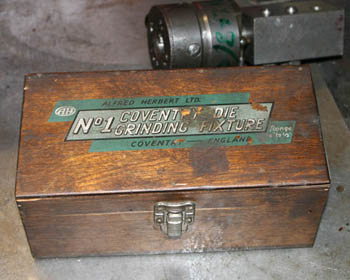 I
was amazed when walking round a Car Boot Sale in Luton many
years ago, to see this distinctive box on a stall, which I think
I paid £5 for!
I
was amazed when walking round a Car Boot Sale in Luton many
years ago, to see this distinctive box on a stall, which I think
I paid £5 for! |
|
|
|
|
|
Coventry Diehead Grinding Fixture
Amazingly, a few years ago I picked up a beautiful boxed example
of one of these lovely jigs (again – made by Alfred Herbert
Ltd, specifically for the Coventry Die Head), complete with fittings
– and what a wonderful precision instrument they are! The
purpose of this device is to allow for the chaser sets to be re-sharpened
in the event they get damaged or blunt over time. To do this,
the jigs allow for a full set of four chasers to be mounted in
the jig together, then mounted on a milling or grinding table,
while a grind stone is traversed over them. The jig allows for
both rake and the throat of the chaser to be re-cut. The throat
of the chaser is the entry point for the bar being fed into the
device, so obviously, it is this part of the chaser that takes
the brunt of the initial cut. With this in mind, it is not unusual
when buying these sets of chasers second hand to find that almost
half ot the number of teeth on the chaser are ground back - indicating
that the engineering company have made very good use of the teeth
over the years and have constantly re-sharpened them, as they
get worn. This does not detract from the quality of the finish
- as I would imagine it is only the first few teeth that do the
actual cutting, but it does have the slight disadvantage that
it is more difficult to gauge when you should stop cutting, if
you are cutting threads to a precise point on the bar shaft, as
you lose that visual aid, the further the teeth are cut back
|
|
|
|
|
|
|
|
 Contents
revealed this elaborate and beautifully manufacturered jig,
that allows for the re-grinding of the chaser teeth of the two
smaller sizes of chasers, it they get damaged or blunt with
age
Contents
revealed this elaborate and beautifully manufacturered jig,
that allows for the re-grinding of the chaser teeth of the two
smaller sizes of chasers, it they get damaged or blunt with
age |
|
|
|
|
|
|
|
|
|
|
|
|
|
|
|
|
|
|
|
|
|
|
|
|
| |
|
|
|
|
|
However,
the jig is even more clever than that! As well as allowing for
recutting of throat and rake for 2 different chaser sizes, it
also allows for both right and left hand threads and for different
angles to be selected, dependent on the chaser type or the metal
type to be cut. The facility for this last variable is made possible
by the design of the top holder being made cylindrical, so it
can be rotated in the base of the jig to a number of preset angles
- how clever is that!
I am a self confessed engineering nurd (albeit a very amateur
one), and this is one of my very favourite engineering tools,
simply because of the sheer cleverness of the design and economy
of its execution - it performs so many different tasks from one
single jig. There are some tools in the garage that you may only
use once or very rarely, but just owning them and being able to
look at them and marvel at how they are made is enough, and this
jig falls very much into that category for me.
Having said all that, how I came by my example in a pretty unusual
and fortunate way - and not because I went out looking for one!
On a visit to the inl-laws in Luton some years ago, we took a
walk round a local car boot sale on the Sunday morning. Amidst
all the normal stalls selling old dross and pirate CD's I spotted
a bloke with a small toolbox of engineering bits - old lathe tools
and drill bits mostly, but on the small trestle table he also
had, there were a couple of larger machine tools and this lovely
looking wooden box.
|
|
|
| |
|
|
|
|
|
|
|
|
|
|
|
|
|
|
|
|
|
|
|
|
|
|
|
|
|
|
|
|
|
|
|
|
|
|
|
|
|
|
|
|
|
|
|
|
|
|
|
|
|
|
|
|
|
|
|
|
|
|
|
|
|
|
|
|
|
|
|
|
|
|
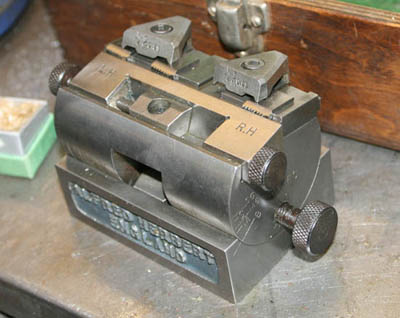 Here
you can clearly see what a wonderful piece of engineering this
jig is. It allows for both rake and throats (i.e. where the
teeth open to first cut the bar) to be re-ground.
Here
you can clearly see what a wonderful piece of engineering this
jig is. It allows for both rake and throats (i.e. where the
teeth open to first cut the bar) to be re-ground. |
|
|
|
|
Not
surprisingly, although attracting a lot of curiosty interest,
he had not had many takers for it - in fact, I got the prize for
being the only punter who had been able to tell what it was, so
after a little bit of friendly bartering I got it knocked down
to me for the princely sum of £8 - bargains do not come
much better than that! Not sure where it might have started life,
but I suspect it is of approximately 1960's vintage, and as Vauxhall
Motors was just round the corner, maybe it started life making
cylinder studs for Vauxhall Vivas.
After saying all that, I confess I have not had to use it in anger
yet, simply because I do not use the Coventry Die Heads and chasers
enough to need to have to resharpen any. I look forward to the
day I do though, though I think it will mean having to setup a
grinding stone on my vertical miller and use maximum revs, which
is not ideal, but will allow me to bolt the jig to the milling
table |
|
|
|
|
|
|
|
|
|
|
|
|
|
|
|
|
|
|
|
|
|
|
|
|
|
|
|
|
|
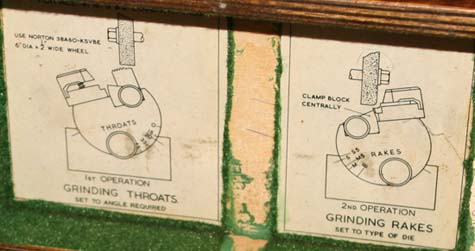 In
this close up of the instructions on the inner box lid you can
clearly see how the chasers are intended to be re-ground. Normally
the base of the jig would be bolted to a milling table which
could be traversed under the grinding stone
In
this close up of the instructions on the inner box lid you can
clearly see how the chasers are intended to be re-ground. Normally
the base of the jig would be bolted to a milling table which
could be traversed under the grinding stone |
|
|
|
|
|
|
|
|
|
|
|
|
|
|
|
|
|
|
|
|
|
|
|
|
|
|
|
|
|
|
|
|
|
|
|
 Not
my lathe this one, but a nice picture of a Myford Super 7 using
a Coventry Die Head in the tailstock. On my own Smart and Brown
I have a jig for holding the Die Head in the toolpost, so I
can engage screwcutting feed. By the way, I have a very nice
Myford Super 7 with quickchange gearbox for sale if anyone is
interested. Not cheap, but a really nice machine and fully tooled
with Myford stand\chest - contact me on the normal email if
interested
Not
my lathe this one, but a nice picture of a Myford Super 7 using
a Coventry Die Head in the tailstock. On my own Smart and Brown
I have a jig for holding the Die Head in the toolpost, so I
can engage screwcutting feed. By the way, I have a very nice
Myford Super 7 with quickchange gearbox for sale if anyone is
interested. Not cheap, but a really nice machine and fully tooled
with Myford stand\chest - contact me on the normal email if
interested |
|
|
|
|
|
|
|
|
|
|
|
Buying
Coventry Die Heads
I picked up my Coventry Die Heads (the three most common sizes
for our size of threads) many years ago at an engineering closing
down auction, as well as two drawers full of cutting chasers,
in various sizes, which included many of the rare to find BS Cycle
sizes. I love using them for their accuracy, and have made a special
holding jig that replaces the toolstock holder on my lathe, so
that it can travel with the main lathe saddle, when I engage screwcutting.
The problem I have with them, is that there is a ‘fine adjustment’
setting on these die heads, which needs to be setup exactly right
first, or the thread will be under/oversize and this normally
takes a couple of attempts to get right. Also, they are quite
fiddly and time consuming to change over from one thread size
to another, as all 4 chasers need to be removed and replaced in
the correct order. Because of this, I only tend to use them when
I have a large batch of bolts in the same thread size to make.
|
|
|
|
|
|
|
|
|
|
|
|
|
|
|
|
|
|
|
|
|
|
|
|
|
|
|
|
|
|
|
|
|
|
|
|
|
|
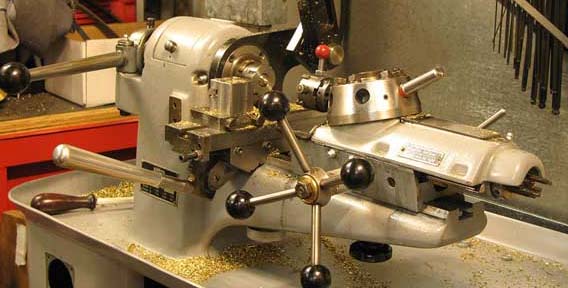 And
another reference shot - this one shows a Capstan style production
machine, where the rod blank is mounted in a quick release collet
type chuck. The Coventry Die Head is held in a revolving toolpost.
These have the facility to hold multiple tools, normally arranged
in sequence and by going backwards and forwards with the turret
feed handle it rotates round to the next tool. This style of
lathe is great for high quantity repetitive production work
And
another reference shot - this one shows a Capstan style production
machine, where the rod blank is mounted in a quick release collet
type chuck. The Coventry Die Head is held in a revolving toolpost.
These have the facility to hold multiple tools, normally arranged
in sequence and by going backwards and forwards with the turret
feed handle it rotates round to the next tool. This style of
lathe is great for high quantity repetitive production work |
|
|
|
|
|
|
|
|
|
|
|
|
|
|
|
|
|
|
|
|
|
|
|
|
|
|
|
|
|
Actually,
since my father died, I have meant to collect the extra couple
of heads he also has (he was with me when I bought mine!), so
I can at least set up a couple of the most common sizes I use,
which would save time.
For me though
the best part about using a Coventry Die Head (particularly
the way I have them set up to work on my lathe), is to watch
it automatically chunder down a blank bolt, until it hits the
stop and the trigger pops it open, and when you pull the head
back, you are left with a perfectly cut thread - which providing
it is setup correctly, has the perfect tolerance to the nut.
As a final
snippet of useless information – to all but us Norton
buff’s, I am informed that the bevel gears fitted in Norton
cammy engines were manufactured by the same company that make
Coventry Die Heads - Alfred Herbert Ltd. This is indicated by
the little oval 'AH' trademark stamped onto all original Norton
gears, which is also stamped on Coventry Dieheads– that
is something I bet you wont get asked in your normal Pub Quiz! |
|
|
|
|
|
|
|
|
|
|
|
|
|
|
|
|
|
|
|
|
|
|
|
|
|
|
|
|
|
|
|
|
|
|
|
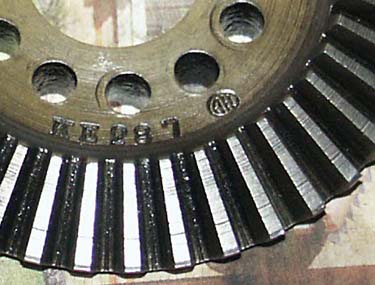
Ahhh
. . . and now the final connection - notice how similar the
logo stamped on an original Norton International top bevel
gear looks when compared to . . .
|
|
|
|
|
|
|
|
|
|
|
|
|
|
|
|
|
|
|
|
|
|
|
|
|
|
|
|
|
|
|
|
|
|
|
|
|
|
|
|
|
|
|
|
|
|
|
|
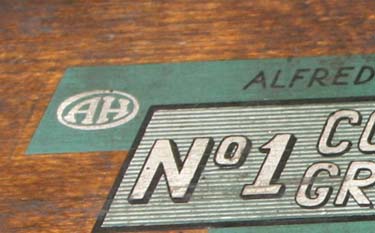 . . . the logo on the front of the Coventry Die Head Grinding
Attachment box - that because they are both the same Alfred
Herbert company logo!
. . . the logo on the front of the Coventry Die Head Grinding
Attachment box - that because they are both the same Alfred
Herbert company logo! |
|
|
|
|
|
|
|
|
|
|
|
|
|
|
|
|
|
|
|
|
|
|
|
|
|
|
|
|
|
|
|
|
|
|
|
|
|
|
|
|
|
|
|
|
|
|
|
|
|
|
|
|
|
|
|
|
|
|