
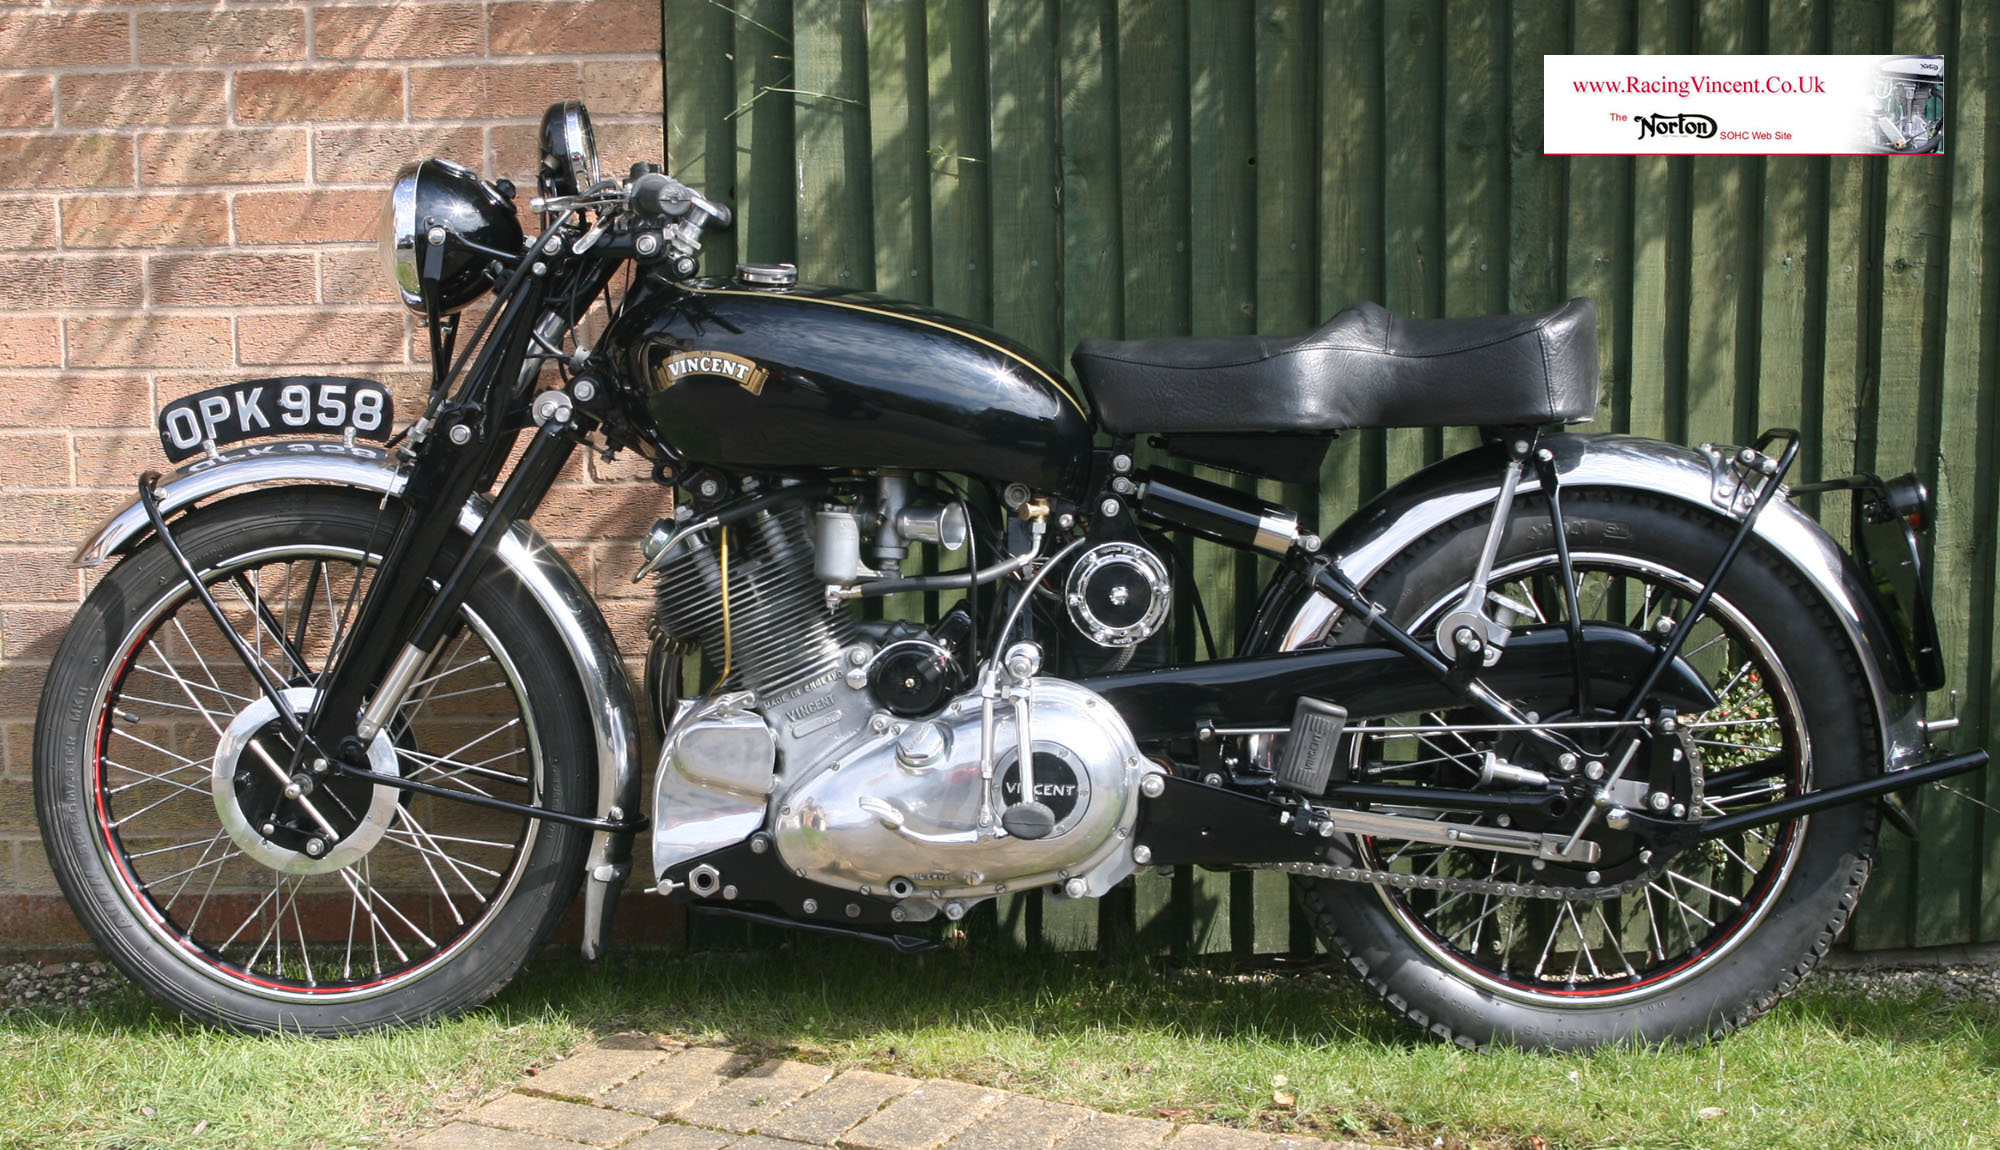
1950 Vincent Comet Series 'C'
So here is our 1950 Vincent Comet, fresh out of restoration and just before its first firing up. This bike has been in our family since 1960 - bought by my father from Comerfords because the Norton he went to buy had already sold by the time he got there! But it became his favourite bike - being used in both solo and sidecar trim (hence the big sprocket on the off-side), but at this point not ran in anger since 1993. I am pleased to say that it sounded just as I remembered it when shortly after this photograph I was able to start it again - a particularly poignant moment, since my father passed away in 2009, so hope he approved
1950 Vincent Comet Restoration: April 2016 - The Finished Article
April 2016 - Has it really been 3 years??!
How time flies! I cannot believe it is almost 3 years since I started stripping down my late father's Vincent Comet - at that time with a view to giving it just a quick cosmetic rebuild, but as so often happens with my builds - they very quickly turn into a full restoration, as I spiral down into the invetiable 'well now I have cleaned this part, the part next to it is looking too crappy' - and before i know it the bike is fully stripped down and the rebuild slips from 3 months to . . . well in this case almost 3 years!
That said, I am pleased to say that (as is often the case), I dont regret this decision at all - I initially had a crisis of conscience about 'prettying' up the Comet, as my father had used the bike for countless years as his 'ride to work' bike, and I felt that by bullshitting the build he would be up there giving me that look he reserved for me when he knew I was just playing at something (is it just me . . . or do we all just remember our parents for the times when they admonished us?!). But as I pulled the bike out of the garage in its near finished state a few weeks ago for the first time - and went round cleaning off all the excess gease I always use when assembling new builds - I grudgingly admitted to myself what beautiful (if over-engineered)
bikes Vincent's are, and how they look the quentissential piece of British engineering at its best - definitely the Bentley's of the bike worlds - even the small 'one lungers' like this Comet.
How did the restoration go?
Well actually, as restorations go this was one of the most straightforward and enjoyable i have done in a long time - it certainly makes a difference when you have a basically original and complete running bike to start from - particularly when you know all the bits originally fitted together to start with!, rather than my normal starting position of having a basket case with loads of bits missing and having to make many of them - this one was much more straightforward, although still a nice challenge in some areas. All through the build I have taken photographs as I have gone along, but with everything else going on, and running the Norton business at the weekends, I have not had time to write articles up or publish any of those photographs. If I get time in the future I will go back and put together more detailed articles of what has gone on between, but as that is looking unlikely for some time, Instead I have included more detail than I normally would on the text accompanying photographs.And as always - click on the photographs to view a larger 'Screensaver' size photo of each. For those that want to dowload, right click on photo and then 'Save As'. Please acknowledge my website if intend to you use them elsewhere

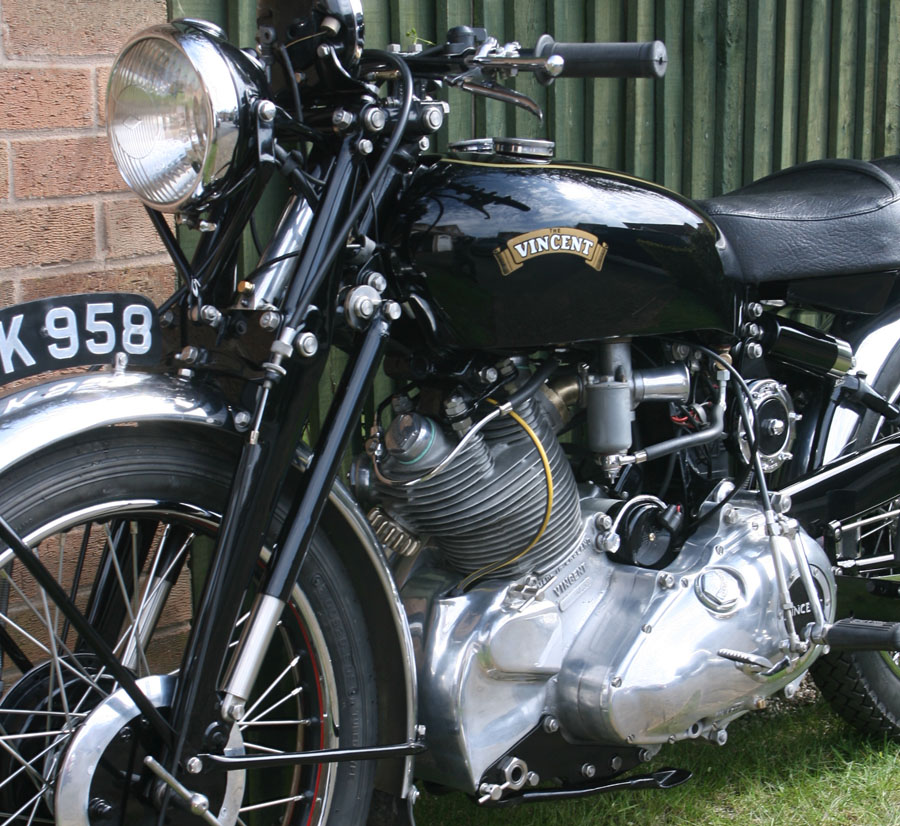
Unashamedly; this is one of my favourite photographs - I love the 'busy-ness' of Vincent forks - add to that the old world charm of Miller headlight and original nickel plated tax disc - gives this photograph a wondeful hue of times gone by. By the way - do you like the original style 1951 tax disc? the first disc this bike would have carried - complete with Essex CC county stamp, where this particular bike was first registered. I am just about to start offering facsimile tax disc's personalised to your bike/s details and this year will be one of them
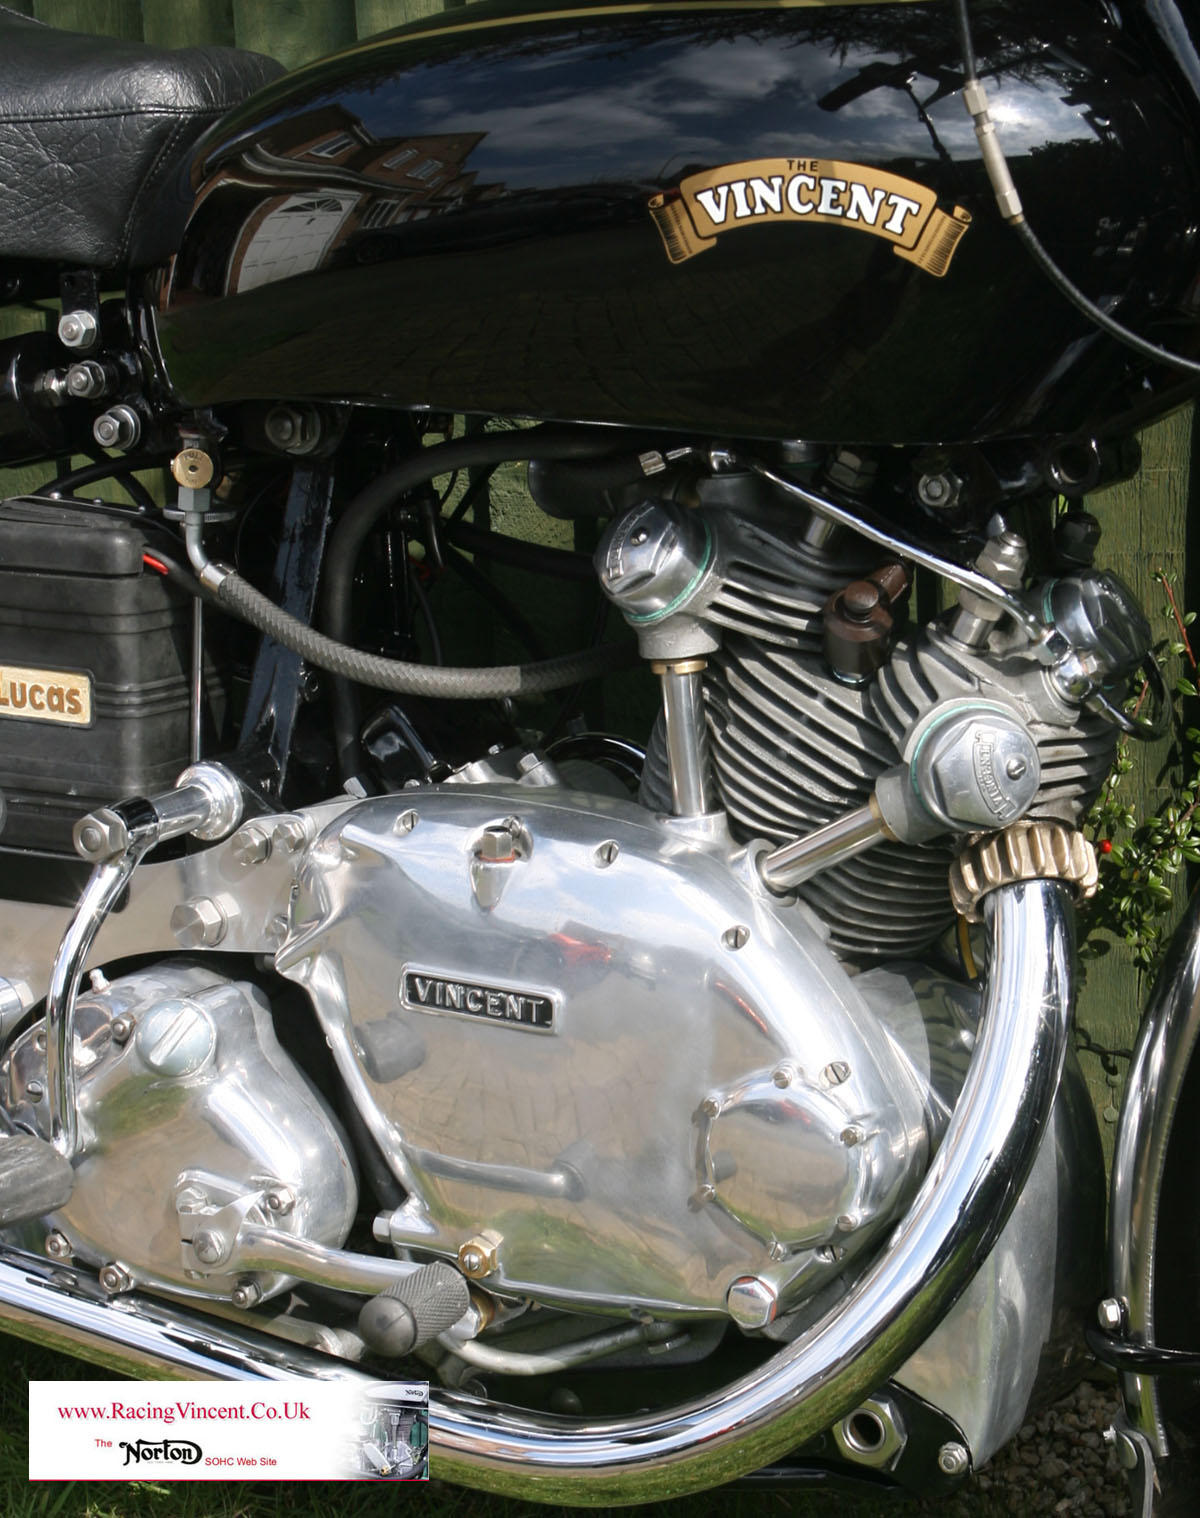
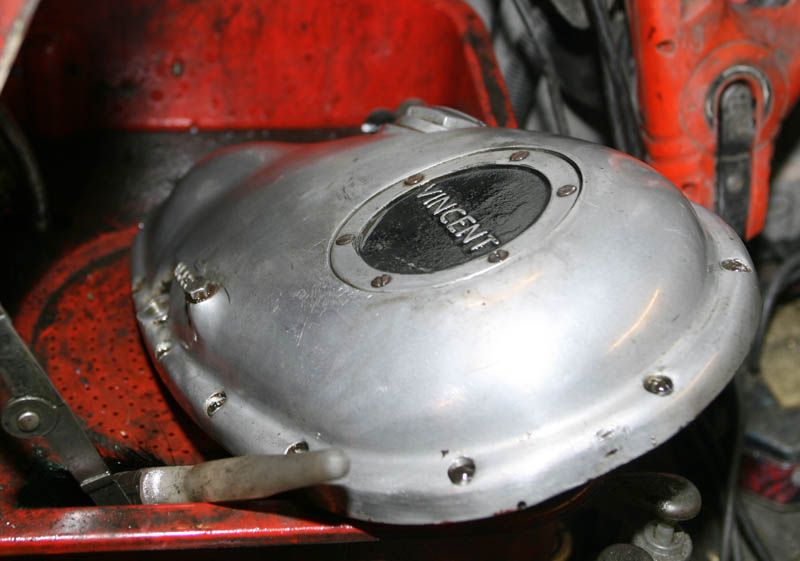
Timing side of Vincent Comet. Nice and shiny I know, but also lovely quality castings and parts that are the hallmark of all Phil Vincent's creations
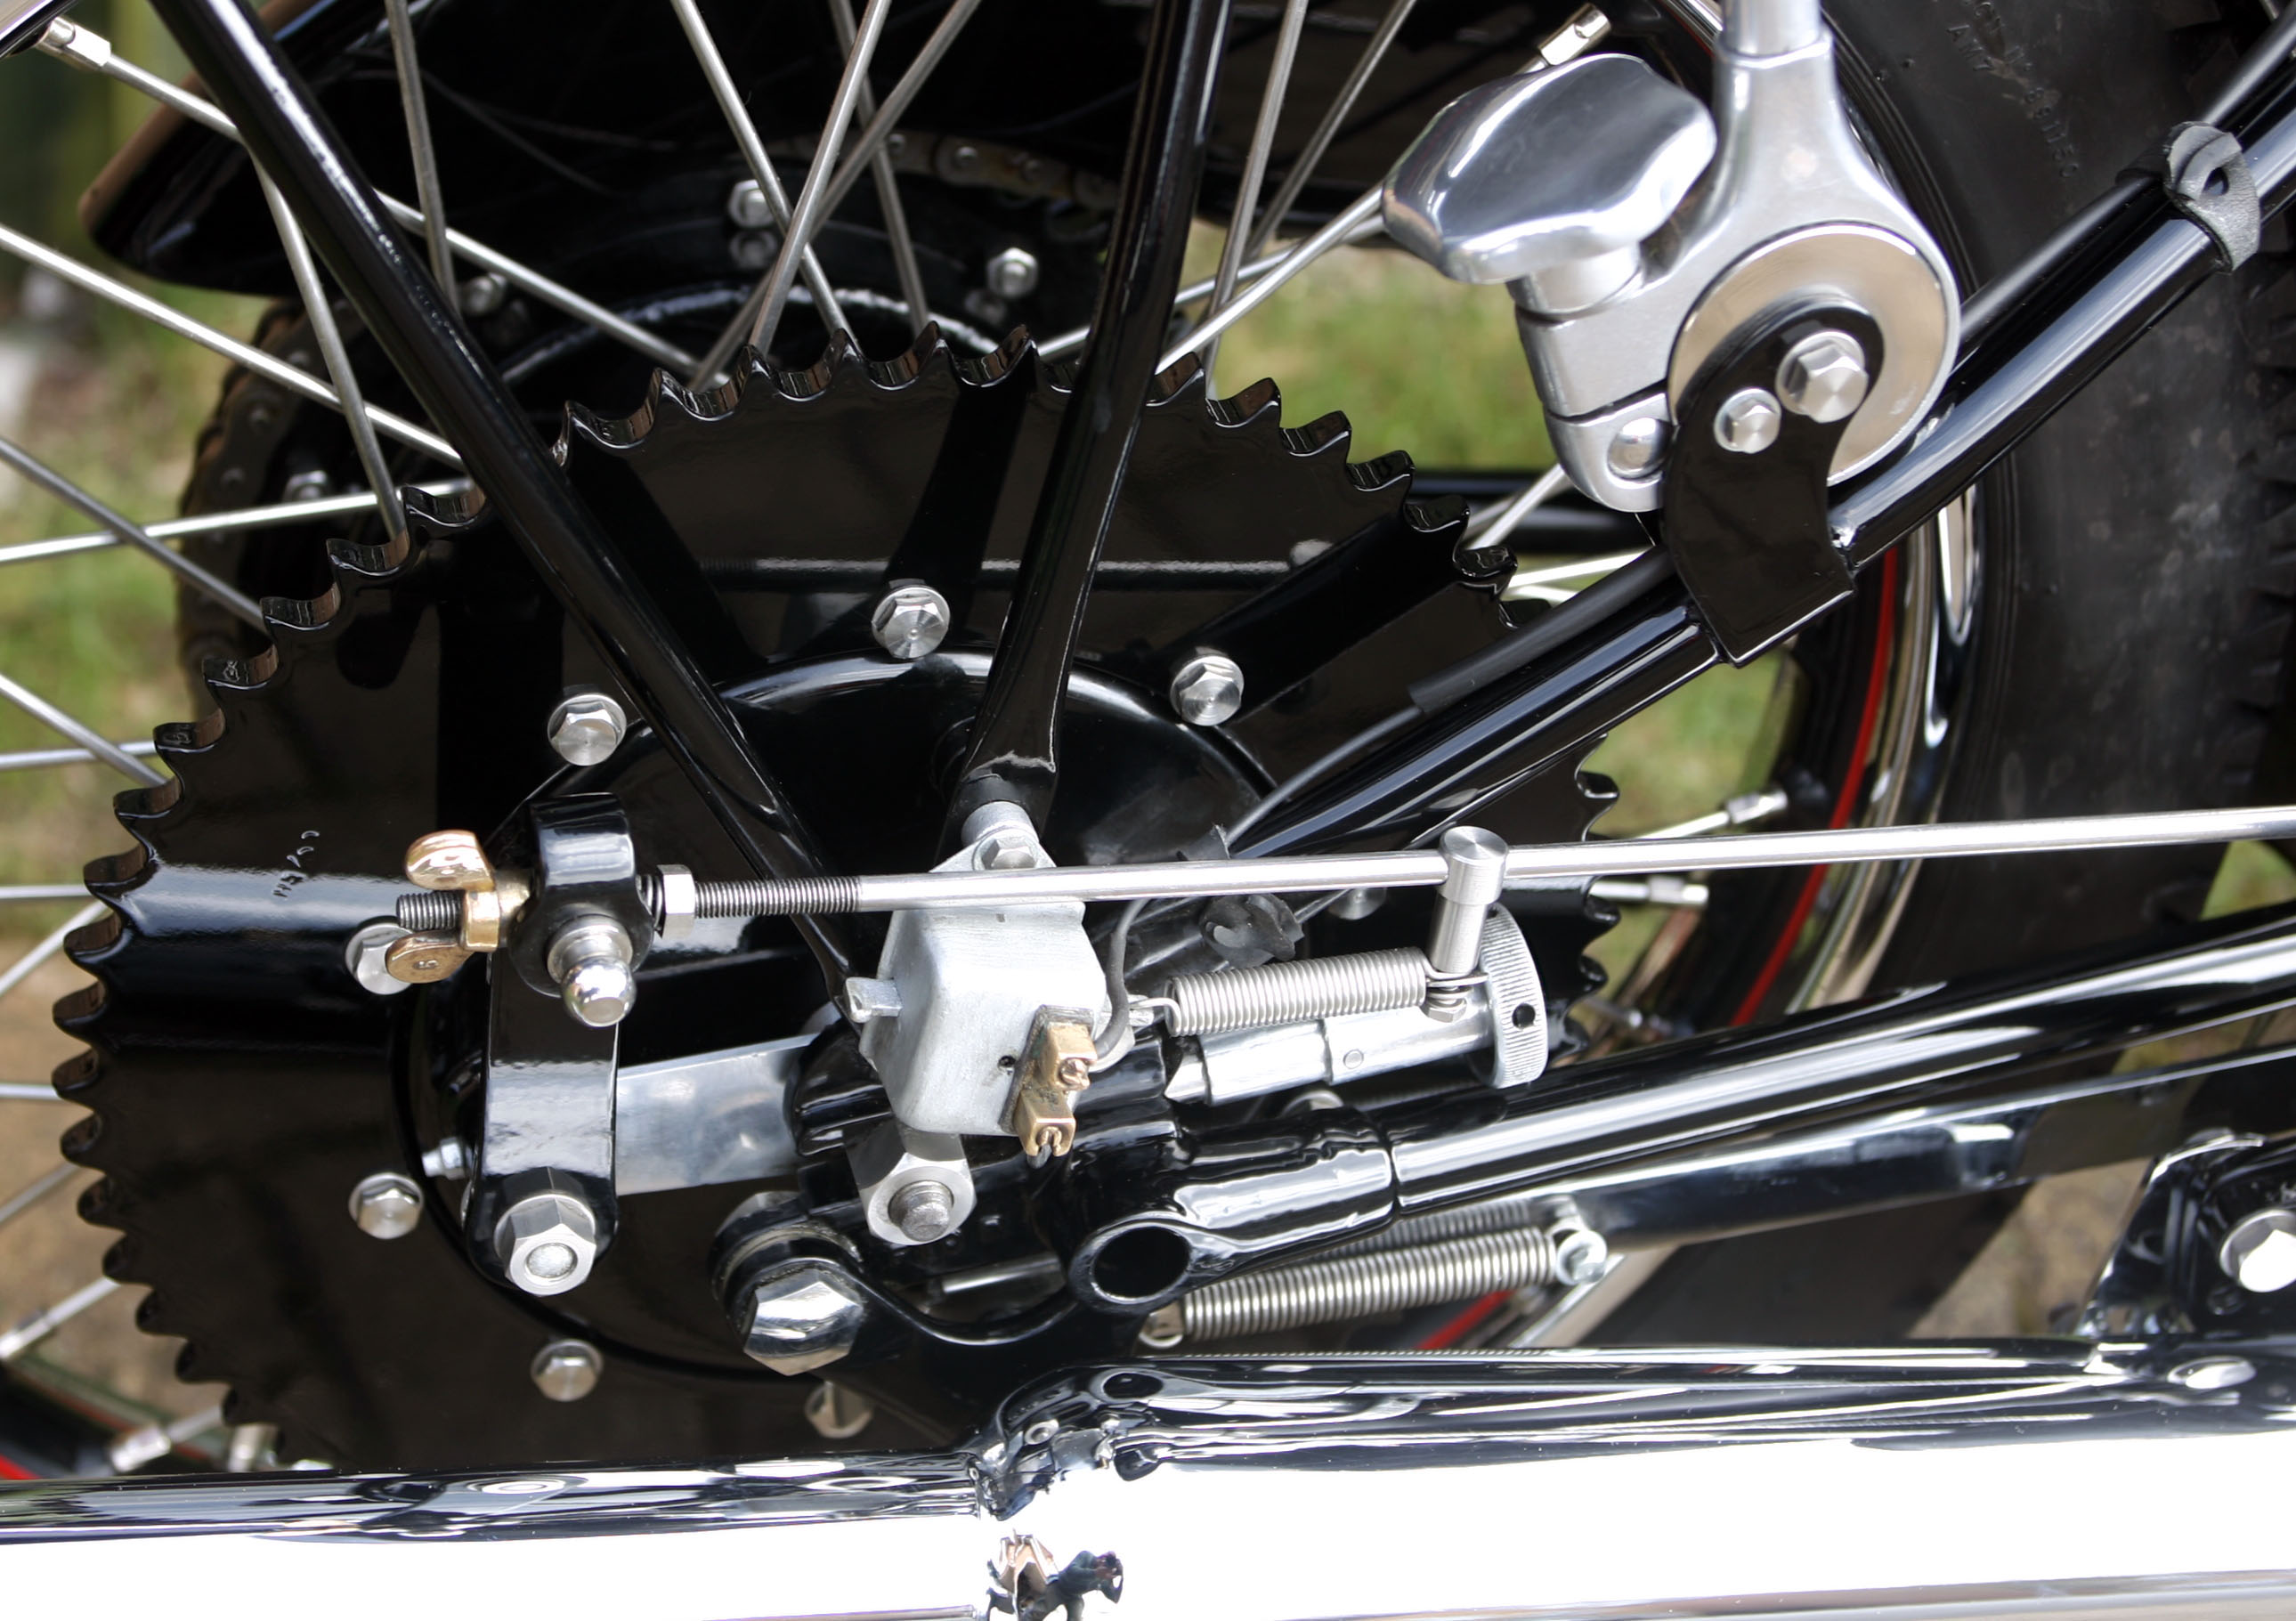
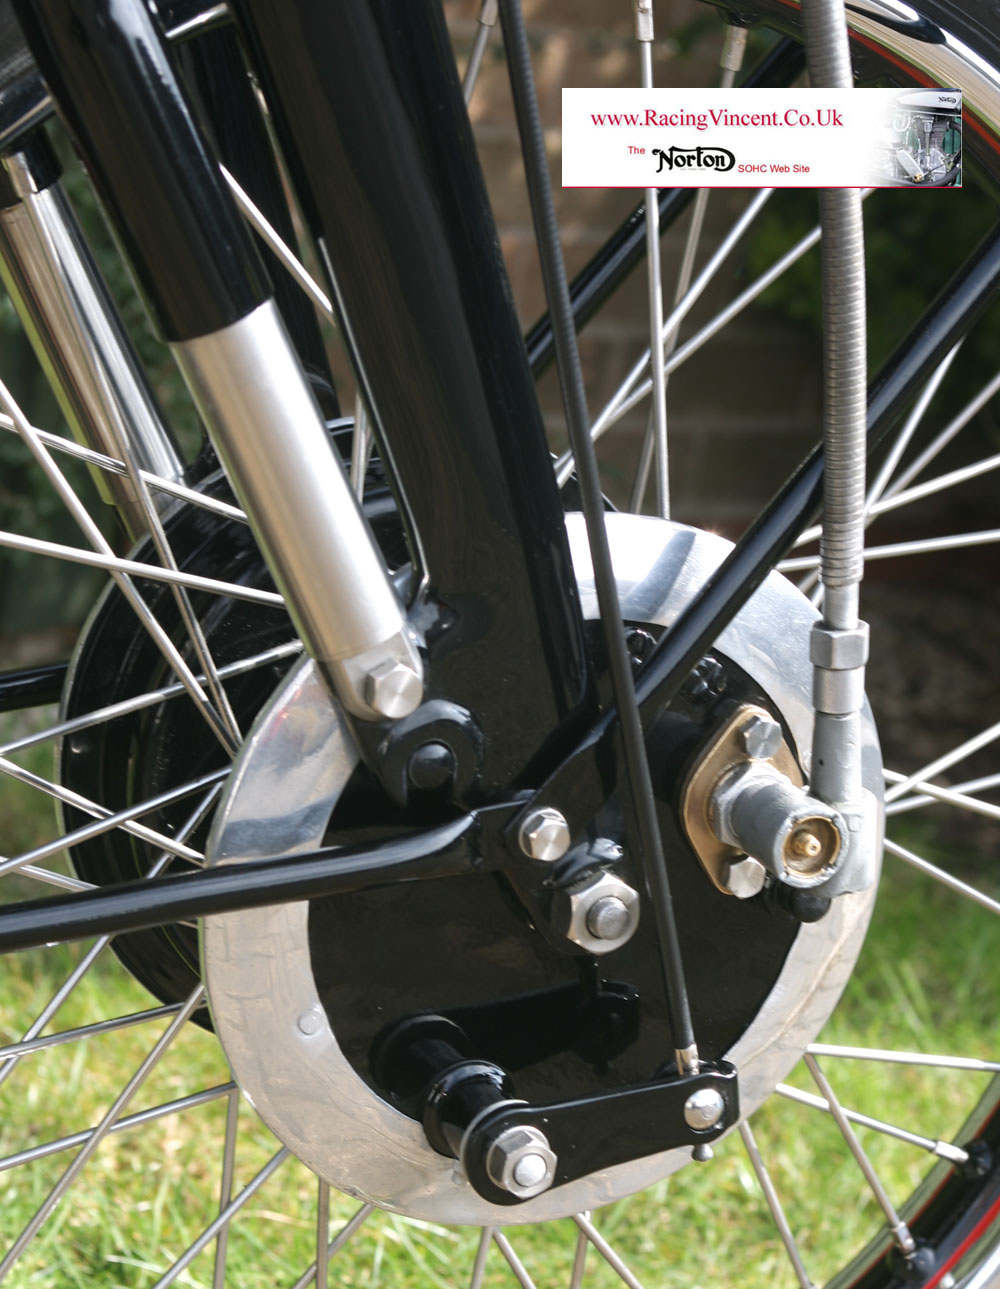
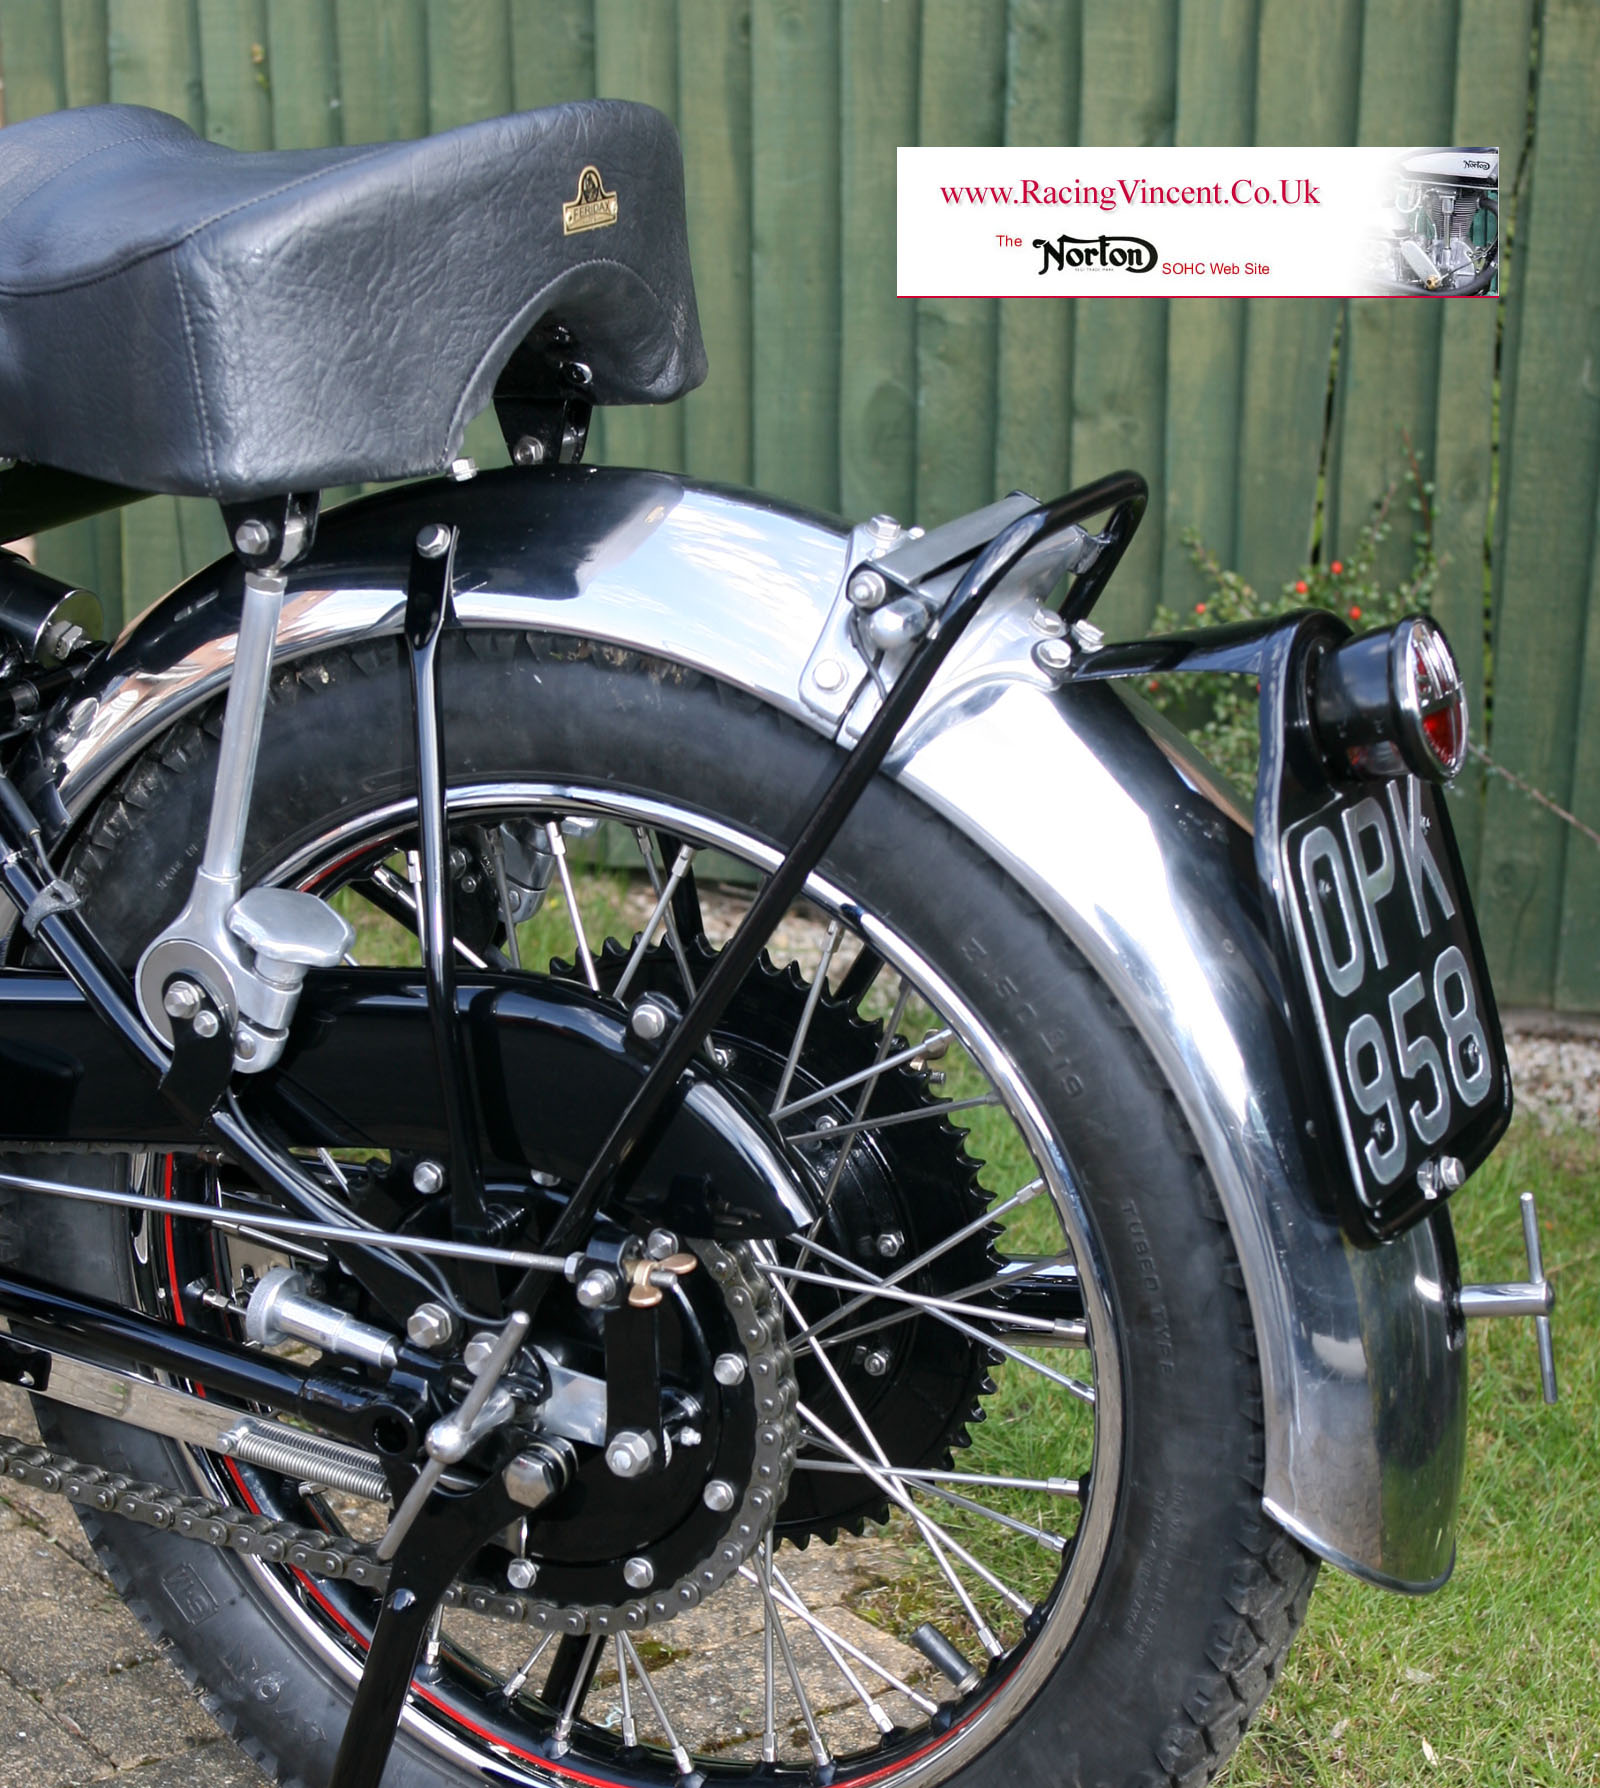
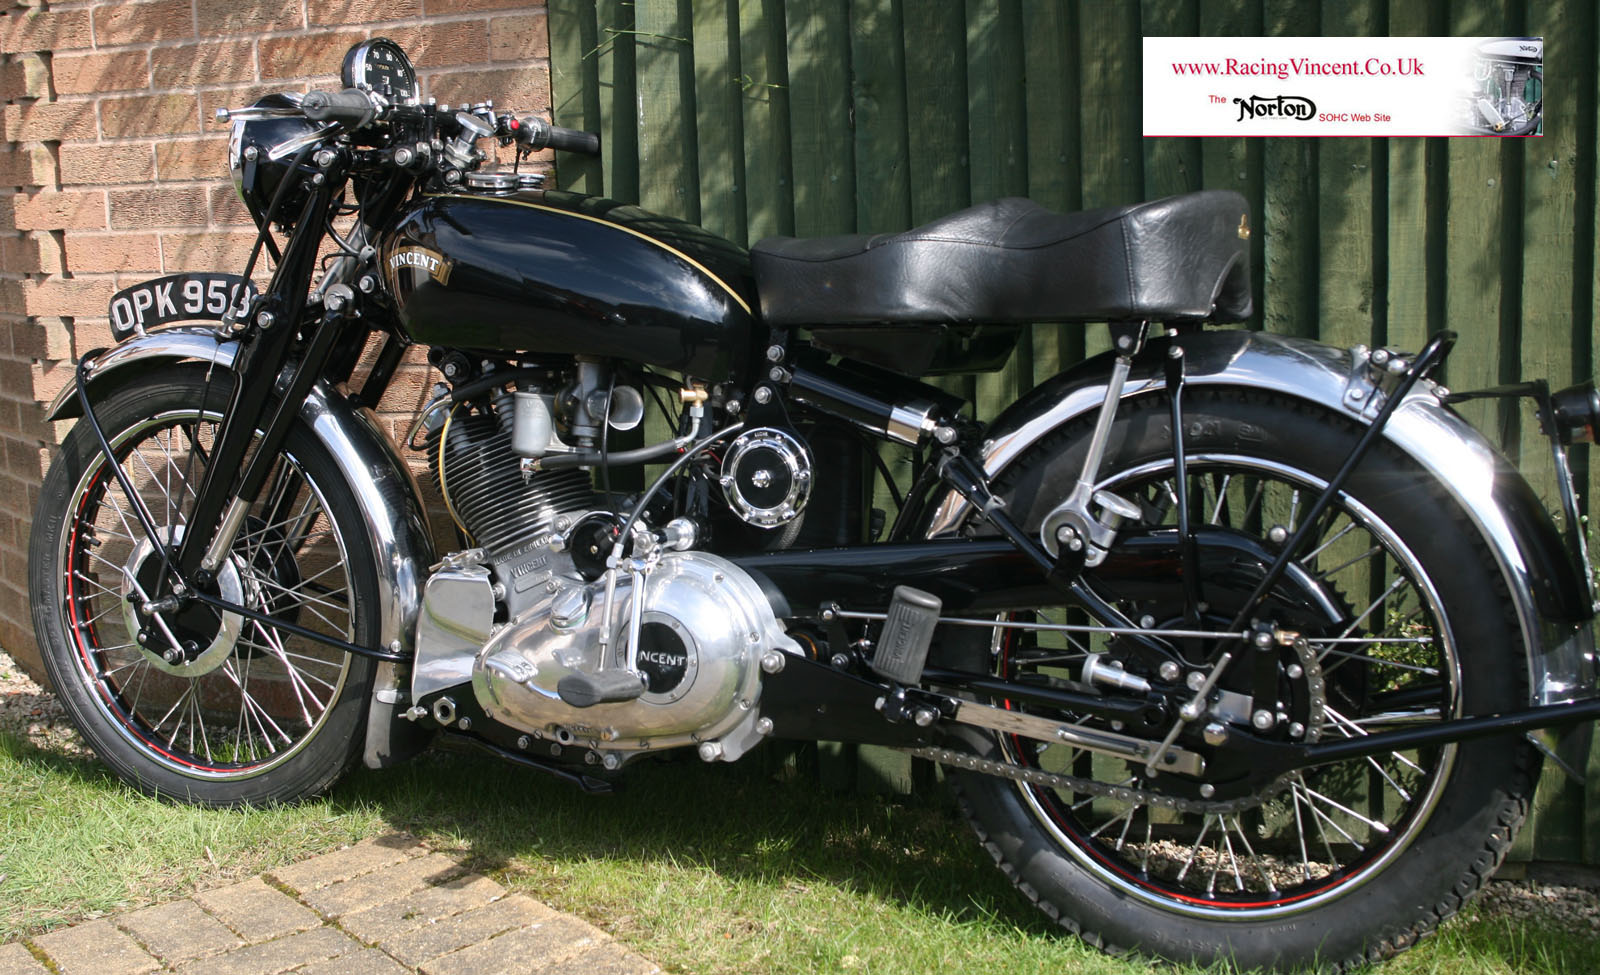
Rear wheel is still fittted with an original Vincent sidecar sprocket (note the small Vincent part number at about 10 o''clock on its cricurmerence) from the days when my father had a Blacknell Bulltet sidecar attached.
I wanted to keep this on - partly as a reminder of my childhood, but also becauuse I remember it was normal in period for them to run like this, where owners switched from sidecar to solo trim
Timing side view of the Vincent Comet - a site I grew up with as a kid as my father always left it propped up against the side of our house like this - click on photo for screensaver version
The alloy water excluder rings had both seen better days - with many knocks and scrapes - so they were removed, the worst of the knocks were planished out - then re-riveted once brak plates had been painted
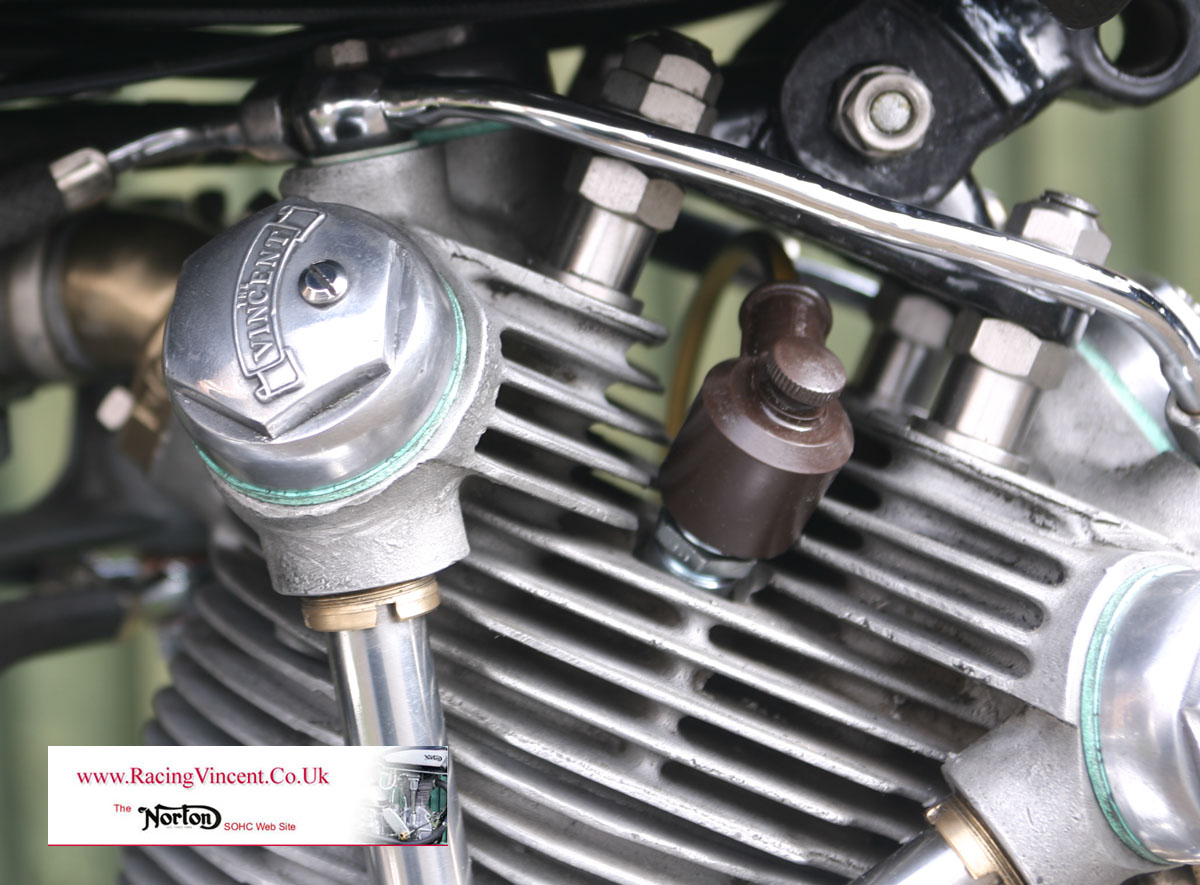
Close up of the cylinder head shows distinctive scrolled rocker caps - which are easily removed with special spanner in toolkit. You may wonder why there are small screws in these ones - not sure why, but my father fitted a special type of grease nipple in them back in the day - maybe as breathers? I never liked them - so removed and fitted blanking plugs.
Bakelite style HT cap is a nice quality reproduction of the original Vinent fitment
Like most areas of this Vincent, I like the contrast of shiny black paintwork with the stainless steel and alloy. I was originally not going to re-spoke wheels, but everything looked so grotty around hubs I could not bring myself to just paint over. Unfortunately original brake drum retainining bolts were so corroded in place, I ended up cracking one of the front brake drums removing it. Luckily I was able to pick up another good original from a friend.
Original rims were re-chromed and then I lined them myself. I also laced the rims with new stainless spokes - while watching the grand prix on my living room floor on a Sunday afternoon - I did put an old bedsheet down first though, to keep 'er indoors happy!
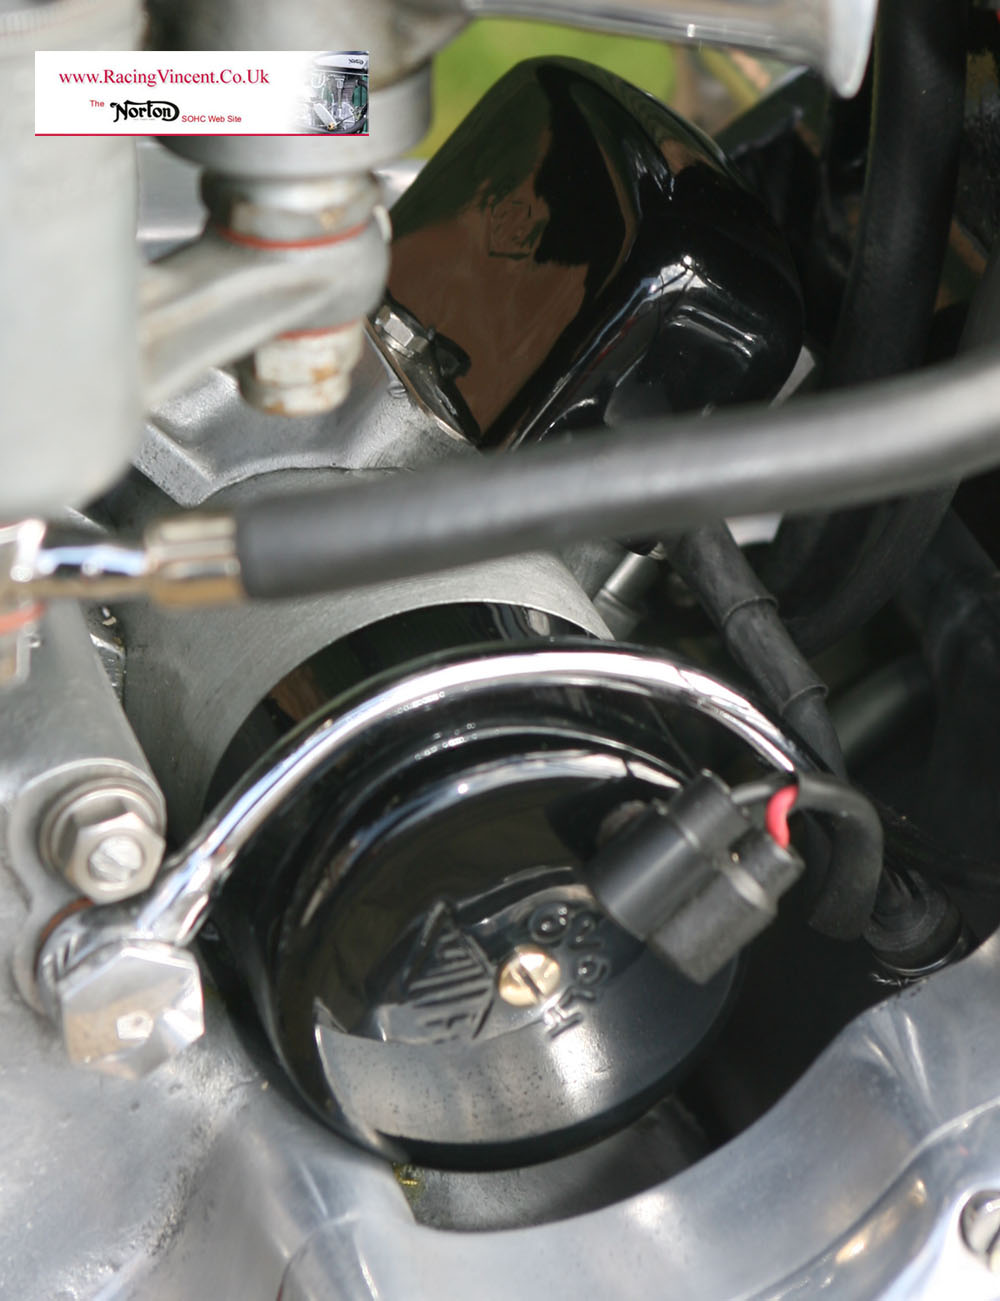
Original Miller electrics have been re-fitted all round - partly because I am not too worried about using the bike in the dark!
More seriously - dynamo was fully stripped, stator windings replaced, new brush's fitted and new wires and connections wherever possible.
You will also see that the original Miller regulator casing is fittted - but actually hides modern solid state regulator - replacing the shitty Miller original. I was so impressed with these that I now sell them - Link here: Solid State Regulator
Final point - you will notice the wiring plugs are also original miller items - at least the red wire one is. the black wire one is a modern replica - almost, but not quite identical!
Reflections On Restoring My Father's Vincent
This restoration was quite different to my more normal 'builds', and in some way's much simpler. I often start a build by purchasing or acquiring a 'kit' of parts, rarely complete, and end up manufacturing or sourcing the missing parts. Therefore, invevitably with that style of build I am familiar with the business of re-manufacturing and fabrication, as well as the more normal cleaning up and re-fettling of exissting parts.
In the case of this bike - my late father's favourite bike (which he purchased on a Saturday train trip to Comerfords with my mother way back in 1960),
the starting point was a fully complete and operational bike that was just looking a bit tired and tatty. On checking the tax disc I could see the bike had last run in 1993 - and I vaguely remember that was with me at the helm, my father by then getting to an age where he was finding a big British bike was getting a bit of a handful for his advancing years - so he said, why dont you take it out and give it an airing?
I remember it being a nice ride and the Comet having a sweet engine, and of course that unusual Vincent 'semi-sprung' seat which I found very unusual at the time. It was strange that riding the bike I should have been so aware of the suspension - because of course I had travelled as a passenger many times on it through the '60's and '70's, and clearly remember one trip down the A6 near my home in Oadby (Leicestershire) where I peered over my fathers shoulder to see '65' clearly showing on the big 'Shadow' speedometer, it felt very fast at the time!
Ruefully, I also remember a couple of times when as a childe my mother and I had been shopping in Leicester, and while waiting for the bus home my father had ridden by, having just left work, and he stopped to pick me up and take me home pillion - a great treat, but a different world to now when you consider I would not have been wearing a helmet or any motorcycling kit - that was the 1960's remember!
After I last rode it in 1993 I am not sure if my father went out on it again, but I suspect maybe not. From then up until my father passed away in 2009 (you can find an obituary page I wrote about him at that time in the Article section of this website) it sat under covers next to his lathes in the garage. The point about the lathes is significent, because all the way through my childhood and even when my father was still pottering - I remember that when we needed to use the lathes we always had to move the Vinnie outside - a real pain looking back on it. I cannot imagine that now, clear access to my old Smart and Brown being essential . .. I guess I have got used to the little luxeries in life!
Restoration Summary
Back to the restoration - as I said, in many ways this restoration was very straight forward, in so much that I knew it started as a working bike - but what made it less so, was constantly trying to decide if a part could be cleaned up well enough to re-use, or if I should replace? With all the main castings and fabricated parts this was simple - re-use, but I quickly decided early in the restoration, that re-painting just the most tatty parts would not be good enough, particularly after thoroughly washing and degreasing the bike - almost every painted part on the bike had lost some of its paint and had traces of rust - so a full repaint was very quickly decided on. As I have mentioned in previous articles - this used to mean weeks of cleaning up parts - derusting, etch priming, filling/rubbing down, topcoating in my spray booth etc etc - but a couple of years ago I realised I was not getting time myself so started farming out my paintwork to Shane at Faircharm Restorations in Leicester.
Having already overcome that feeling of guilt in my previoius restoration, this one was far easier, so I asked Shane to take on the majority of the black work - asking for Concours finish on petrol tank fork blades and a few other prominent areas, and good but durable finish on most of the others, as I wanted to use this bike on the road when complete.
The biggest dilemna was all the brightwork and fastenings. Almost every bolt I pulled off had either lost its original plating, had been replaced by non original some point down the line, or just looked a bit knarled. Eventually, I settled for replacing all the 'generic' nuts and bolts with stainless (either from my favourite Vincent people - Maughans, still the best!) or manufactured by myself. Then wherever possible I would save/refurbish original Vincent parts such as Tommy bars, electrical parts, levers, brake fittings etc.
Continued below:
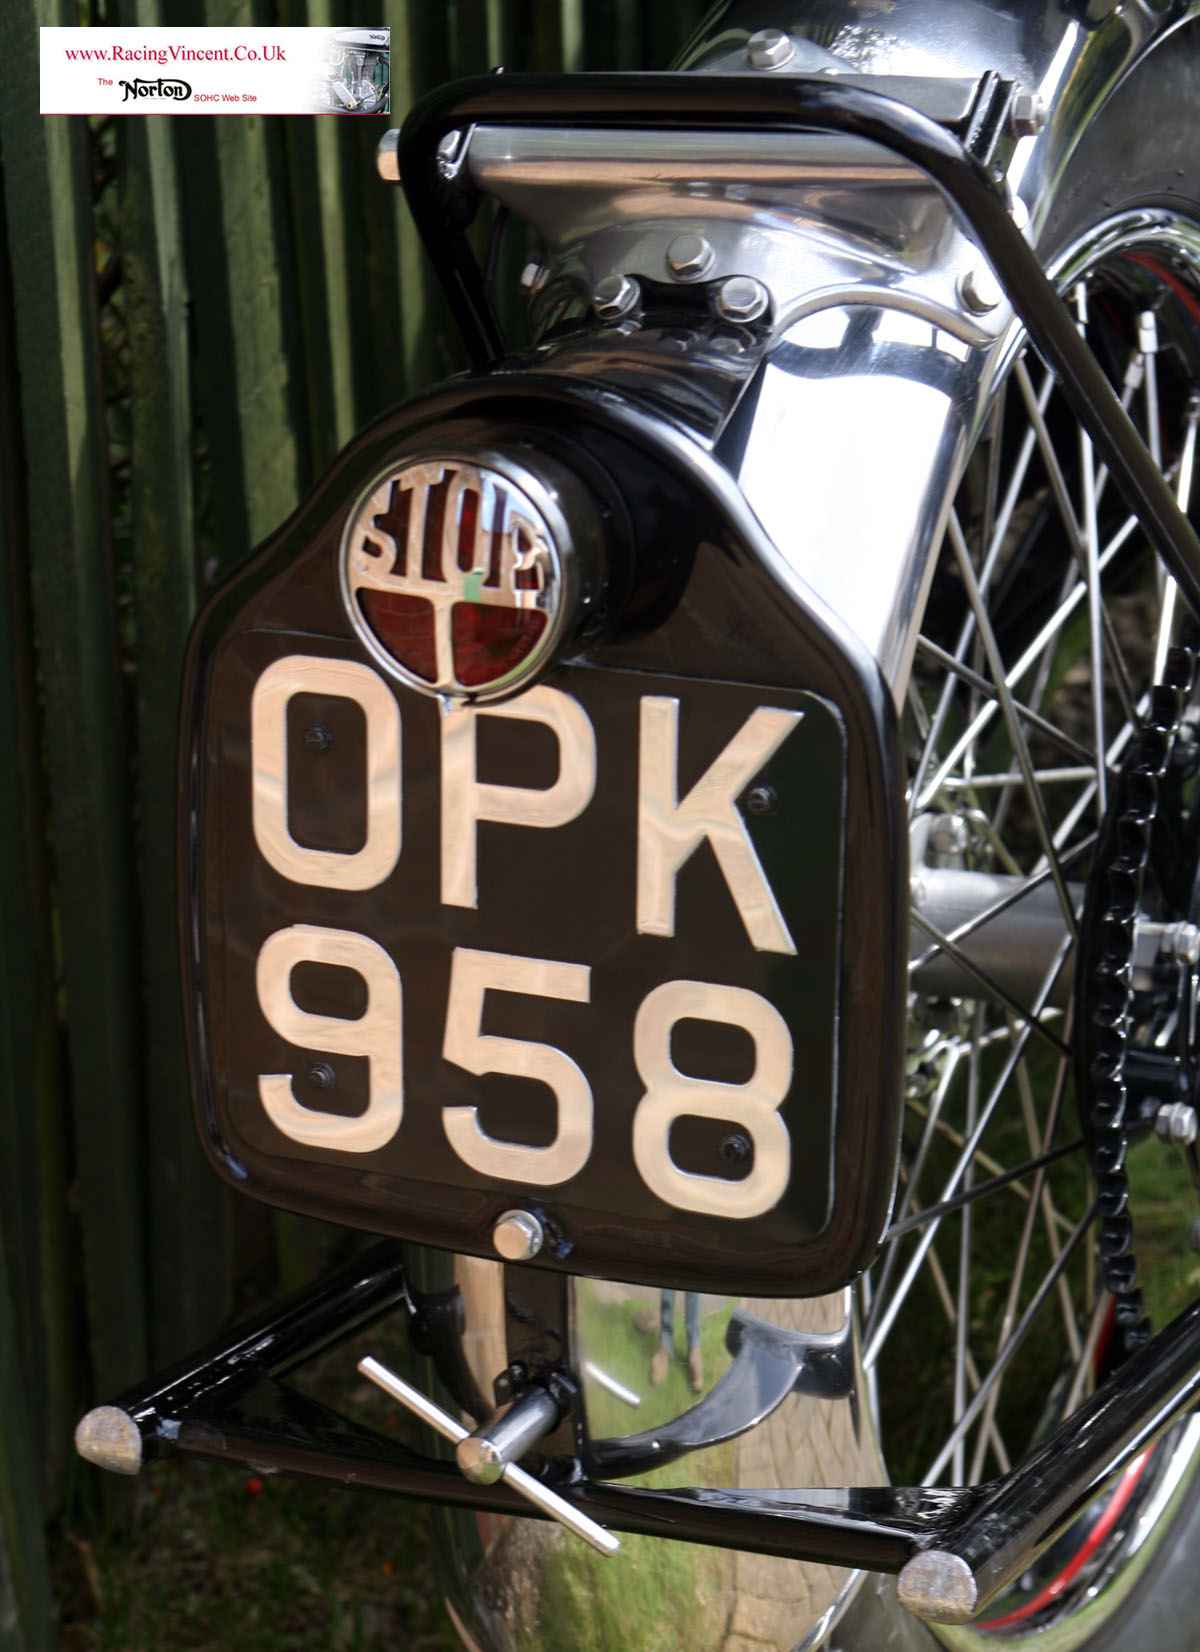
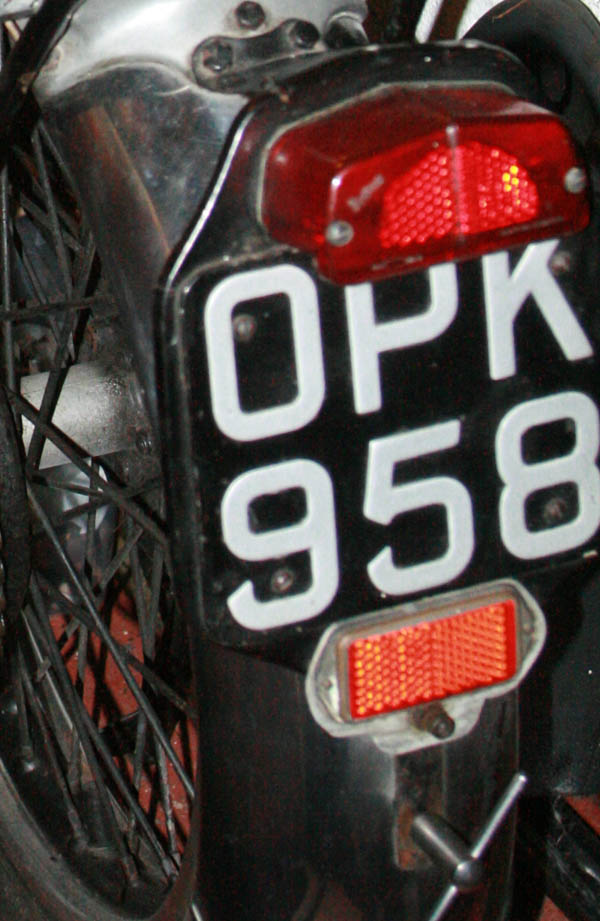
I remember as a kid when my father and many others were still riding Vincent's as daily transport that the Vincent 'STOP' light was almost universally abandanoned in favour of more modern and suitable light units. Therefore when I started the restoration the Comet was fitted with a 'standard 60's issue' Wipac/Lucas reflector. It was only when i went to remove this I realised the number plate was also a different shape to accomodate the wider reflector - the joys of restoring. Luckily, a couple of weeks scouting on Ebay turned up a really excellent 'New Old Stock' original fitment plate as shown above - and you can clearly see the top lip has a more rounded (and attractive) appearance. When it arrived it was even wrapped in its original brown paper bag and had original paint. Distinctive light unit is a modern replica but excellent quality - again I now sell these on RacingNorton catalog in Magneto/Electrical section

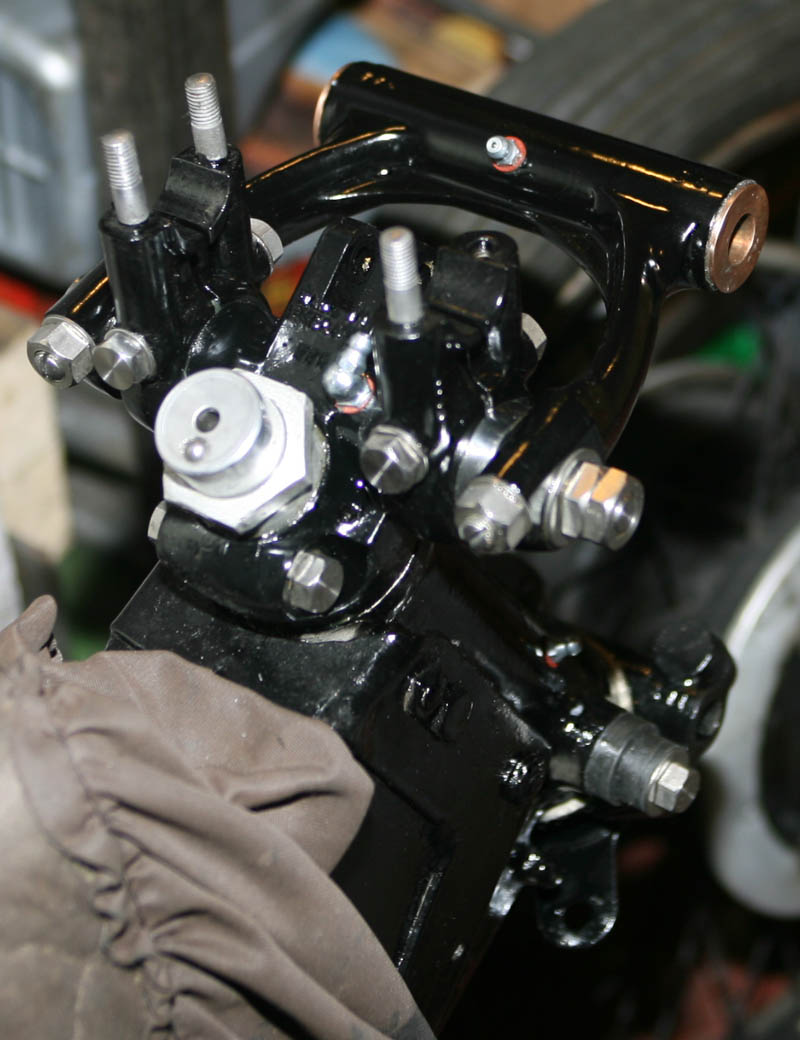
Original footrest hanger and brake pedal were chromed (brake pedal should actually be black), but other rear brake fastenings and cable fittings were replaced with stainless. all main castings were in good nick, just needing knocks and scratchs removing before polishing
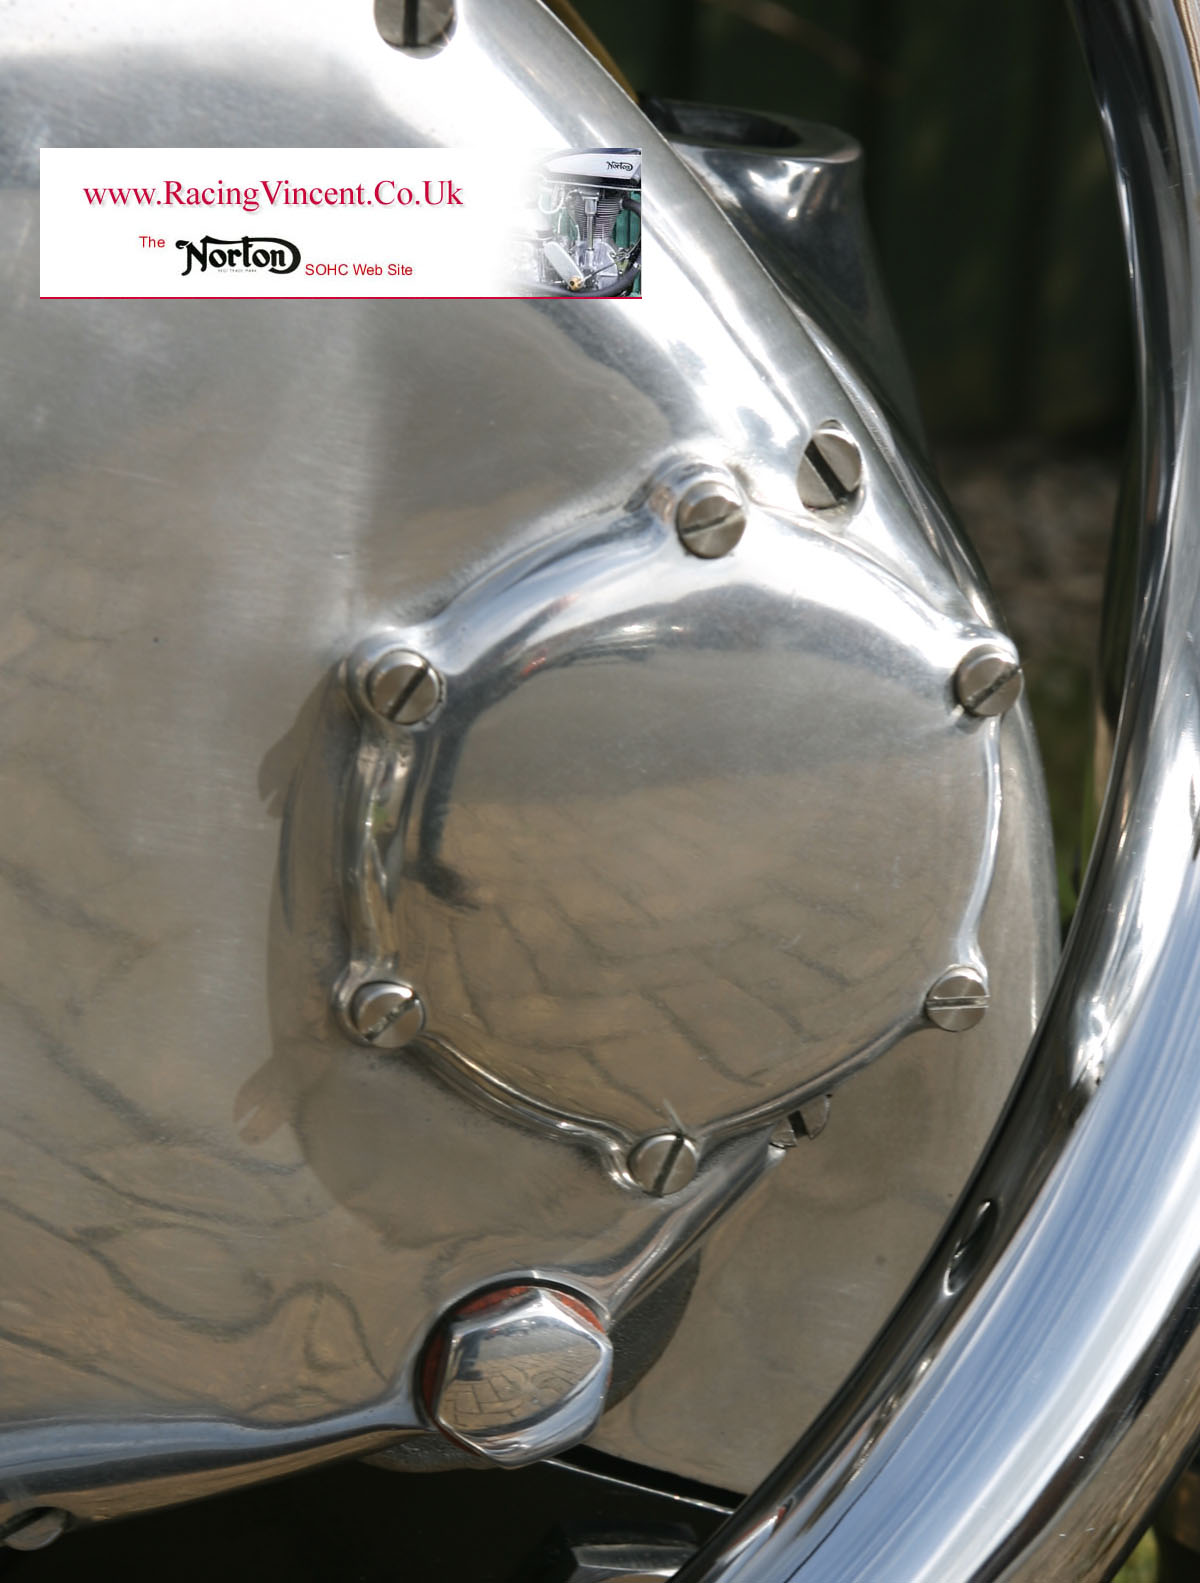
Timing case and advance/retard unit cover were both in pretty good condition to start with, but both benefited from some careful hand polishing with wet and dry/light oil to remove scratch's and knocks. Finished result, combined with new stainless cheesehead scrws and polished alloy is very pleasing to the eye - and I confess this is one of my favourite photos
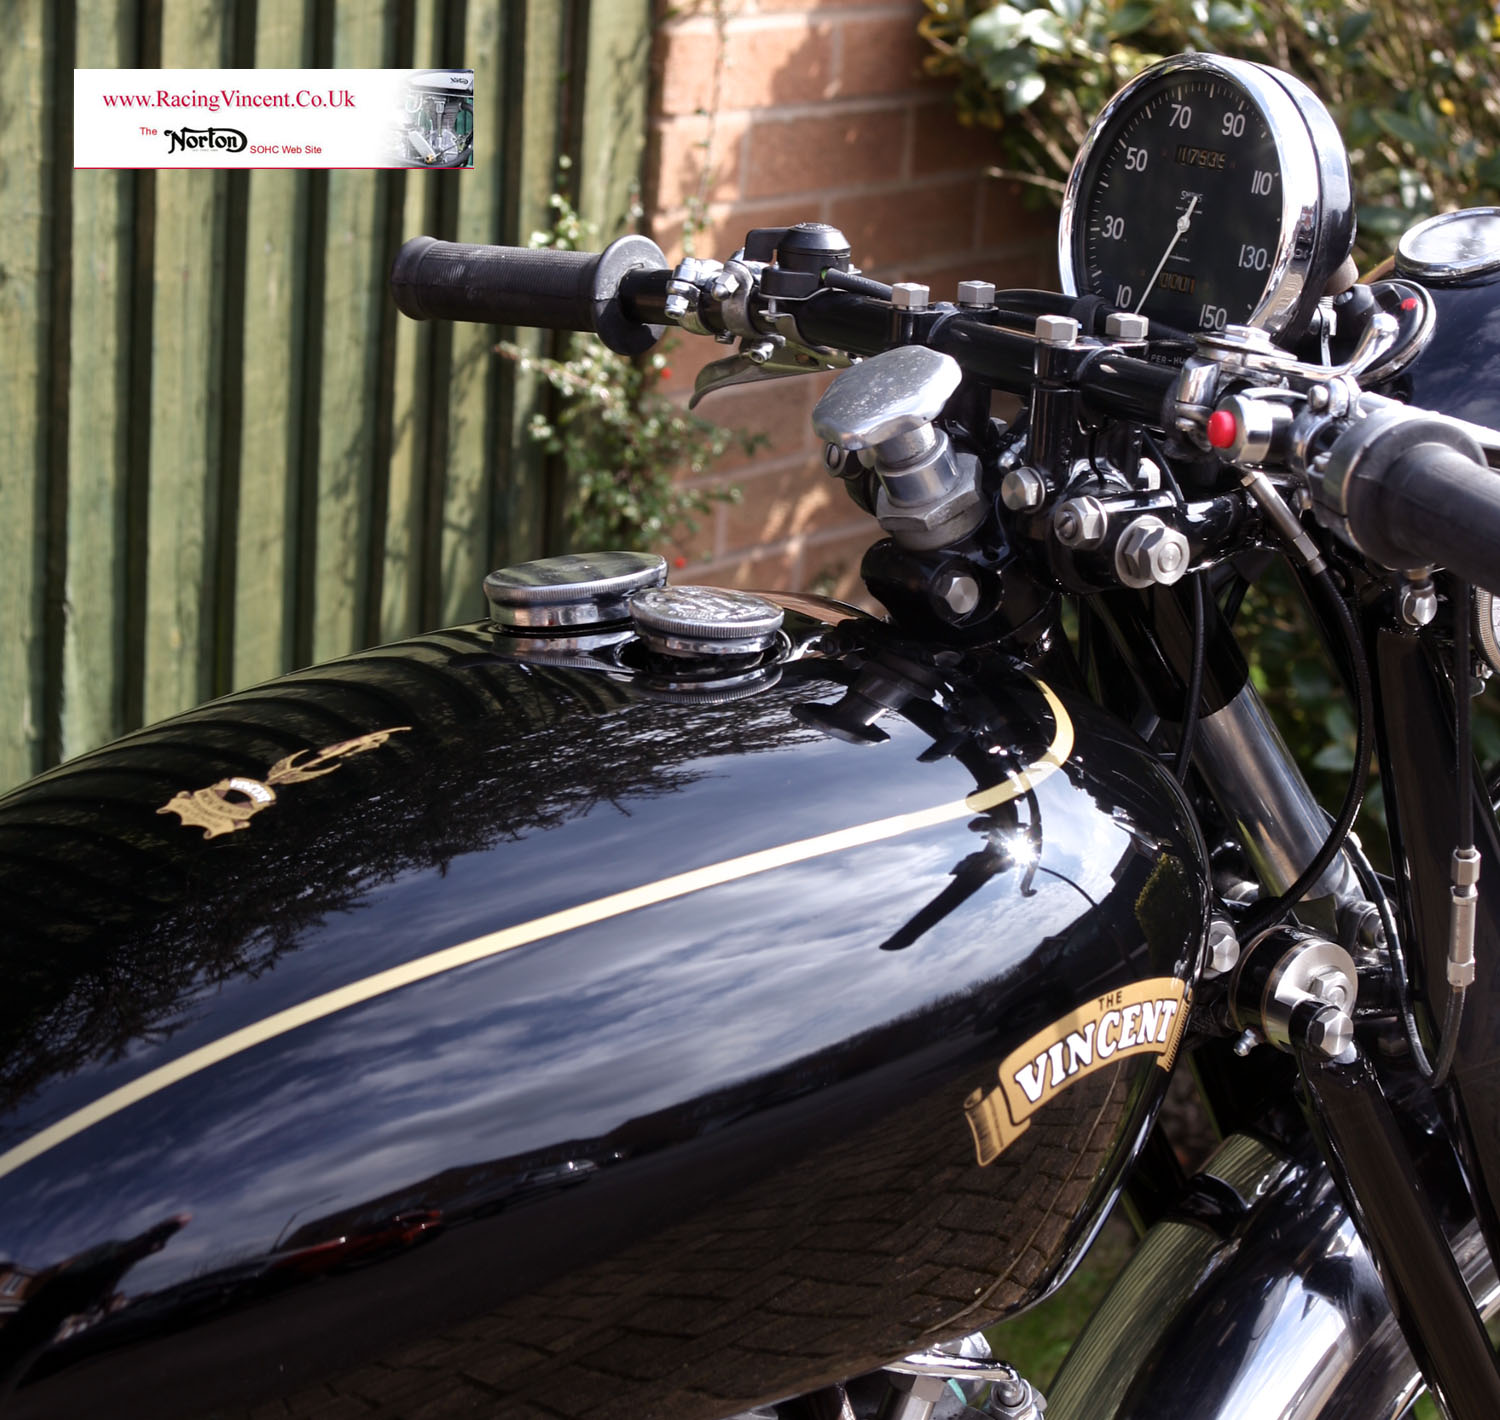
Vincent petrol tank - with scrolled Vincent log and gold lining - my other Vincent (twin) is actually an HRD and has the earlier HRD transfers and Mercury figure. Shadow clock is possibly an over induglgance - but as it has been fitted to the bike since approximately 1964 so I dont intend to remove it now!
Restoration Summary (cont'd)
Luckily, from a mechanical view my father had kept the bike in good order and most ot the major castings, although bearing the inevitable scratch's and knocks of 50 years of day to day
use. It was quite poignant finding some mod my dad had fitted and a few of them I remember when he had done them - the Lucas regulator being the most obvious. Where practical I kept the mods (the Shadow clock being the most prominent!)- but as much as possible tried to go back to original specication - with the exception of stainless steel fastenings and mudguards - whcih my dad and I fitted together in the mid 1970's!
There was still the normal hundreds of hours spent restoring all the normal stuff - castings that needed cleaning up and polishing (I have power tools to help with that ardous task these days, but it still results in many painful hours with different grades of wet and dry and light oil to remove scratch's - and I have still never found any substitute as good for 'feel' as your hands - despite the fact it leaves them looking like badly butchered pork chops!).
Then there were the fabricated parts that had been damaged over the years and needed some straightening or surgery before painting - my father had been down the road a few times in the bike's life .. . normally when riding it through icy winters . . . I remember doing the same in my younger days and watching one of my Norton's sliding alongside me on its side in an icy car park!
Other tasks - such as restoring the original Vincent Feridax seat were interesting and challenging - simply because it is not the sort of restoration task we take on every day. In the case of this seat - my father had already recovered it in the early 1960's, and although still passable, it had a couple of serious holes and the stitching was going, so I made the decision to recover. As always, on stripping it down I found the condition worse than expected - the original Feridax foam giving the distinctive twin seat shape was badly crumbling at the base, the bolts were badly rusted, and the frame attached to the ply base board had a small crack around the front welded area. All these were dealt with as sympathetically as possible - and gave a great feeling of age knowing I was able to reclaim most of them - notably, I was able to chop away most of the bad foam, replace with new, but still keep the majority of the Feridax top part. Having used original style tack pins and much heaving and grunting to bring the VOC supplied new cover to the required shape, I am pleased to say the seat looks pretty good - on top and underneath. Final finishing touch for this job was to be able to attach by rivets an original style Feridax badge.
And then finally, there were all the multitude of smaller jobs that go to make up any restoration - and it is taking your time with these which really start to build up the hours - but by doing so - all add up to a restoration that gives pleasure - not only to yourself, but also (hopefully) to other like minded enthusiasts. I have found that on reflection - it is these smaller time consuming jobs (many that can 'waste' a full afternoon just for some small inconspicuous part) that give me the most satisfaction - and knowing that when I put my hands or spanner on it in the future - I will remember the work that went into it to get it that way.
So now as I write this article in late May 2016, the bike has been finished for about two months - and although I do intend to ride it this Summer, I still am in the tinkering ready for use stage. It has fired up and with a bit of adjustment to the carburettor sounds quite sweet - and even with a new exhaust, sounds just like I remember it.
On the first couple of engine runs it spilt its guts (well, new oil actually) all over the driveway, this was traced back to two issues - the main oil feed pipe union coming off the UFM into the New Old Stock herringbone oil pipe (that I had been saving for this restoration) was not sealing properly - not surprising considering the shortness of the original pipe design, this soon solved by using a welding pipe style crimping connector. Ts, and one of the rocker oil feeds not properly tightened.
However, two more annoying problems have also been found - the exhaust lifter mechanism is sticking - and I confess this is one of the few areas of the bike I did not strip down as it looked to be fully functioning and secure - I just think one of the components is gummed up . . . but is going to require timing case and possibly timing gear stripdown to investigate. And the second issue is that at the moment - when on the move it just seems to be a 'single gear' model
Another view of drive side - giving a good view of the magneto cowl and front paddle stands. The small Tommy bars were both made by my father many years ago, but I fitted a new bar in the top one - my father had put a copper bar in originally . . . no doubt because that was what he found in his tin of oddments at the time!
Timing case and advance/retard unit cover were both in pretty good condition to start with, but both benefited from some careful hand polishing with wet and dry/light oil to remove scratch's and knocks. Finished result, combined with new stainless cheesehead scrws and polished alloy is very pleasing to the eye - and I confess this is one of my favourite photos

This is a nice advertisement for the quality of Maughans & Sons fasteners and parts. All the bolts and nuts around the engine plate area are from Maughan's - wonderful quality with every face linished
Another timing side shot from a different angle. Front mudguard flap just visible is the one my father fitted in the 1970's - probably taken from our old Wolseley car!, I had to chop away the rotten bit when cleaning it up . . . but nice to have a few of my fathers old touches on it
Restoration Photos
I would like to have published more detailed articles of the restoration, but being realistic, I am probalby not going to get time in the near future. Therefore, below I have included a selection of photographs from the start of stripdown through varioius stages of the restoration.
As always - click on any photo for an increased size version
Vincent as it looked before restoration - at a distance it looked ok, but as you got closer it was evident that it was looking very tired and in need of some TLC
Stripdown begins! - Forks are off at this stage and tirec paintwork, loss of plating on bolts and fastenings and general tiredness now clear to see
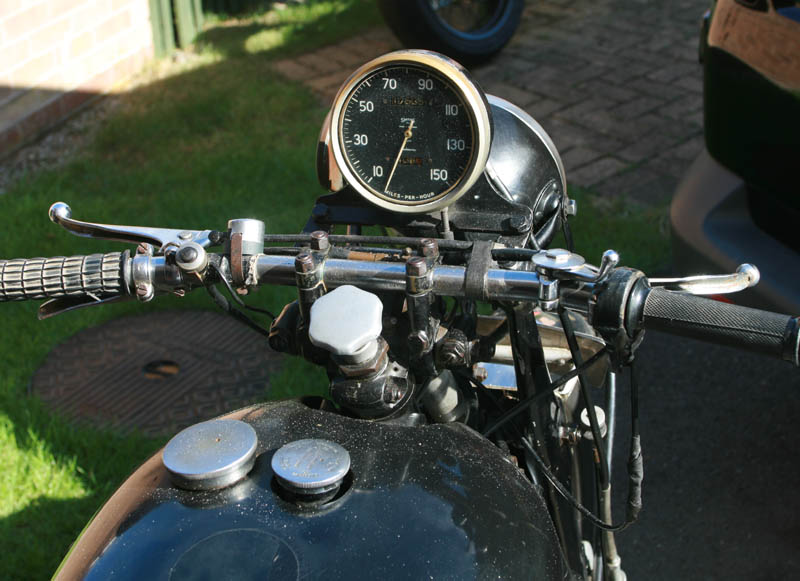
Looking down at cockpit view - distinctive Shadow speedo has seen better days - bezel had lost all its chrom and needle very discoloured. Controls and fittings grotty, with original Miller fittings replaced with Lucas or similar in the 1960's

The rear end looked much the same - springboxs had been painted silver over red primer by my dad and the primer now coming through - old tape holding wiring and all fittings and fastenings painted over - definitely time for a faeclift!
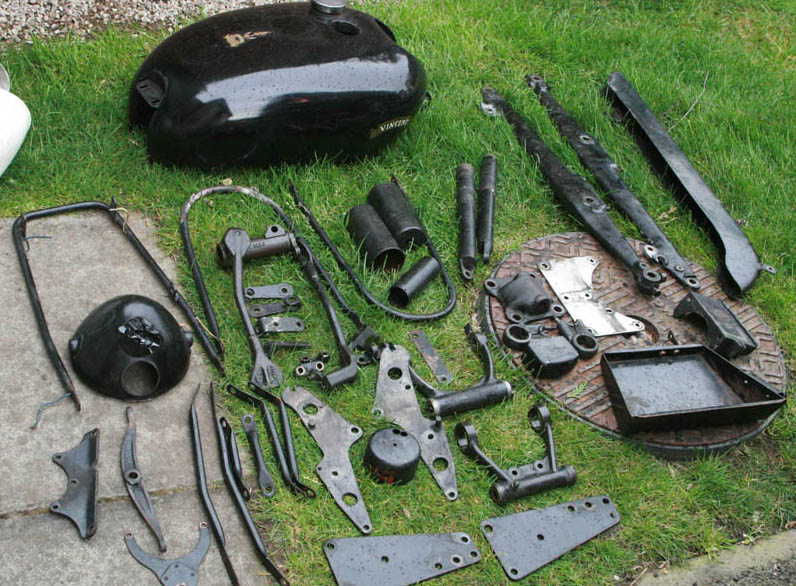
Once stripdown complete, all parts for painting were laid out. Some parts like the mudguard stays needed some repair work, other were fine - just very grotty. As mentioned above, I used to do all my own painting, but these days I dont have time - so accept this and send them out for blasting and painting

And these parts I wanted to get full 'concours' treatment as they are very prominent - headlight rim is lovely Miller original but needed work with planishing hammer and sandbag first as it had a dent from one of my father's previous 'off's'
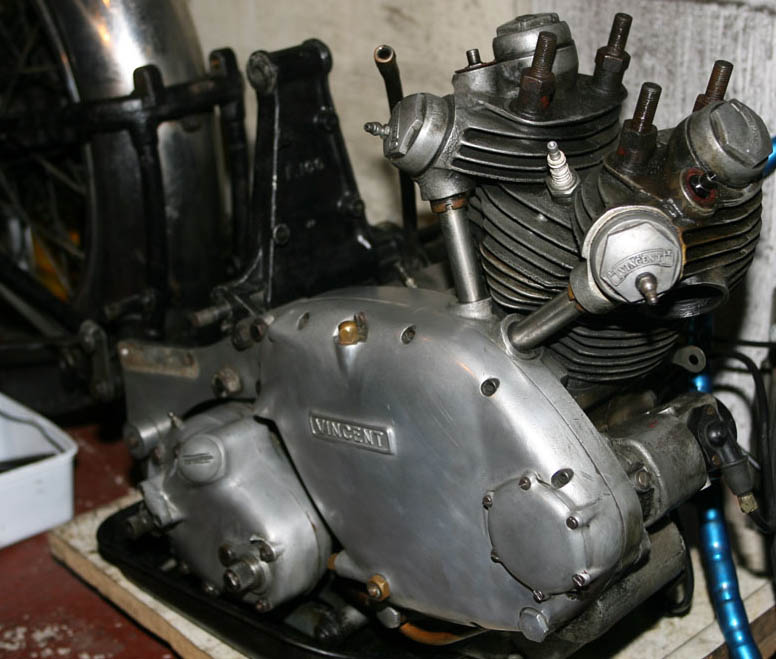
Quite early on I decided I would not strip the engine bottom half unless it really needed it (as I remember my father fitting a new bigend in the '70's, and he had not done a terrific mileage since then, but I would strip top half and check timing chest, primary drive gearbox etc. Notice grease nipples - soon to be removed!
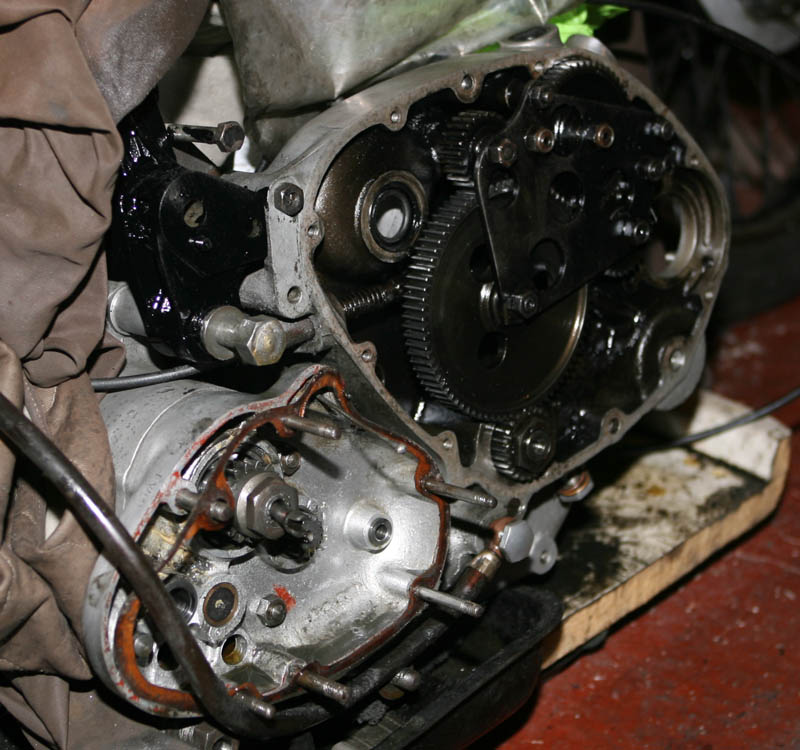
With covers removed - although looking pretty dirty from old oil (I think they had less detergents in the oils in those days?), mechanically the timing chest looked pretty good. Large idler was alloy (I fitted a lighened steel version in my racing Lightning), but did not look badly worn - so I elected for the moment to leave well alone. As I write this, I need to revisit as exhault lifter mechanism sticking
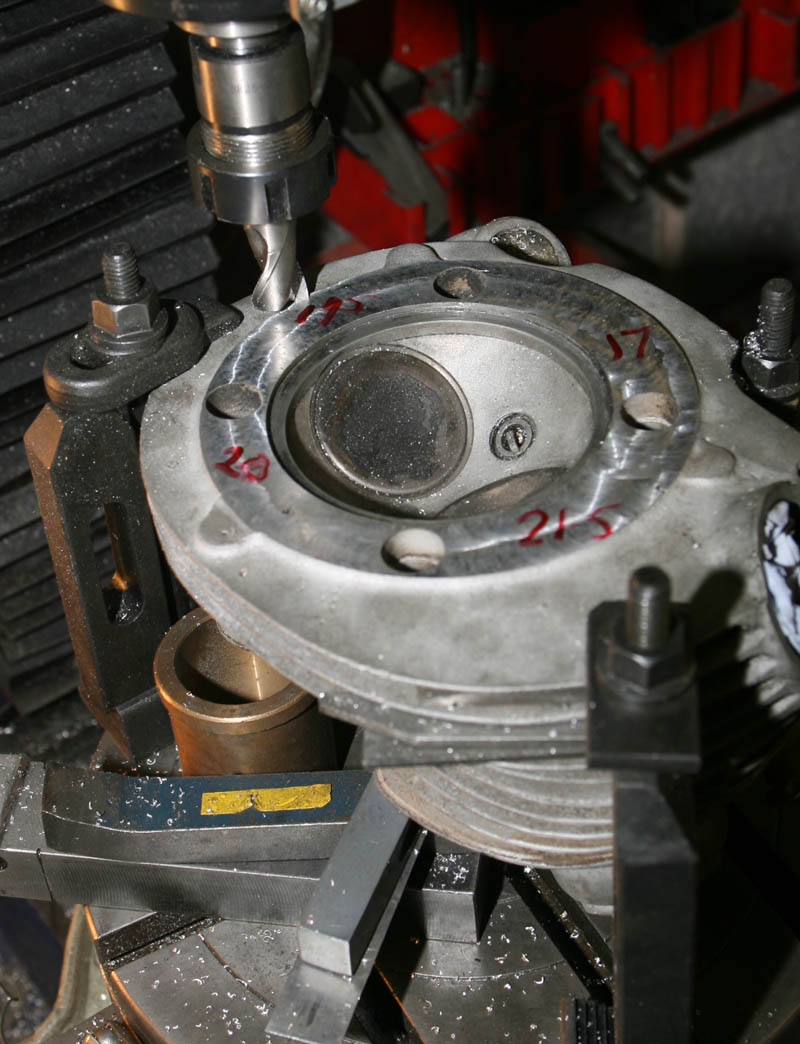
The cylinder head looked in reasonable condition, but I could see it had been weaping from head gasket face. On inspection I could see the outer face was slighlty warped when comparing to inner spigot face. Therefore a light skim on vertical miller - note weird collection of spacers to prop head in right position. At this point head still distorted, with relative height in 'thous' written on the face
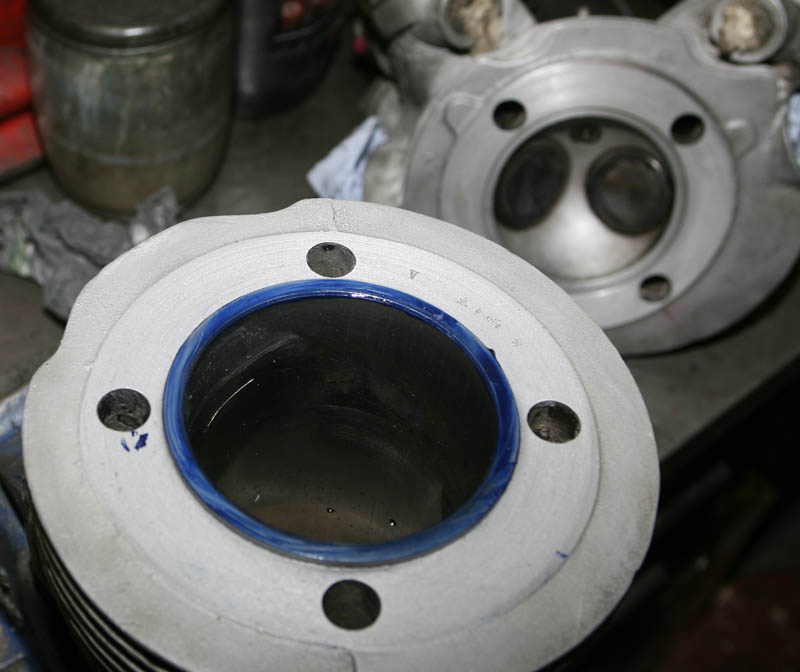
And following machining - the normal process of grinding both head faces with valve grinding paste, and then 'bluing' with Engineers Blue to check they are now fully sealing all round - hopefully engine will run cleaner now with this done
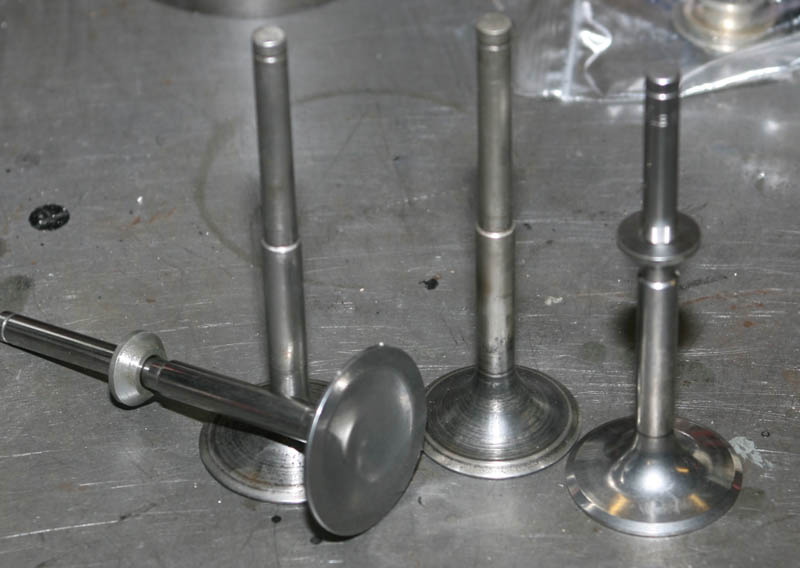
Next step of head work was to replace valves - new ones purchased from Maughan's, as well a the collers. For those not familiar with Vincent valve gear - Vincent's adopted an unusual valve operation - where there was a lower and upper valve guilde with the rocker pushing down on a collar midway down the stem. I decided at this stage not replace guide's (removal of lower guide can sometimes damage head if not careful) as they seemed relatively good condition
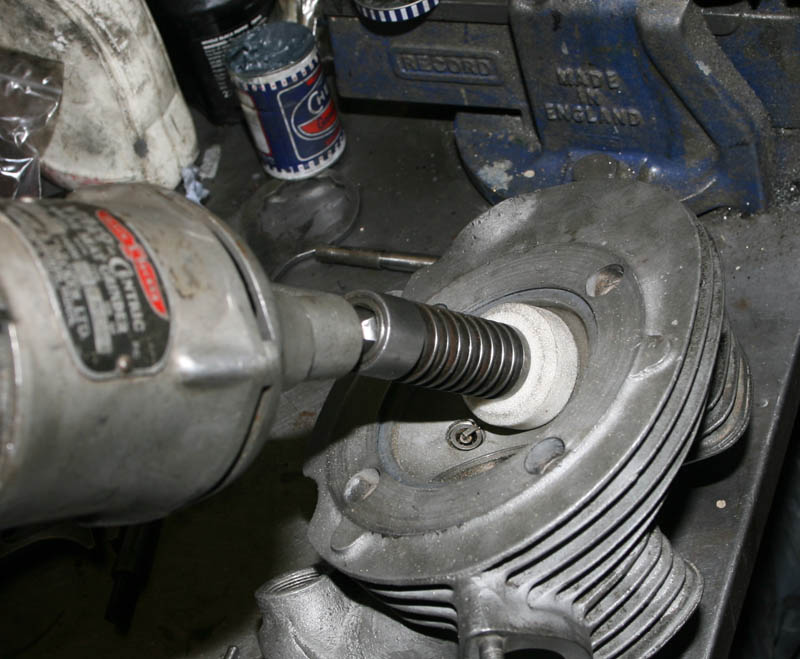
.. . . However, valve seats were re-cut as they were showing some signs of pitting and uneven seating. This strange device is my trusty Black and Decker valve seat cutter - of approximate 1950's vintage, but still a great tool
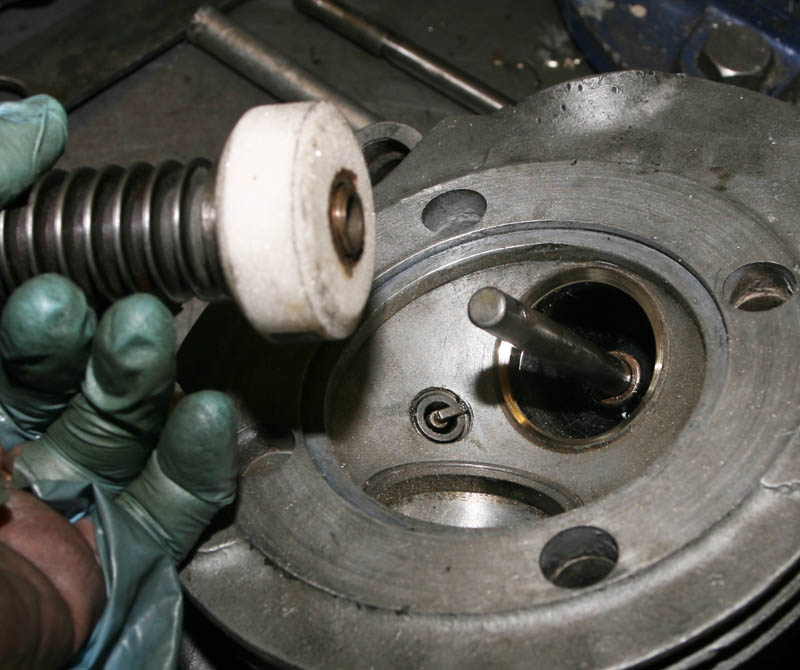
And now with valve seats recut - note that the rod inserted into the valve guide is part of the valve cutting tool - it ensures the cutter is abolutely square. Seat is wider than I would normally allow on a racing bike (I would carefully cut it back into tract), but fine for a road bike. Valve seat's on a Vinent a different angle to most other bike manufacturers, but luckily I have a correct angled stone
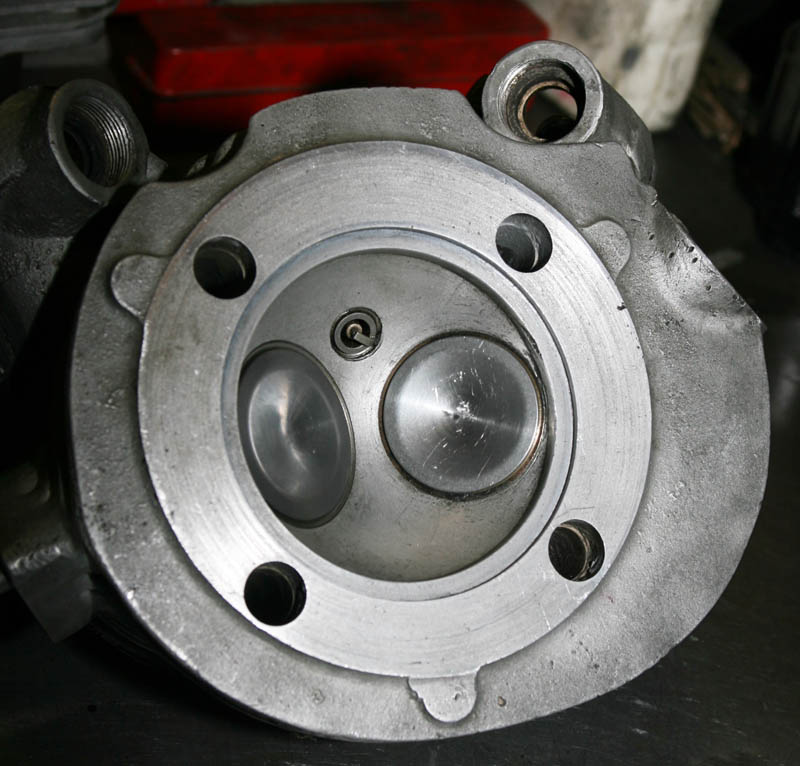
Head complete with new valves fitted. I noticed on re-assembly that one of the alloy rocker bearings that fit into the rocker tract moved slightly - a common Vincent problem. I will see how well it runs first, but will probably replace those in the near future - maybe with 'captive' type with long ears - a common mod to overcome wear in the rocker tract
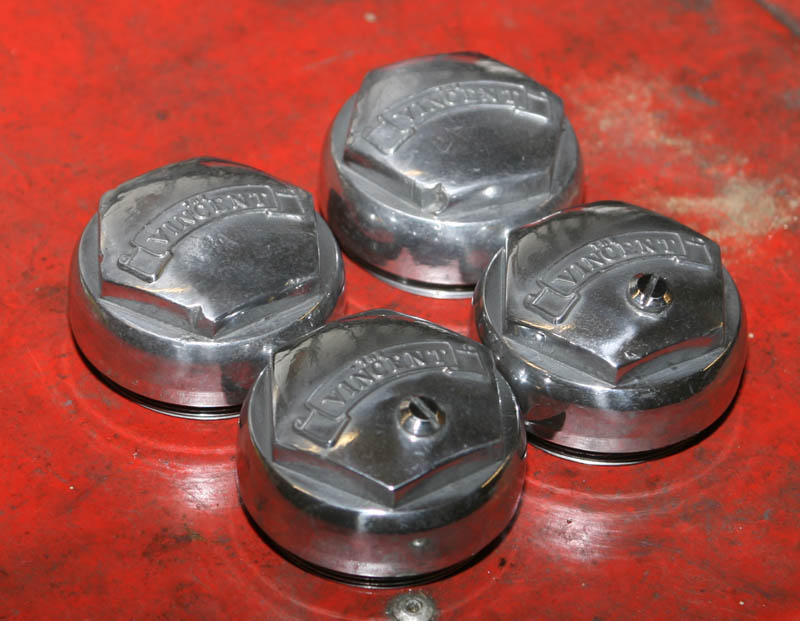
A couple of the caps had knocks to them, and a couple had grease nipples fitted by my father (not sure why!). I did consider replacing, but then realised it is part of its history - and I should be getting out of the (expensive!) habit of just replacing for the sake of it! Anyway, they cleaned up nice - with crisp scrolls
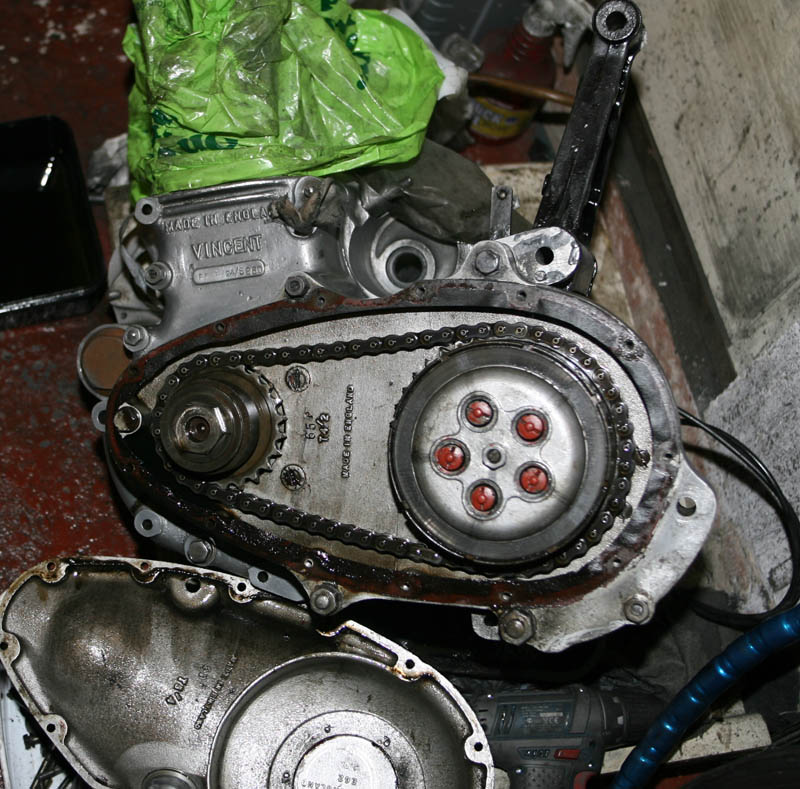
Primary drive chain and clutch both felt good, as did the mains and bigend - so have been left as is. Clutch may be revisited for new plates if needed once on the road
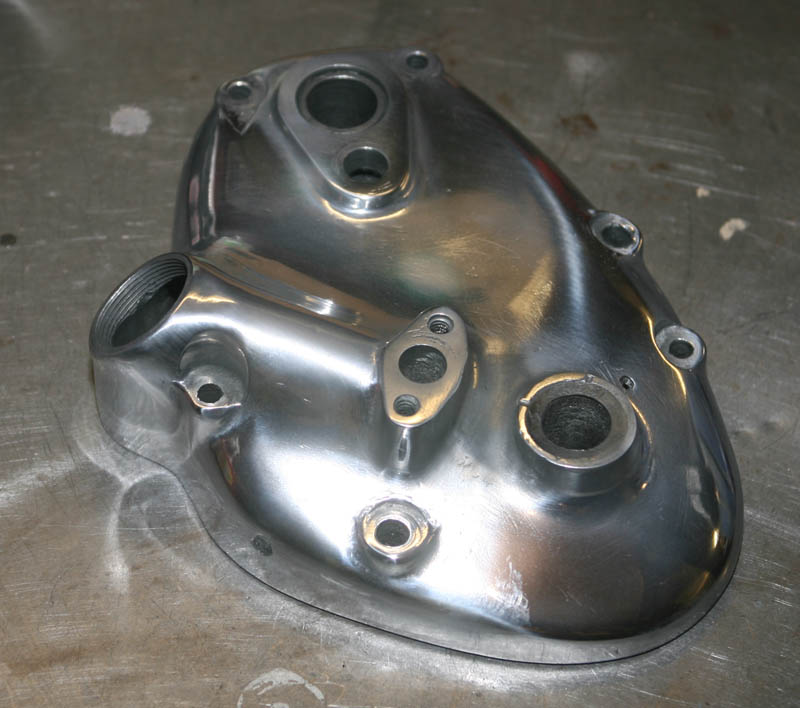
Not a job I enjoy doing - but a necessary evil of any restoration - cleaning up and polishing covers. In this case they were quite straightforward, i.e. no major problems, just lots of elbow grease and broken fingernails removing 50 years worth of scratch's and marks
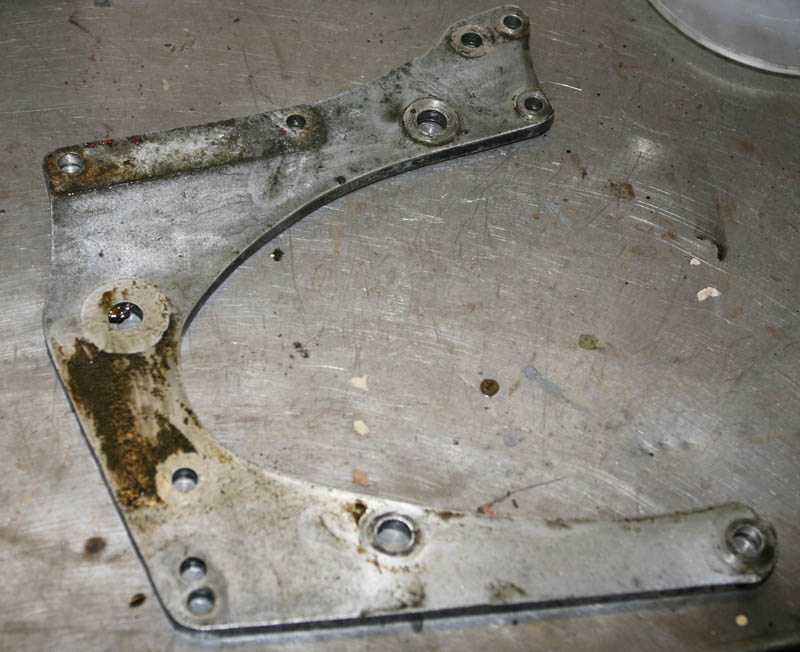
. . . Likewise the G50/1 gearbox Pivot Plate - looking a bit sorry for itself, but as can be seen from photographs above - it cleand up very nicely. By the way - if anyone has a G50/2 for a Vincent Grey Flash I would be interested - it will save me making one!
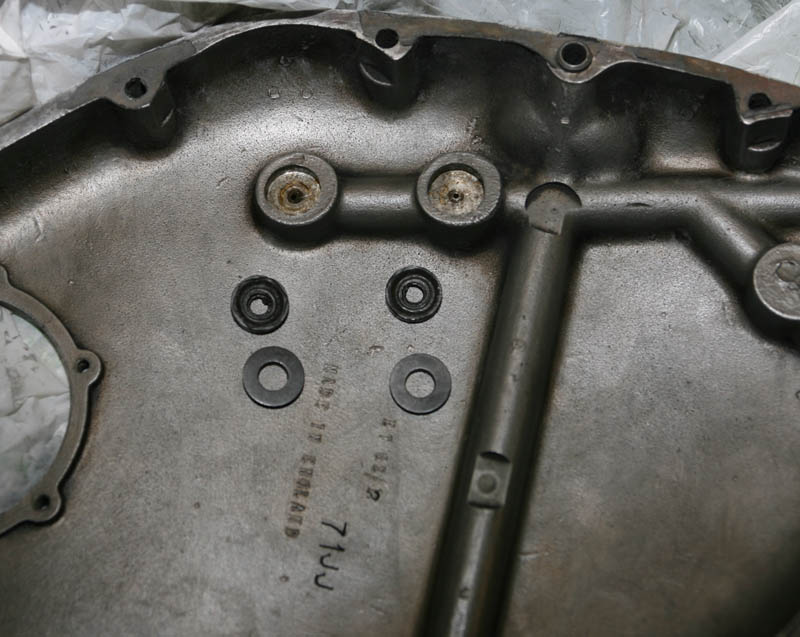
Not surprisingly, new rubber seals on camshaft oil feeds when refitting timing cover
I reclaimed some of the oil and petrol fittings - but the main engine oil feed pipe was too rough to straighten fully, so a new one purchased from Bob Culver
Moving onto the chassis - RFM in good condition, but you can just see new stainless brake pin FT144, and conical bearings checked, greased and new felts made - I use horse saddle felt for these
Refurbished front stand being reassembled - nice shiny black paintwork and lots of stainless steel - lovely!
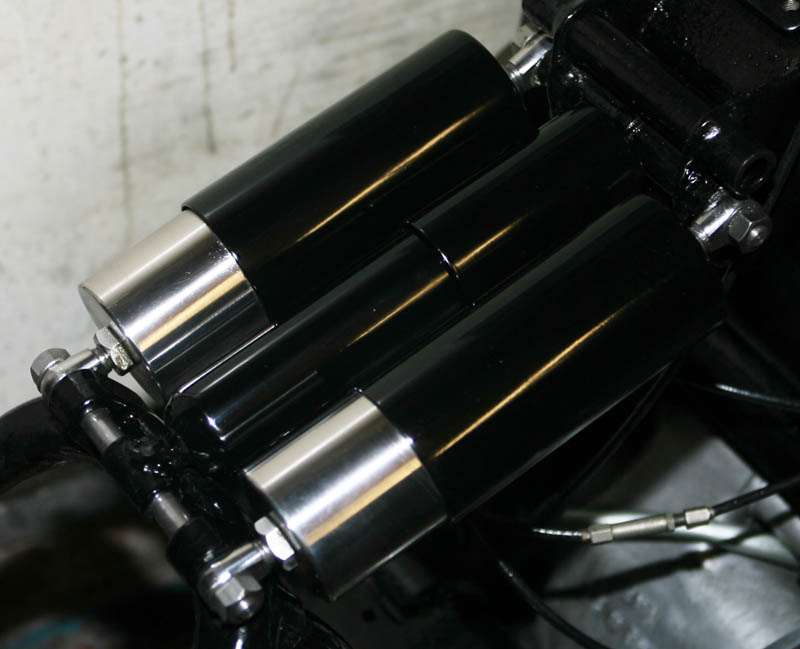
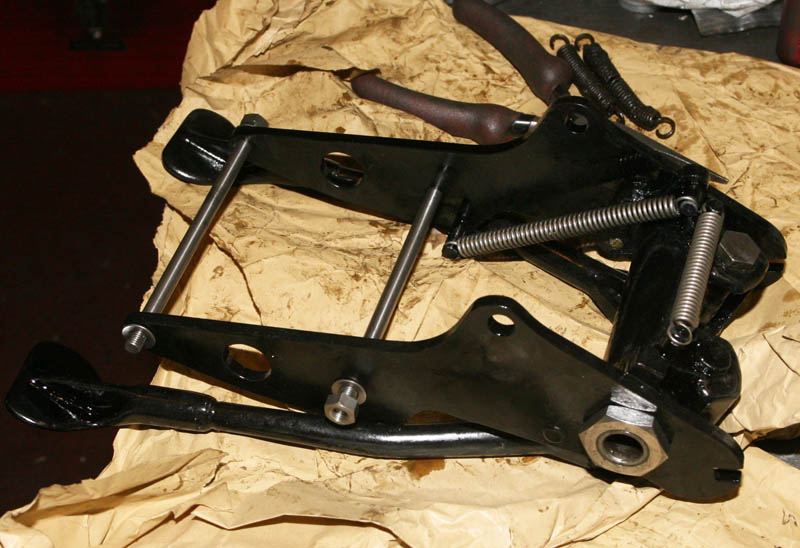
Rear spring boxs refurbished :- outer boxs repainted, inner box's and clevis's/locknuts replaced with stainless items, springs regreased. Damper was checked and repainted - interestingly it was an Armstrong sealed unit, dated 1959, i.e. replaced just before my father bought the bike
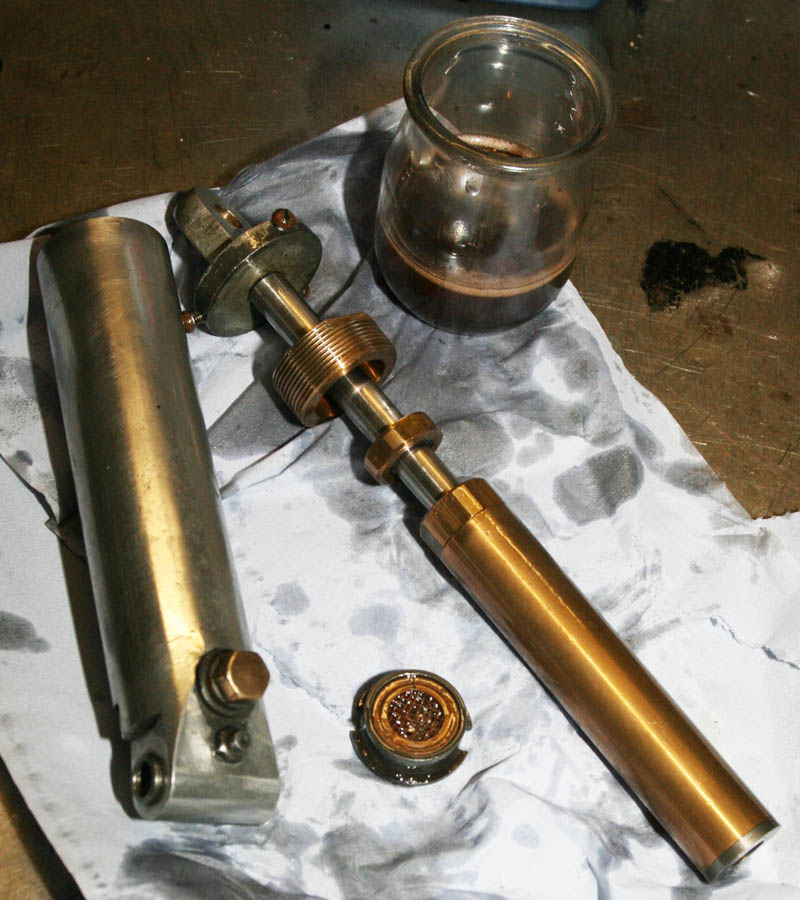
Original Vincent front damper was interesting to strip down - I passed it to Maughans as they have a mod they carry out that make them less susceptable to leaks and work bettter than the original
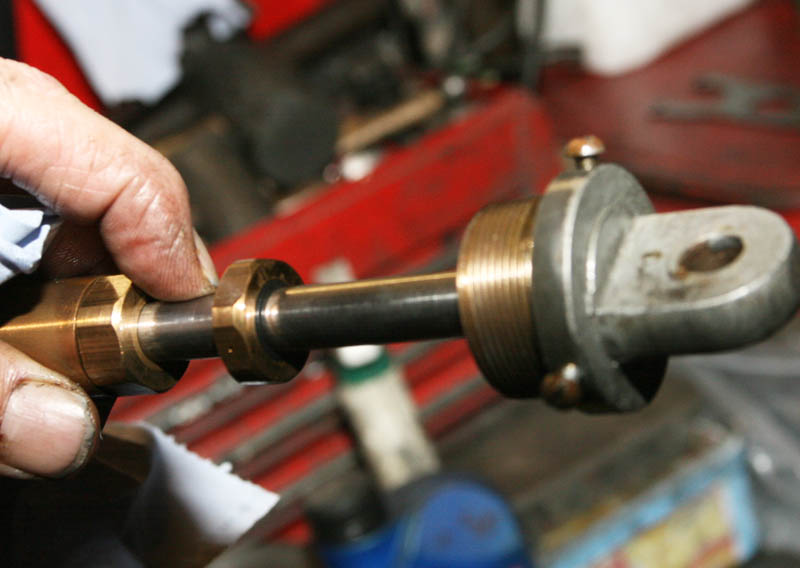
Oil seals on these orginal units have a reputation for leaking - but they can be refurbished and at least can be stripped. notice original brass screws for retaining painted outer cover
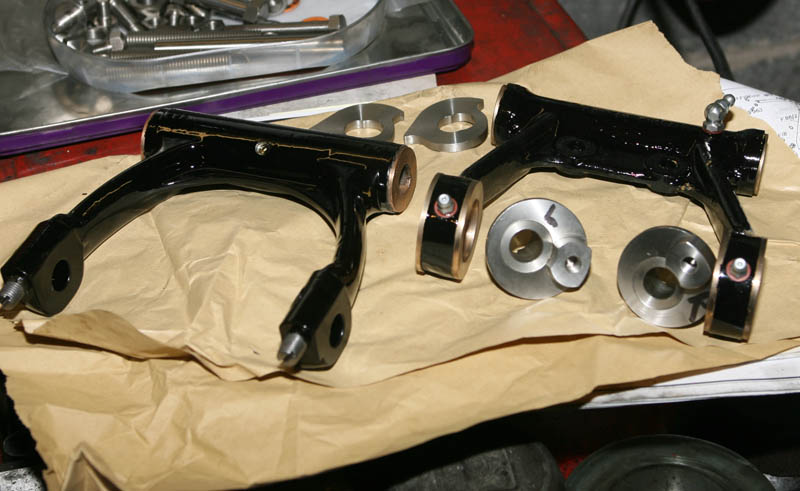
One of the more difficult but essential jobs when refurbishing a Vincent is to check the lower link assembly - as the bearings often wear in the steel casting and turn the castings holes oval - allowing clunking! Maughans to the rescue again, they offer a line boring and honing service then fitting new bearings and stainless bearings, projper job
And then new spindles and stainless fastenings - followed by the time consuming but rewarding task of assembling everything and ensuring everything turns freely, but with minimum sideplay
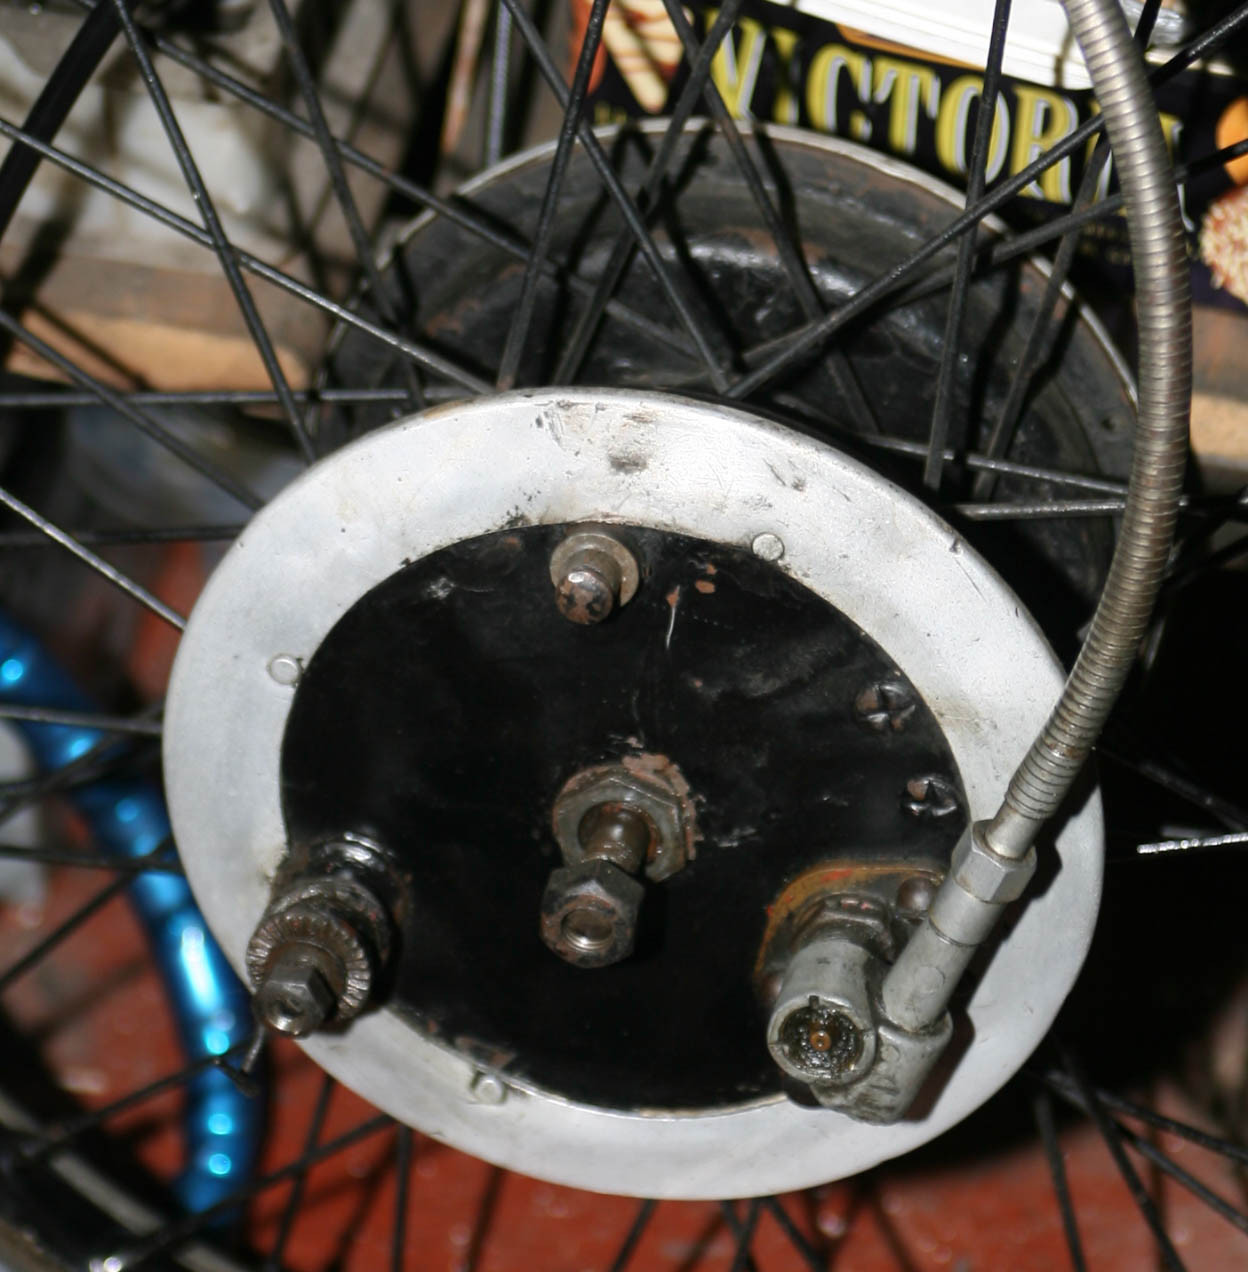
I had started rebuild wondering if I could get away without rebuilding wheels, but on close inspection they looked pretty rough - alloy water exluders were removed, knocks planished out and re-riveted to repainted humbs
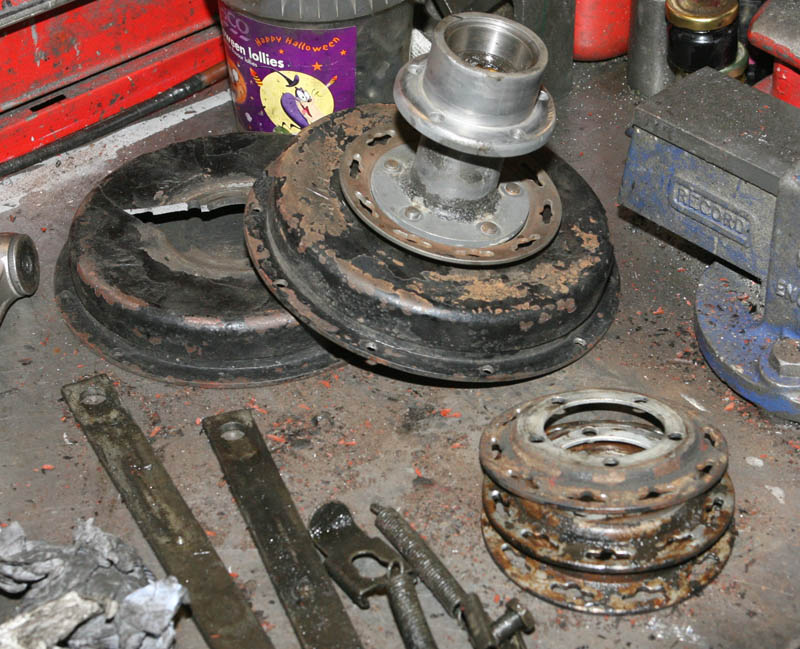
Ohh dear - these have seen better days. At this stage looking very grotty and I am not proud to say I got a bit carried away with the big rubber mallet - notice the cracked drum underneath
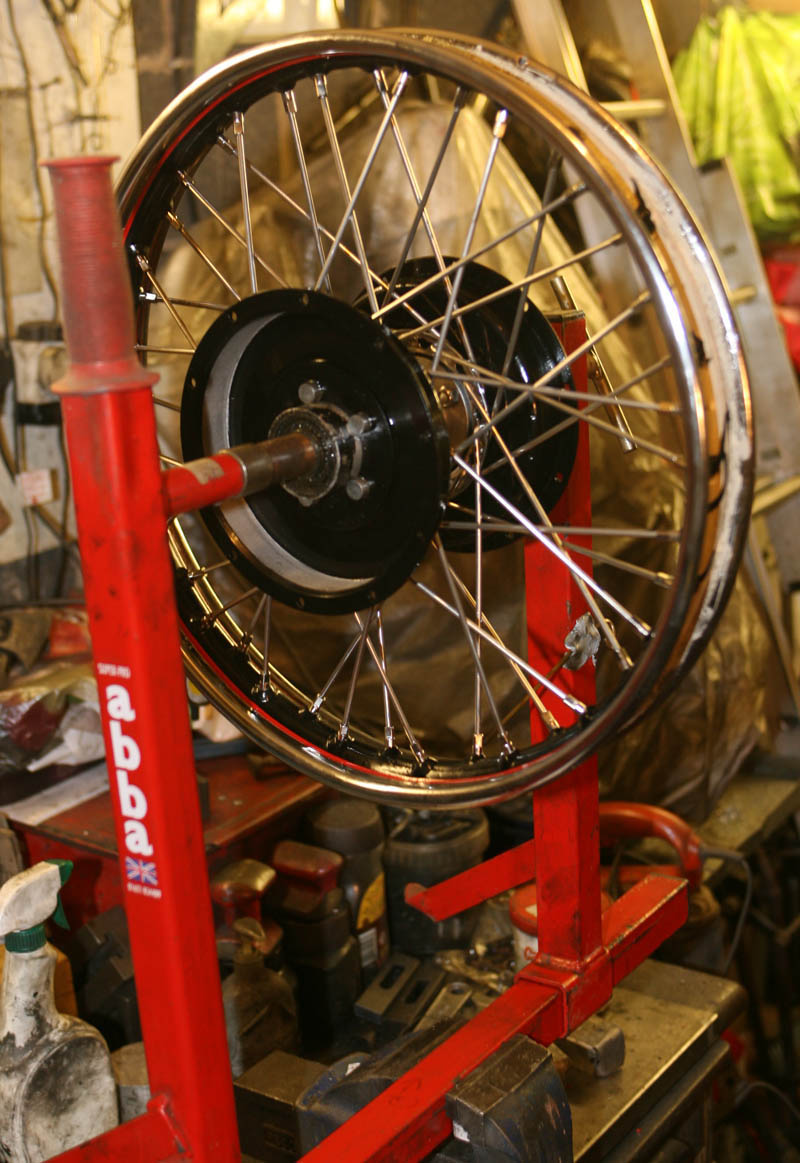
. . . and a long time later - wheels rebuilt with refurbished hubs, rechromed and painted rims and new stainless spokes. Hope you like my nifty wheel holder - it reminds me of two pretty women I used to fancy - not sure why . . .
Licas magneto also got some attention. I had the armature windings rewound and a few other consumables replaced. In this photo I have fitted my little testing handle so I can spin it and test for a big fat spark.
As an interesting throwback - my dad used to do the same thing . .. except he used to ask me to hold the wire against the magneto body - then would give it a quick spin before I was ready - just to see me jump half way across the garden . . . dear old dad!
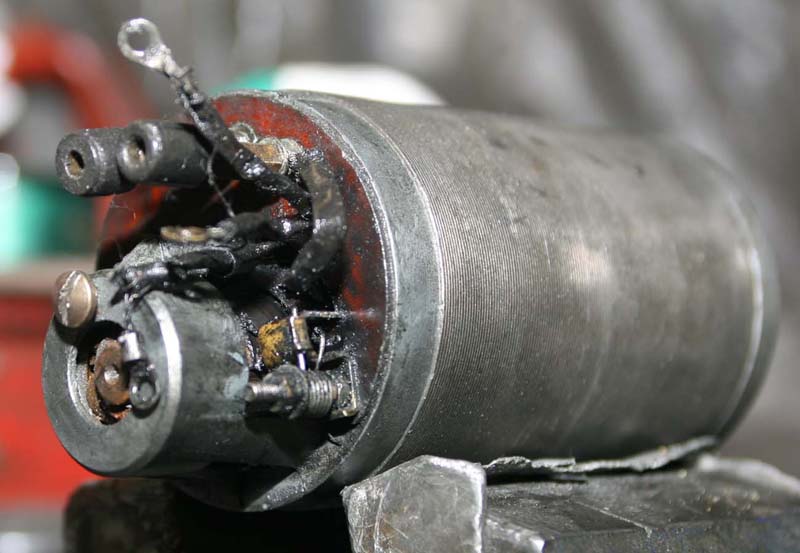
Like everything else, the Miller dynamo had seen better days and was looking tired and worn. Also, its wiring had been changed by my father to use a Lucas regulator - a common mod. I wanted to fit the original Miller regulator body, but using a modern solid state regulator
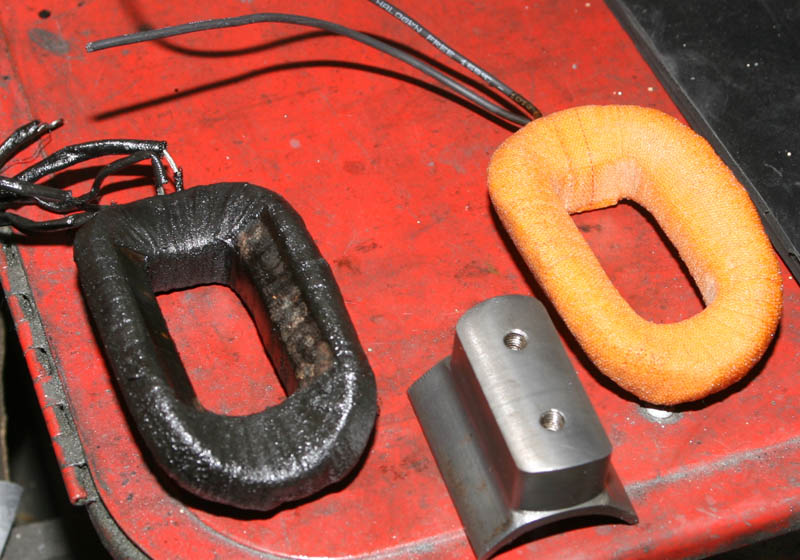
Original dynamo windings on the left were totally oil logged and wires perished. Magnet in the middle. New wiindings on the . . . err, right - came from Bob Dunn
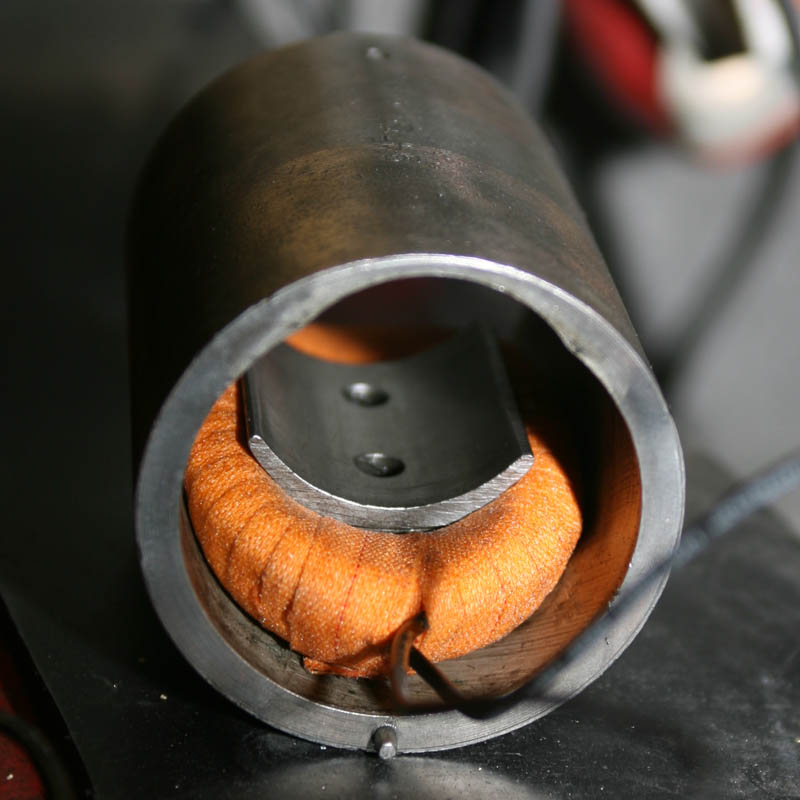
And fitting them in dynamo body
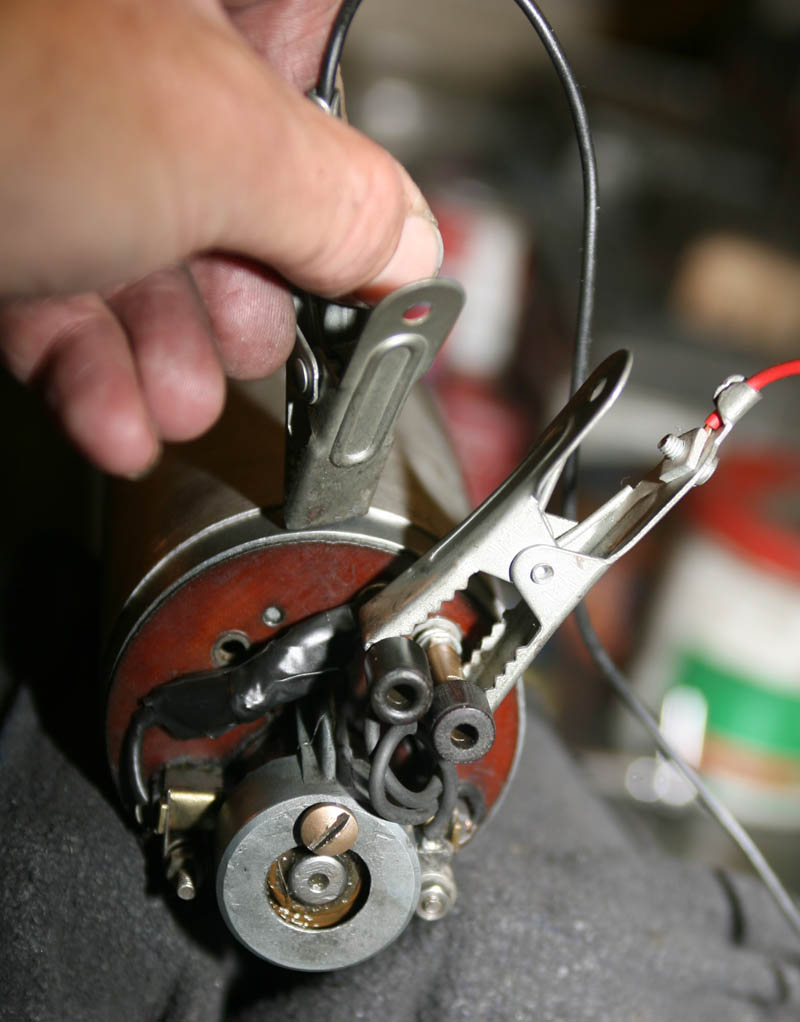
Rebuilt dynamo, including new brushes - testing to ensure armature spins and the direction is correct
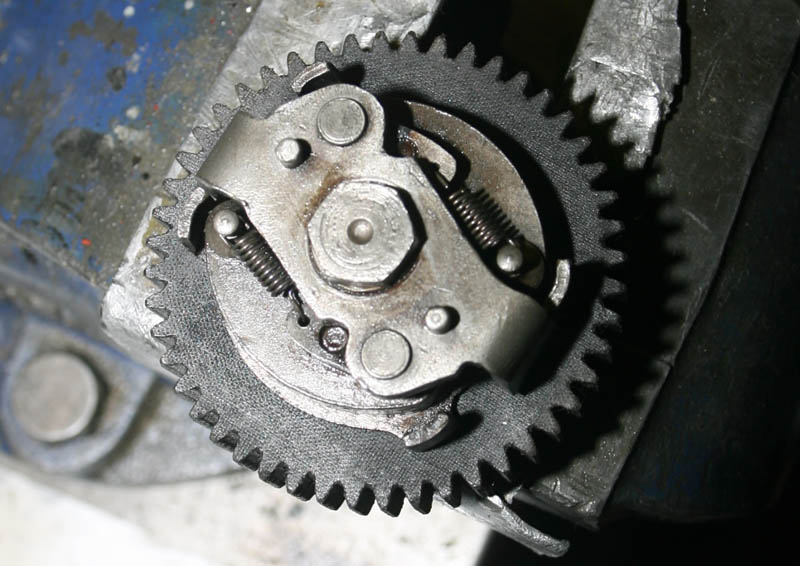
Magneto Advance/Retard unit was in reasonable condition after cleaning up - bob weights still moving freely and fibre gear not being too worn.
However, the all important bobweight springs (which are what control the rate of advance under centrifugal force) were in poor condition so replaced with new springs shown here
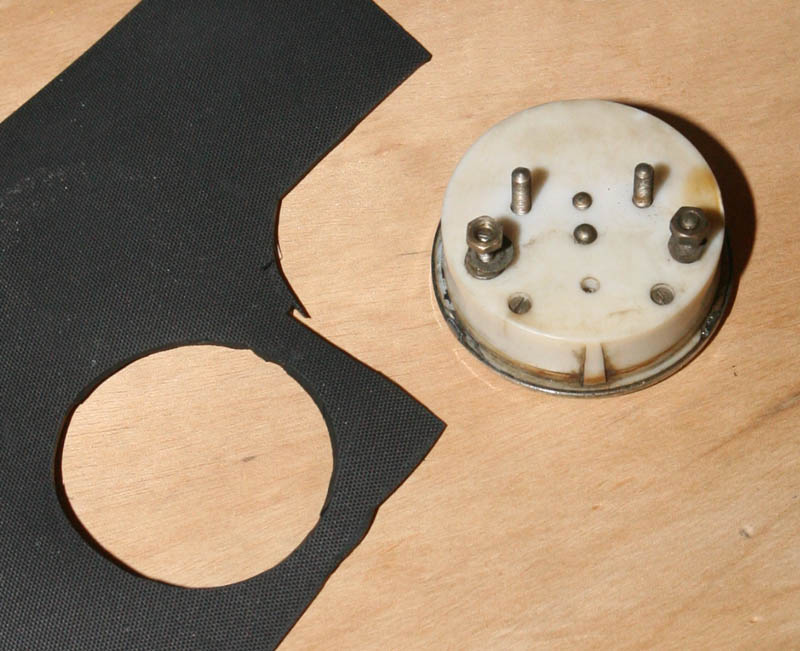
All electrics were looked at - including new wiring (a very time consuming task) and wherever possible - original style Miller fittings used.
If you look at top photos you will see original bakelite style repro Miller dipswitch fitfed, but I was able to refit the original Miller ammeter which still looked good condition - just needing new rubber gasket cutting
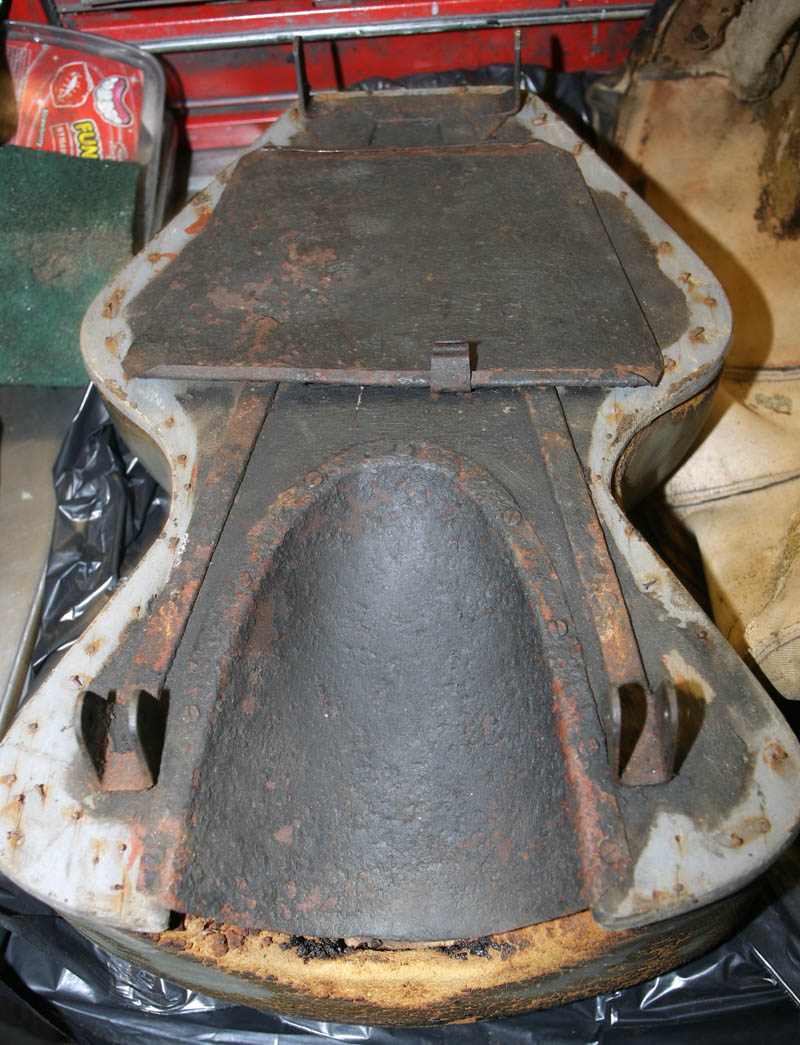
Recovering and restorrig original seat was not a task I looked forward to - but I wanted to try and keep as much of the original manufacture as possible. Unfortunately, tool tray plate was badly split and needed replacing. Original ply backing board and frame carefully restored, including a little welding
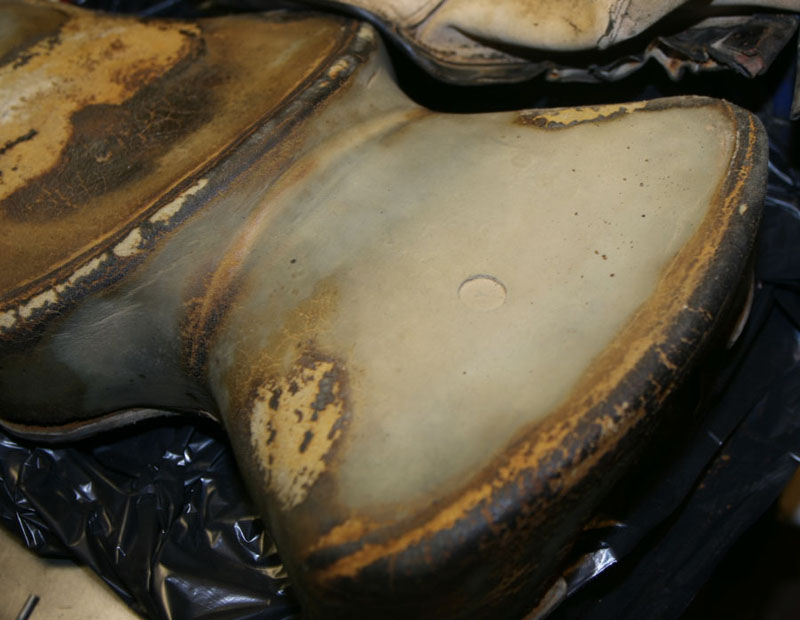
Having removed the split and worn seat cover (fitted by my father in the 1960's), The original Feridax 'Dunlpillo' still held its distinctive shape, but had started to crumble at its base and had areas of glue causing crumbling at the top. The bottom areas were cut away and new heavy foam grafted in, the top area was smoothed to shape as best as possible
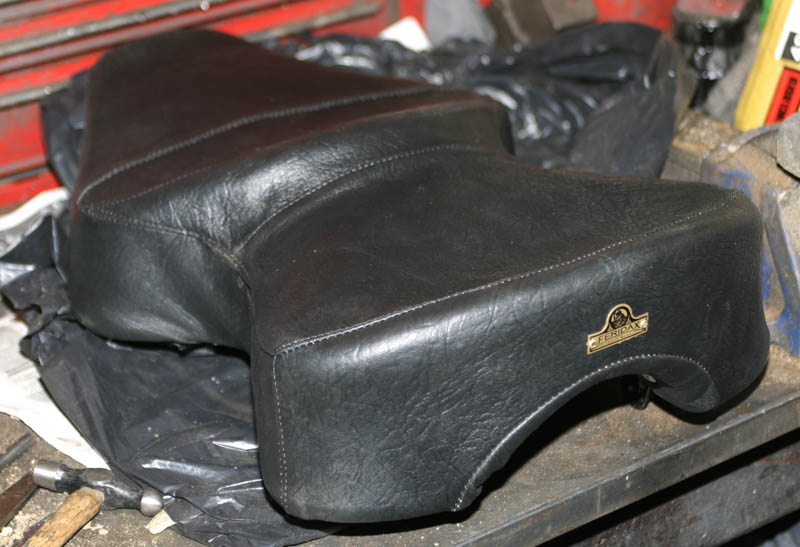
Here is the seat at the end of the process. The seat cover came from Vincent Owners Club (VOC) and when I first saw it I was not sure if the material looked right - but once fitted I was impressed and think it gives the correct period look. I also fitted correct 'Feridax' brass and black label, that sets it off nicely
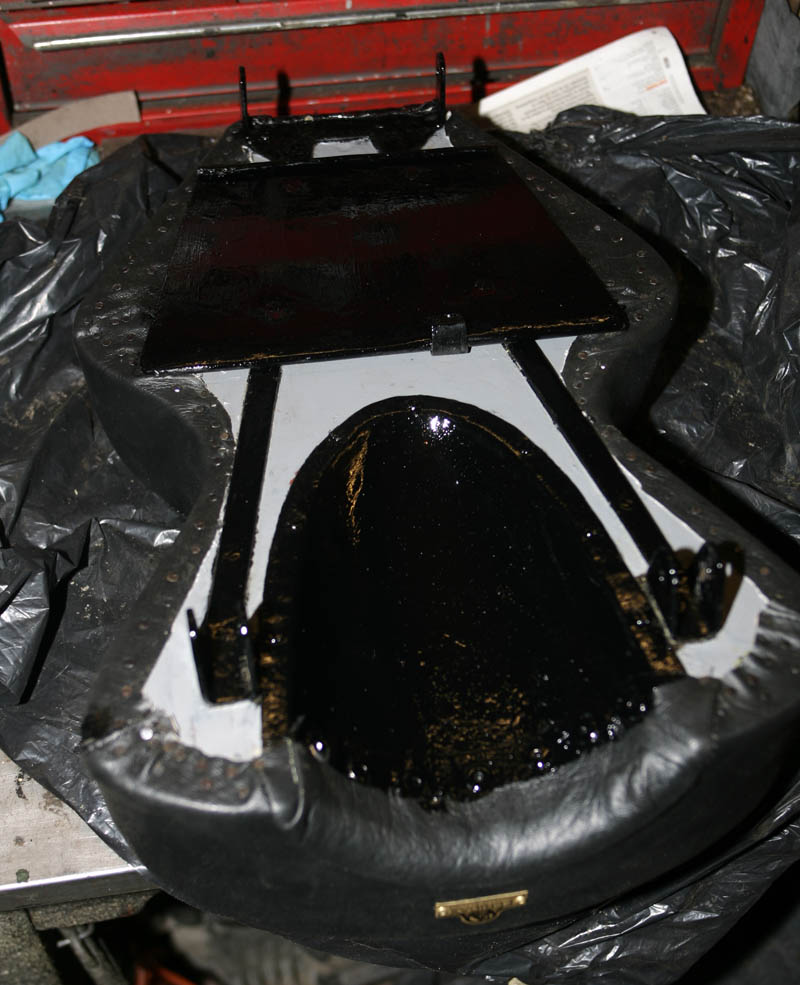
Finished underside also looks much better and close to orgiinal - using original style tacks, grey painted wood base and metalwork derusted and fresh black paint. New toolbox frame fabricated as well
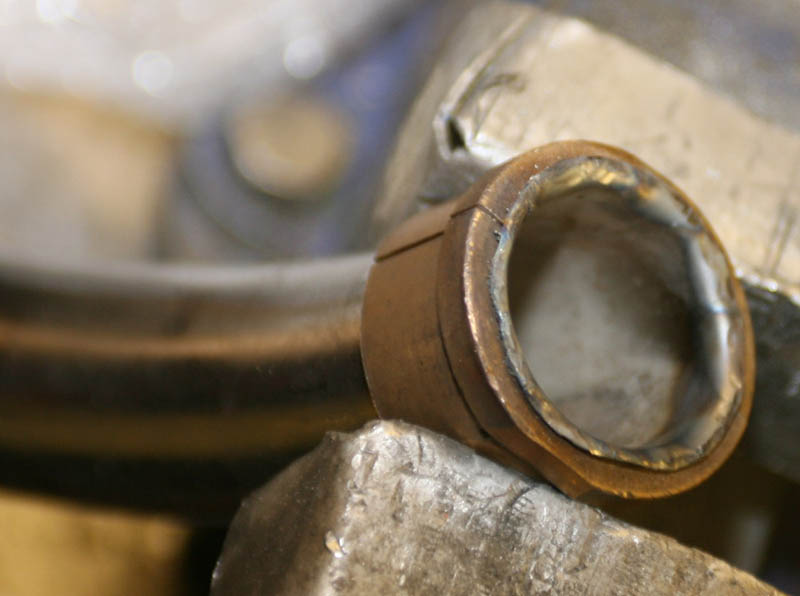
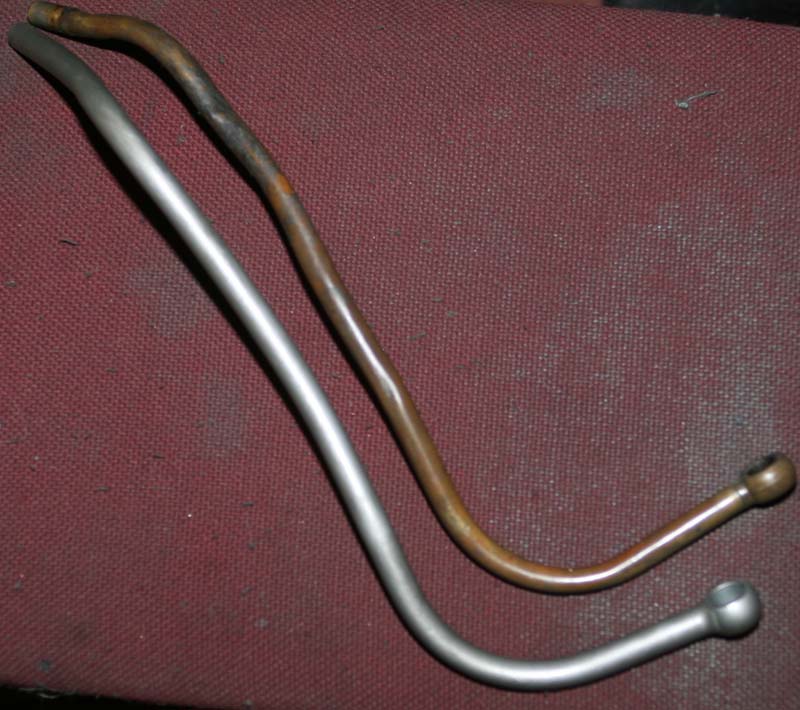
I bought a nice new exhaust system from Armours (of Bournemouth). However when it arrived I remembered that because Vincent's have a mounting bracket at the end, they cannot have a head flange fitted - else the exhaust nut could not be fitted. Therefore anyone fitting a new Comet exhaust needs to consider this . . . you need to think about how you will peen the end of the chromed tube to give a suitable flange without damaging the pipe badly.
Having given this some thought, I made up this jig, made from an old bronze fork beairng I think - internal bore machined to same bore as pipe, then slit so it would clamp pipe in vice with approx 1/8" of pipe protruding.
Then I was able to heat the protruding pipe end to red hot and peen it over to make flange. The mass of the jig also helped take the heat away, so it did not discolour the rest of the exhaust pipe. A painful process - but ultimately it worked
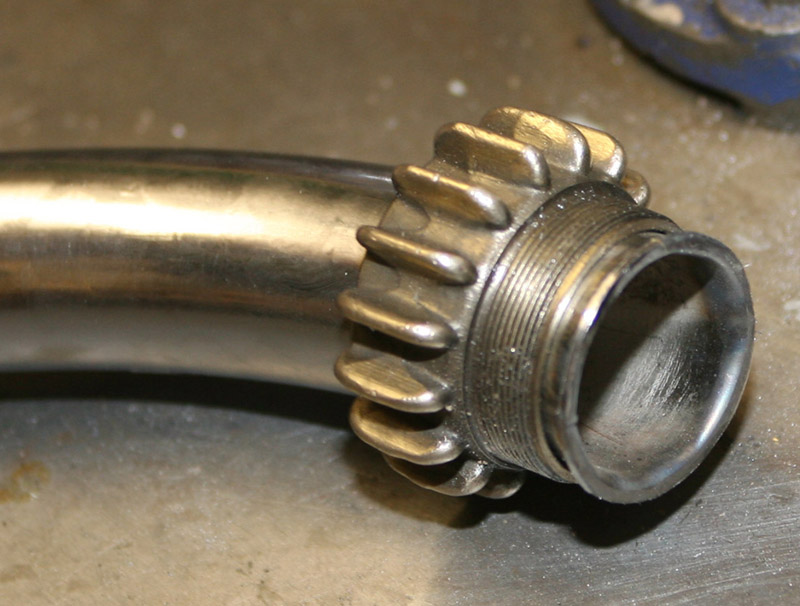
Here is the final result - new exhaust pipe with original bronze exhaust nut fitted. This was one of the last tasks of the restoration before the inevitable tinkering associated with any fresh restoration began!