
Vincent - Black Lightning Build
November 2011 - August 2012: Progress at last!
After almost 10 years of being on hold, I started back on the long term restoration of my Vincent Black Lightning Replica at the end of last year, in November 2011. However, unfortunately that did not mean I had finished the previous restoration - a 1937 road going 500cc Norton International, instead I succumbed to a personality trait that I think is common amongst many enthusiasts fortunate enough to have more than one bike in their garage - a butterfly like desire to swap from one project to another!
Interest in the Norton had temporarily waned, while instead I kept looking over at the Vincent lump on its build stand sitting forlornly in the corner, and thinking it would be nice to play with the Vincent again, and finally get it to a point where I could at least put it into a van and take it to a couple of meetings to display it, even if it was not fully finished.
Therefore, much of my ‘own bike’ time (rather than the Norton parts business which takes up a lot of every weekend) has been spent concentrating on getting the Vincent closer to being able to stand on its own two wheels – which I am pleased to report is now very nearly the case – after only 23 years in the build!
So, with that backdrop I hope to be able to provide a few Vincent updates in the near future.
I am
not sure how I am going to cover this progress in actual 'articles' over the coming weeks, as they are quite time consuming to write and I am only getting very limited writing time, but I will try and summarise each area in its own separate update, and maybe give more emphasis to pictures (I always take pictures when bike building now – I cannot even remember the time where I did not take a camera into the workshop with me!).
So read on over the coming months, and feel free to email me if you have any questions or want to know more about a particular area in more detail.

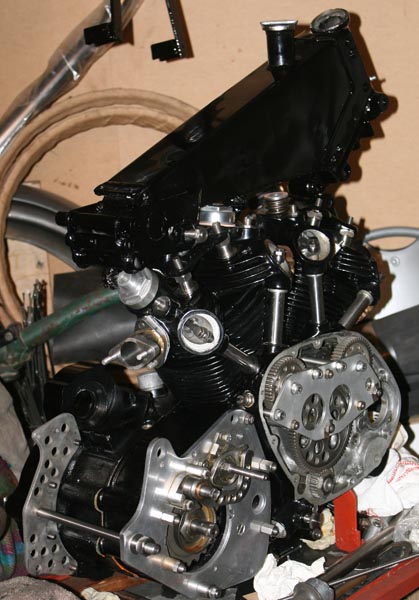
The imposing form of a big Vincent Vee-Twin engine never fails to impress!
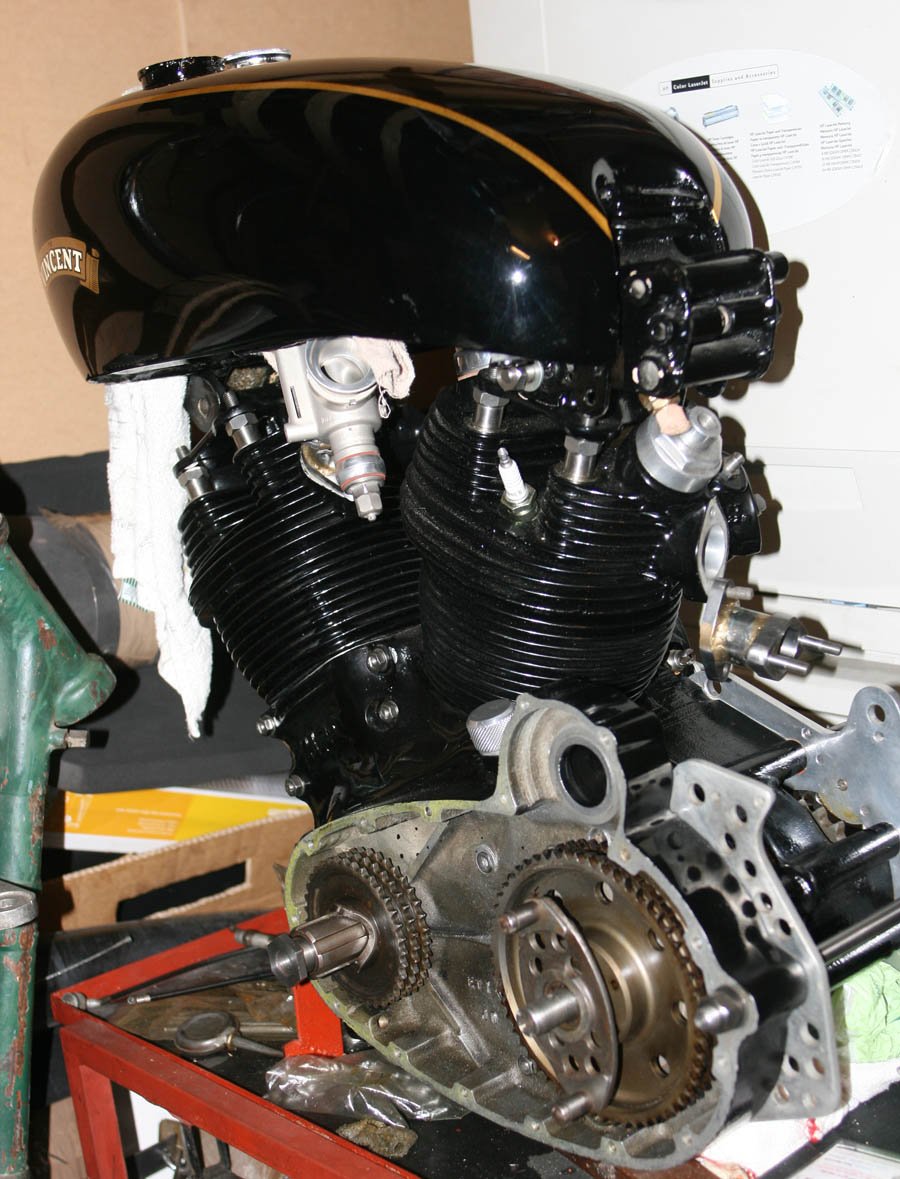
. . . And the drive side shows a loosely assembled primary drive - which is what I was working on when I last put the covers over it. Petrol tank is only loosely placed at this point - still a lot of work to do on that!!
This shows the Timing Side of the engine as it was at the beginning of Nov 2011 - i.e. where I had left it when I last worked on it 8 years ago!
Article 1 - Vincent Primary Drive Assembly: Nov 2011
November 2011 - August 2012: Progress at last!
As I pulled the covers off the Vincent engine unit back at the beginning of November 2011, I first had to remind myself at what point in the build I got to when I last stopped working on it - which I think was in about 2005.
I vaguely remember spending quite a lot of time playing with the gearbox, and actually, as part of starting this article I have gone away and dug out a number of archive CD’s from that period, with all the photographs I had taken at the time – which I think might be the foundation of another article in the future – to detail that gearbox build, as well as the timing gear assembly which I also did around that time.
I remember I had the gearbox end cover on and fully bolted up – on a Vincent twin this almost represents a ‘cassette cluster’ affair, as it means the entire cluster can be pulled out on this cirucluar gearbox cover, that holds substantial size bearings, shafts, gears, etc, with the selector plate sat on top. I remember I had fitted a genuine Black Shadow/Lightning selector plate, which is heavily lightened in comparison to a standard Rapide item. But more of that when I do the backtrack and write the gearbox article. So, the gearbox was fully fitted, as was the selector mechanism on the right hand side of the engine. I had been worried when I left the build that the gearchange through all 4 gears was not as pronounced as I would like, and this had played on my mind ever since
Going Through the Gears
With those thoughts still nagging at the back of my mind, I figured that re-visiting the build, the first task I would need to do was re-test this gearchange and if necessary, to strip the gearbox again to find why, before building up all the primary drive, clutch etc. So first task was to temporarily fit the outer gearbox cover (so it can hold the selector shafts in place – it acts a bit like an outrigger case), then put a suitable spanner against the square slot of the gear change, while spinning the gearbox shafts from the primary drive side, and try to go through all the gears. Although not 100% perfect, I was indeed able to move up and down all 4 gears, as well as finding (at least one!) neutral in there as well. It is always difficult to gauge what the gearchange will be like when the bike is on the move, when comparing what it is like when turning it by hand on a workbench – i.e. being under load and on the move etc etc makes a lot of difference. Therefore, having spent half an hour experimenting with reasonable results, I gave this exercise a tick in the box, and decided it was good enough to carry on building. I will see how the gearchange stands up when I actually start riding it, and can re-visit then if necessary
A photo taken back in 2002 - Large hole in crankcases where the gearbox cluster should go! ( a future article to follow, covering this gearbox build)
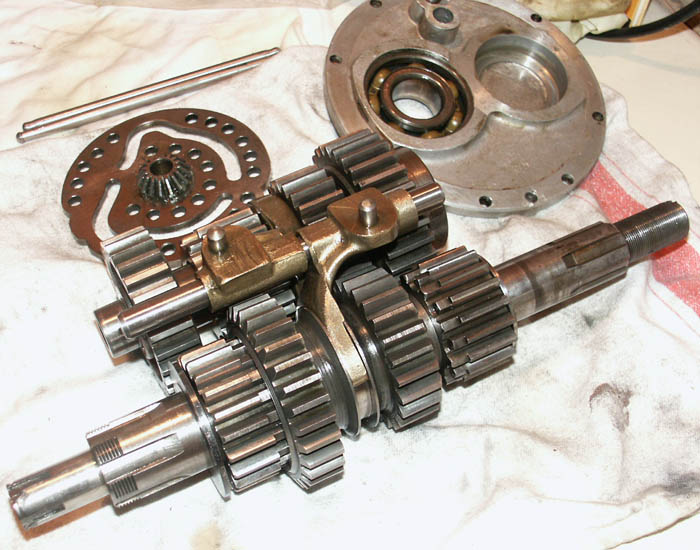
And here is the gearbox cluster, selector forks and Black Shadow/Lightning lightened selector plate. The circular gearbox cover is also visible. Gear cluster looks like it could have come from a lorry!
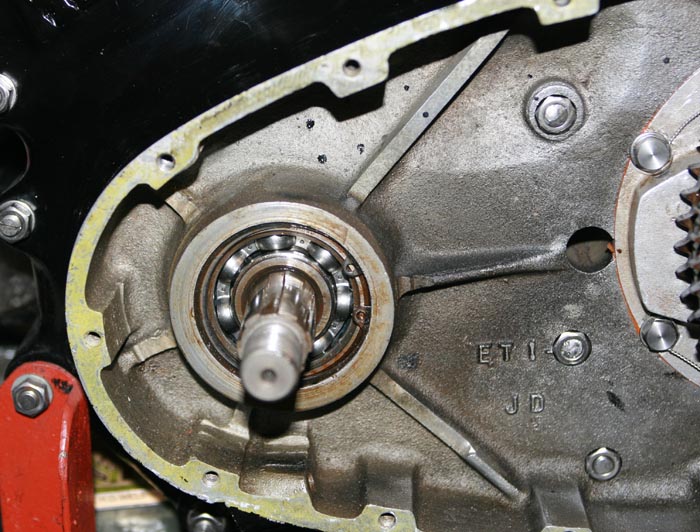
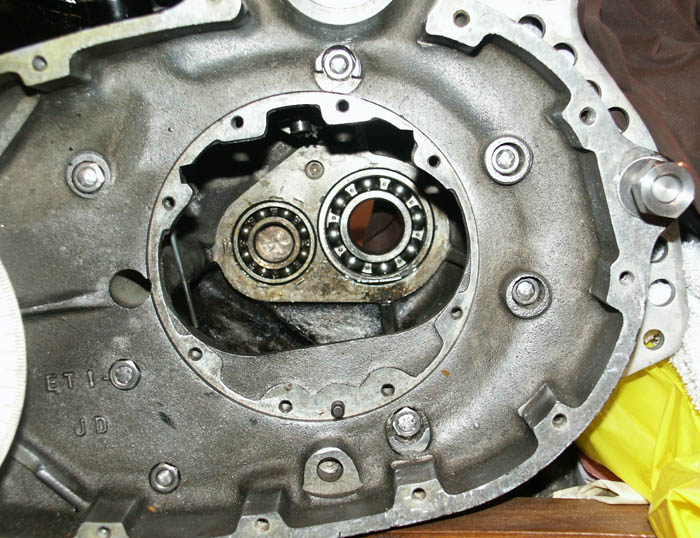
Nov 2011 - Here is the primary chaincase, showing the Drive Side Main bearing, retained by circlip. It also gives a good view of the substantial webbing around this area
Now - Where Did We Get to??!
So, having convinced myself the gearbox build could be passed as complete , back in November 2011 I was finally able to move on with the next build step, which was the Primary Drive and Clutch assembly.
A bit of background at this point; The Vincent twin primary drive/clutch assembly is very much in keeping with the rest of Vincent engine design – ruggedly constructed, slightly quirky in design and probably more complicated than it needs to be!
This is particularly true of the Vincent clutch, which has an almost mythical reputation for weirdness of design – often referred to as a ‘servo clutch’, it has a reputation for being difficult to setup, to ensure it does not snatch or slip in use.
About 20 years ago when I was first heavily into building the Vincent, and much closer to the Vincent people ‘in the know’ at that time, I was told that Suzuki GS750 multi-plate clutch’s were considered one of the best alternatives, and were easily available.
I remember visiting Don Alexander at the time - one of the real experts of the Vincent world, and watching him machining a new inner body for one of these clutch’s, which was the main conversion task required.
But even back then, when I was more serious about racing the Vinnie, I did not feel comfortable about abandoning the genuine Vincent clutch – it was a bit like giving up without even trying, so I always had it in my mind that I would at least fit the proper Vinnie clutch first, give it a good shot, and only if it did give issues when racing would I look at alternatives.
Now all these years later, I am not intending to ride the bike competitively – I have given up any pretensions of racing the bike seriously - it will now be used for race parading at 1000 Bike Festival and similar events instead. Therefore I have even more reason to want to fit the original Vincent clutch – so I can enjoy the full Vinnie experience – warts and all!
One of the first tasks was to seal off the engine case bolts in the Primary Chaincase, to avoid oil seepage from the engine/gearbox
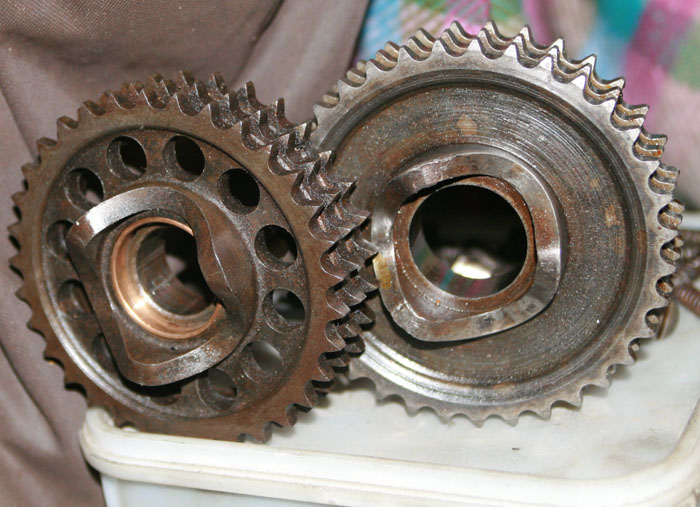
Sprocket on the left is from a Vincent Picador engine - one tooth less (i.e. a slightly higher gearing), much lightened, and originally to fit a slightly wider mainshaft - note in the photograph that it is fitted with a phosphur bronze sleeve, to allow it to be used on my standard width crank.
. . ... unfortunately, fitting this sprocket meant the primary chain was 'between' links - i.e. it would either be too tight with one link removed, or the tensioner would have too much tensioning to do. Therefore I decided to continue with the standard engine sprocket, and leave the Picador for later on
Getting Ready for the Next Build Stage
Having established where in the build I was, the next job was to pull out and organise all the parts I needed to assemble the primary drive, and for a couple of these parts where there was a choice – decide which I was going to use. If you had already read some of my earlier Vinnie articles, first written some years ago, I mentioned that I had already bought the major bulk of the consumable parts I needed to assemble the engine many years ago, in the first 10 years of ownership.
I had not skimped on this task either, having bought the majority of the consumables from either the Maughan family – the late Tony Maughan (the father) in the early 1990’s and Graham and Steve (his sons) in more recent times, as well as Ron Kemp, Ted Davis and a few others. In those early days of the rebuild I seemed to be selling a bike from my collection almost every 18 months to raise the necessary wads of cash, and then I would head off with Titch into the deepest depths of Lincolnshire to buy another batch of beautifully made Vinnie parts from Maughan’s. I was a like a kid in a candy shop on these visits and greatly looked forward to them.
I would tackle a section of the engine at a time, scanning through the original Vincent exploded diagrams, marking off all the parts I had that I thought were serviceable (i.e. not many!). from this I would generate a spreadsheet of all those parts I required.
Then I would post this spreadsheet off to Maughan’s, wait a few weeks for them to be picked, then head off with a large wad of cash in hand. As much as anything, it was always nice to see what was new in their workshop and admire the quality of their work – Tony was a real gentleman (as indeed are his sons) and extremely good engineers, and I always used to take a few quid extra to buy one or two extra goodies that undoubtedly I would see on the day. I think it was also fair to say that they looked after me well, and we established a friendship that has endured until now. If you look at the quality of the parts they produce, they are beautiful, particularly the cosmetic parts – most of which are stainless. In fact they were one of the earliest exponents of after-market stainless parts, and I think it was the quality of their parts that encouraged me to do similar when I started making Norton parts.
A detail that I particularly remember is that their 'own made' nuts always had the hex faces burnished, which gave that extra hint of quality - I am sure Phillip Vincent would definitely have approved!.
Getting Ready
You have to remember that at this time in my life (late 20’s) I had been used to having to make or refurbish everything I needed for a build myself, and never having much money available, I had not been able to afford to build a bike any other way. Therefore, when I got the Vincent I decided I would indulge myself and try and buy the best of everything. If anything looked in any way worn or dodgy I would endeavour to replace it – and damn the expense! I also realised that skimping on the engine of a bike like a Vincent was not a good idea, if anything failed, it could have very expensive consequences!
Anyway, the upshot of this is that I am still reaping the benefits of this approach – each time I come to restore a new section of the bike, the first thing I do is go to the relevant bag or box from underneath my Vincent build platform, then pull out all the shiny new bits I bought from Maughan’s 15 years ago!
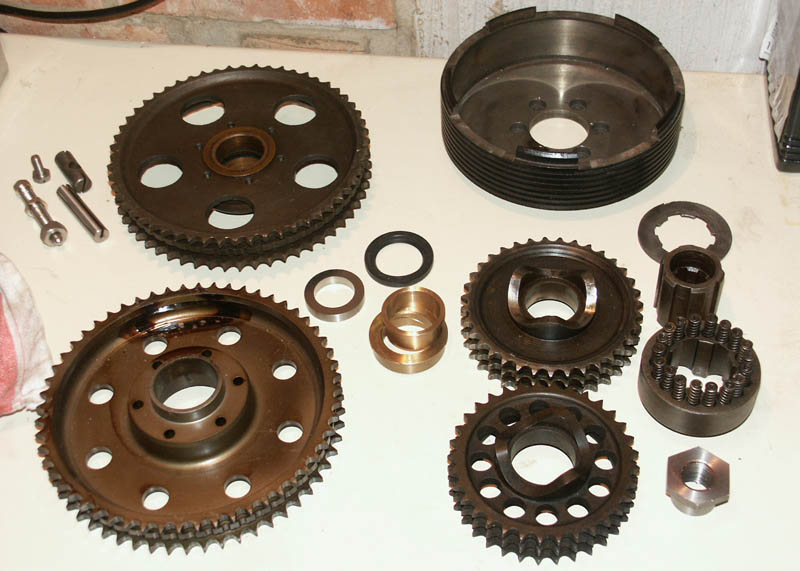
Primary Drive Starting Point: Notice two engine sprockets and two rear sprockets (PD20) and a number of new parts already purchased many years ago. Note the drill pattern of the clutch sprocket at the top left (an original) is different to the modern replacement
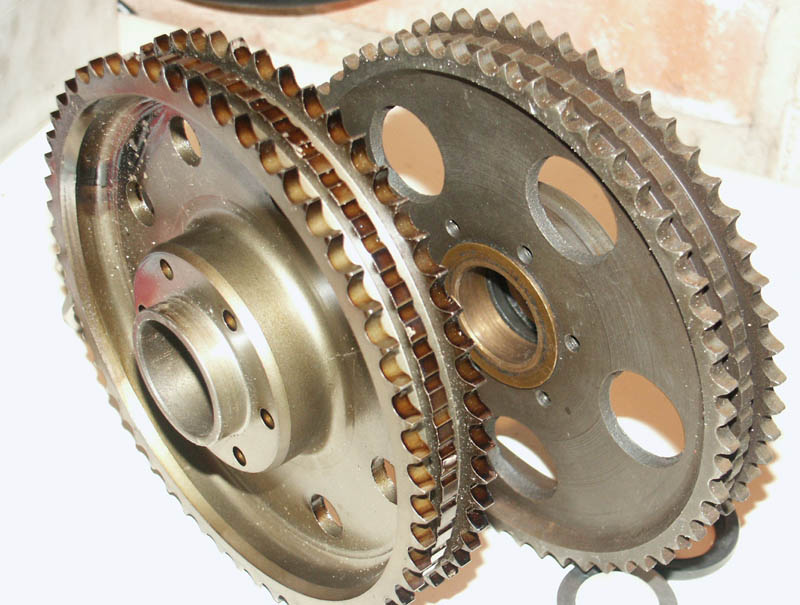
The PD20 sprocket on the right is the original that came with the bike. It was ok, but had a few chipped teeth, probably due to interference from the dynamo drive that sits above it on road bikes. Sprocket on the left is a very nice new item, which was one of the first parts I bought for the build, and came from the late Ted Davis the original Vincent Development Engineer. I was lucky enough to visit Ted with Titch Allen back in the 1980's - it is probably 20 years old itself now!
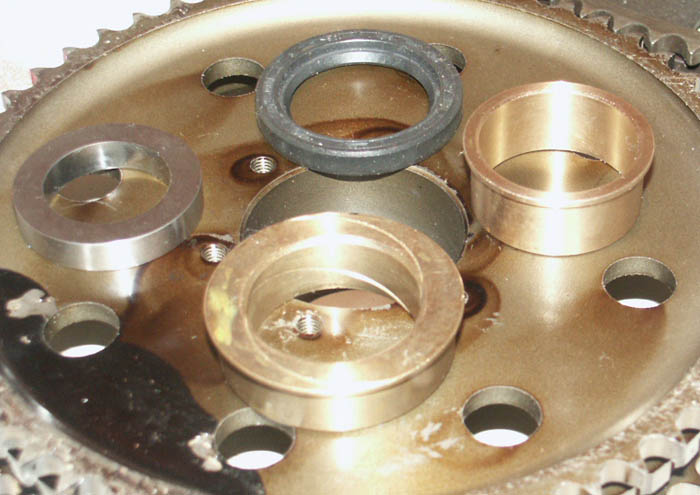
It is easy to understand why a full rebuild on a twin can be compared to a second mortgage on your house - having bought a new primary drive PD20 sprocket, there are then 2 bronze bearings, a hardened spacer and a seal required to fit to it before it can be used!
Primary Drive Assembly
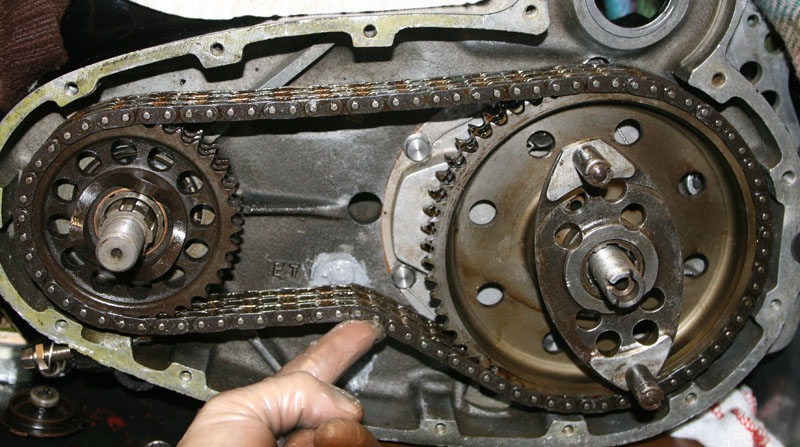
First task was to check the sprockets I was going to use for the primary drive. On a Vincent twin the primary drive consists of two substantial 3 row sprockets, connected by a triple row chain, running in an oil bath The rear sprocket only has teeth on its two outer rows – the middle row of teeth mostly removed, so that the roadgoing Vincent could run the dynamo sprocket against the middle row of the primary chain from above – a typically clever Vincent design feature. The clutch itself runs in a separate chamber outboard of the oil bath, so that it can run dry – i.e. no oil from the primary drive should seep into that chamber. The primary chain is tensioned by means of a spring steel plate about 8 inches long running underneath the bottom chain row and adjusted by means of a long fine thread bolt protruding out of the front of the lower crankcase casting – so it can be easily adjusted by the rider, just by loosening the external locknut and then removing the Vincent inspection cap, so that the rider can check the tension of the top row of the chain while making the adjustment.
When I bought the bike it came with a used chain tensioner – but as always with this type of tensioner, it already had 3 deep trough’s where the links of the chain had rubbed against the tensioner, so that was quickly chucked away and a new tensioner purchased. It goes without saying that I had also bought a brand new triple row primary chain. This has to rate as the single most important investment on rebuilding a Vincent twin engine – as one of the most common causes of the Vincent twin crankcases being ‘destroyed’, is when a primary chain breaks – where it invariably smashes the front part of the crankcase around the engine drive sprocket.
In the late 1980’s there was a period where I was doing short straight line sprints on a Norton, and was regularly sharing pit space with Tony Brown and family, who were demo-ing George Browns legendary Nero and Super Nero Vincent at the time. I remember at one of these demos at the BMF rally talking to Tony after practice and he being understandably very upset that the primary chain on Super Nero had snapped under power and done just that – making a bit of a mess to the crankcases of this very historic bike.
Incidentally, as a footnote to this story – at another meeting at a similar demo meeting, I was not riding myself but was in the vicinity while Tony was trying to start Super Nero on rollers driven by his van (no Foxley starters at that time!). I offered to help hold the rear of Super Nero down on the rollers, which meant my ears were within a couple of feet of those huge 2” exhaust pipe. When Super Nero finally roared into life, the amazing cacophony of sound frm that hugely powerful supercharged engine was truly unimaginable . . . it literally shook the ground beneath you. Unfortunately it almost took my eardrums away as well – I felt them vibrating, and was left totally deaf for the next 5 minutes. Not an experience I would have missed though – fantastic!
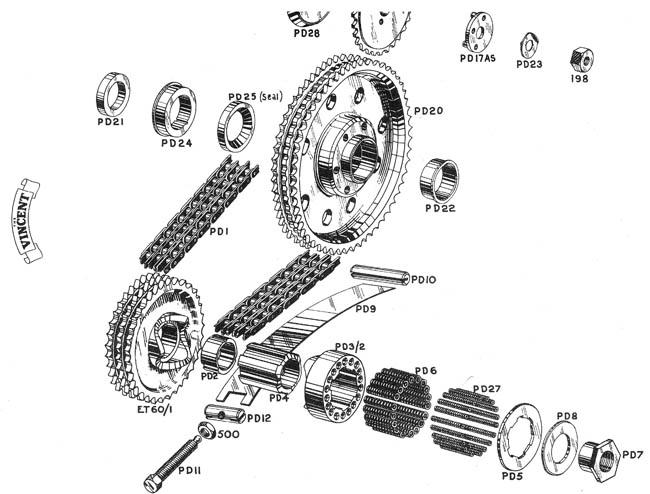
An exploded view of the Vincent Primary Drive assembly, taken from the original Vincent spares catalog
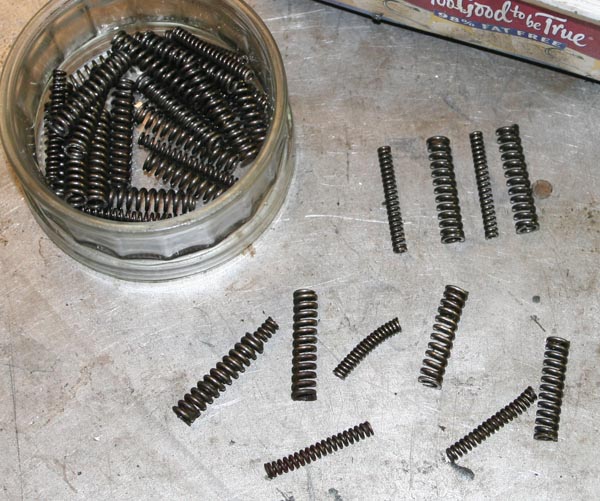
I was originally hoping to use the shock absorber springs that came with the bike - but on inspection another area for replacement! Actually this was no surprise, these springs breaking are a common fault.
Replacement springs are on the top right
Choice of Sprockets and MeetingTed Davis
Coming back to the build last November, I knew the first thing I needed to do was decide which engine sprocket to use, as I had a lightened Picador sprocket I really wanted to use, as well as a standard sprocket.
Back in the 1980’s I had been very fortunate to have been introduced to legendary Vincent Development Engineer Ted Davis by Titch Allen, who had grown up with Ted before the Second World War. Ted and his lovely wife had invited us round for the day to their home in Welwyn Garden City and it was a memorable visit. At the time Ted had a fantastic collection of his own Vincent’s, which included genuine examples of both Grey Flash and Black Lightning’s. Although Ted was a very modest man, over lunch (the first time I had ever been offered Avocados – it felt very sophisticated at the time!) he did talk a little about his time in the war, recounting the most amazing stories of his time around the Blitz, where he was part of a team diffusing unexploded land mines and such like. Later, as part of his time in the Navy, he served on one of the rocket firing ships that was used to support troops landing on the beaches in the latter stages of the war. Although he made the stories very amusing, and played down his own part through the war years, it was clear he had done some amazing things in his life and I came away in with an even greater respect for the man.
I had been told before hand that he might have a few odd parts of interest, so I had come with what meagre funds I could assemble at the time.
When he had shown me round his collection, he took me to his workshop and tried to help me with what bits he could. From his own Lightning he was able to help me take cardboard templates of the racing footrest hanger aluminium plates (which I have recently used to have laser cut copies made – some will be on sale shortly). I was trying to assemble parts for the primary drive at the time, and although the bike I bought did come with an original rear sprocket, it had a few chipped teeth, which made me nervous. As it turned out, Ted had recently had a batch of very high quality rear sprockets made, so this was the first purchase. I mentioned to Ted that as a lad I had seen photographs of genuine racing Vincent engines at the Works, which had the engine sprocket liberally drilled. Ted at this point went to one of his drawers and was able to pull out an engine drive sprocket that looked exactly like I had described! Interestingly, Ted told me that it was in fact a sprocket made for a Vincent Picador engine, which was the special twin engine made to power pilotless drone planes being tested by the Ministry of Defence in the early 1950’s. These Picador engines had very different crankcases, but shared the same barrels heads, and many engine parts. As lightness is always a concern in the aircraft industry, the sprockets were drilled as per Lightning’s. However, there were two other differences with this sprocket – the mainshaft of a Picador engine is an 1/8” wider diameter than a roadgoing twin, and the engine sprocket has one tooth less, giving a slightly lower overall gearing.
Obviously this sprocket appealed to me, and a deal was done, even though I was not sure I would be able to use it without modification . . . but I know how difficult it is to drill lightening holes in a standard hardened sprocket, so this alone was enough to make me want it
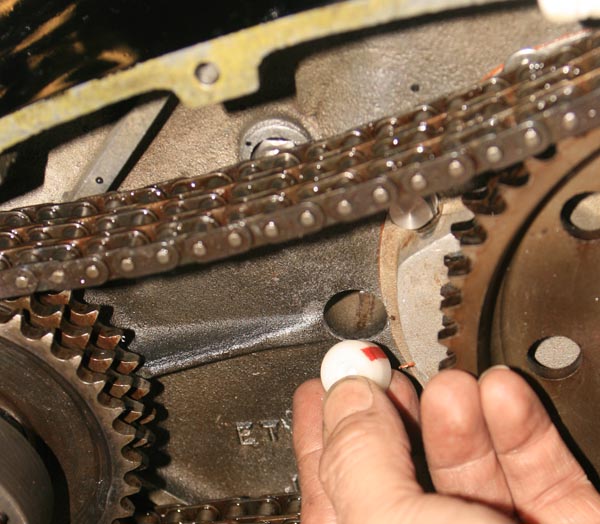
New springs being fitted to shock absorber - inners and outers
The plate with the springs is called PD5 - but many Vincent people will tell you that placing the springs in the indents will actually make the springs break quicker - therefore it is an old trick to fit the PD5 plate with indents facing outwards
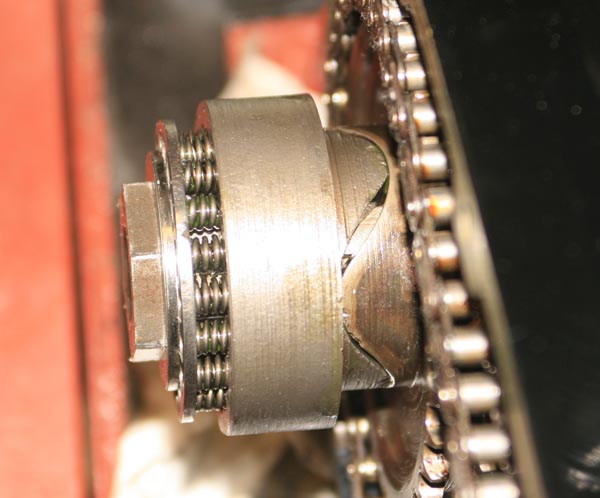
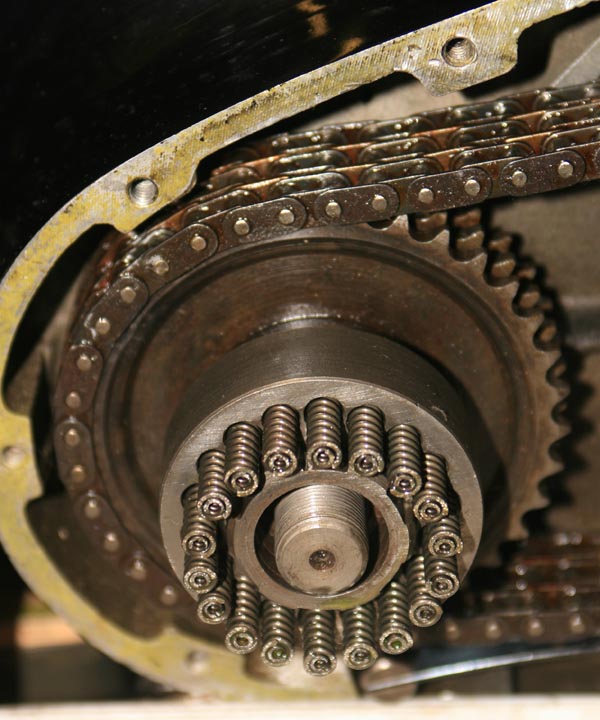
And here the fully assembled shock absorber, showing the ramp on the splined PD3 absorber body, mating with the slightly different ramp on the sprocket
Fitting The Shock Absorber
Anyway, back to the present, and last November the first task was to trial fit this sprocket with the new rear sprocket and new primary chain, to see how they all matched up. I had already pressed a phosphor bronze sleeve into the sprocket, so it could be used on standard shaft, although it does not fit directly onto the mainshaft, but instead fits onto a hardened oil thrower spacer – PD2. Unfortunately as per the photo above, having assembled them altogether, it was immediately obvious that using the Picador sprocket with one less tooth than standard, left the primary chain so sloppy that there would be no chance of being able to take that slop up with the tensioner alone. I did for a few seconds consider the other option – fitting a special ‘half link’ but very quickly decided that was far too risky, just to give me the benefit of a lightened sprocket. So reluctantly I have decided for the moment not to fit the Picador sprocket, and instead fit the standard item that came with the bike. I thought about trying to drill this as well, and although I could do this, I decided it would be very difficult for the benefit it will give, so decided not to bother. I also considered, that maybe once the primary chain had stretched a bit, it may be possible to fit it with one less link . . . we will see, but not really important.
Shock Absorber
This was relatively straight forward to assemble. A complete assembly in reasonably good condition came with the original bike, including splined PD4 that fits over the mainshaft and allows the PD3 shock absorber body to slide along the spline, riding up its ramp against the corresponding ramp on the engine sprocket and buffering out the initial shock of the throttle on/throttle off. Incidentally, this is a totally different design to the customer Manx and International Norton’s, that use six rubber inserts within the Norton clutch body to perform the same function. However, not widely known is that early racing Norton’s used the same mainshaft ‘shock absorber’ design (but with a single large spring), and that this continued with Works Manx Norton’s into the 1950’s – one can only imagine that cost constraints caused them to discard this design from customer bikes.
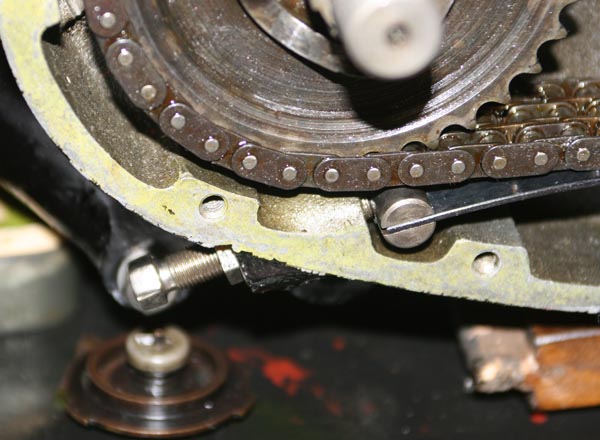
Fitting a 'push fit' fibre plug to stop oil leaking to the other side of the engine from the Primary Drive. I believe this hole was originally allow the gearchange to be mounted on the left
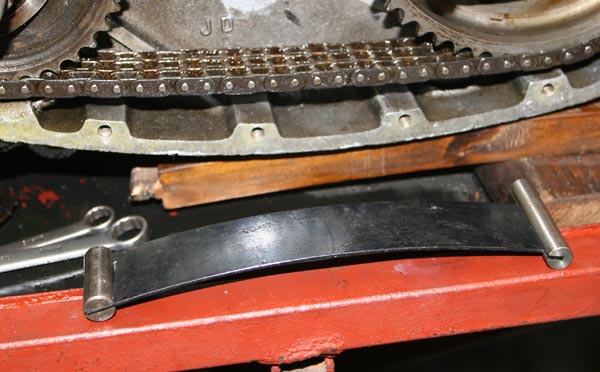
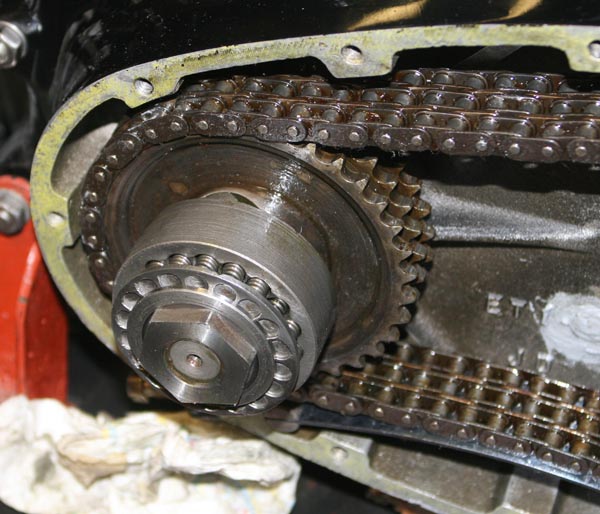
You can see here the new chain tensioner before fitting. The pin on the right mounts into the crancase, while the pin on the right is floating to adjust the chain tension
Here you can see the lower crankcase boss holding the primary chain adjuster and locknut, so the tensioner can be adjusted without stripping anything down - simple yet clever
Fitting Sprockets and Primary Chain
Once having decided (reluctantly) to use the standard engine sprocket, the remainder of the primary drive build was relatively straightforward. Before final assembly I smeared 3 Crown gasket silicon around the engine bolts (which do supposedly allow some seepage from the engine if this is not done) and blocked off the straight through passage for the alternate gear linkage which supposedly can also lead to leakage from the primary drive (let’s see if I regret this . . . not sure if this will result in a lack of breathing ability), then fitted the spacers, splines, sprockets and chains. Once these were loosely assembled, next task was to fit all the small shock absorber springs. I was going to use those supplied with the bike, which looked used but in reasonable condition. However, it came as no surprise that on close inspection some of the small inner springs were snapped – a very common issue, so it was a no-brainer to replace them all. Incidentally, this body is the earlier and more common 18 spring body. I gather later bikes were fitted with a 22 spring body – presumably to give more resistance, but I am happy to see how we get on with the 18 spring version first.
Before I could fit the very pretty and new rear sprocket I had bought all those years ago from Ted Davis, I first had to press in new phosphor bronze bearings from Maughans, with yet another oil seal in its centre, this was a straight forward job with no dramas.
At this point though, I should probably explain yet another strange quirk of Vincent design – when you first fit this sprocket, with chain fitted, you cannot help but think to yourself – ‘have I forgotten something?’, because the rear sprocket just wobbles on the gearbox mainshaft, it is only when you fit the clutch shoe carrier – part number C3 (or C3/1 in the case of a Lightning) onto the gearbox shaft that you realise this carrier has a large hardened outer shoulder that slides very satisfyingly through the rear primary drive sprocket, thus centralising it and ensuring the sprocket torque is spread over a large a contact area as possible – just another example of the deep thought that Phil Vincent and Phil Irving put into this design.
Obviously this means that you have to temporarily fit the clutch shoe carrier to tension the chain, before fitting the primary drive cover, where it has to be removed again to allow the cover to be fitted. This I did, and actually it was a lot simpler in practice than trying to explain the process in an article!
With springs fitted to the shock absorber, I was then able to fit the spring securing plate PD5, washer PD8 and engine drive nut PD7, and as with Norton engine sprocket nuts, this nut can be tightened up with the aid of a large mallet, using sharp taps against engine compression alone. As a point of interest, the PD8 ring, which has 18 indents to match the small shock absorber springs, is just crying out to be assembled with the indents facing inwards – which was the intention as originally designed. But the general consensus seems to be that this actually leads to the springs breaking prematurely, probably due to increased side pressure, therefore I resisted temptation, and mounted the PD8 with spring indents facing outwards!

Inside of the very substantial primary chaincase cover. This casting is an early B/C version and the quality is second to none - Beautiful!
Notice small boss at bottom of casting for retaining other end of chain tensioner pin
The casiting is very cleverly designed with a tight fitting lip - which presumably matches up to the rear sprocket when fitted, as well as another oil seal . . . all designed to keep oil from escaping into the outer clutch cavity. I just love the crisp lines of this casting . . . possibly my favourite casting of the whole engine
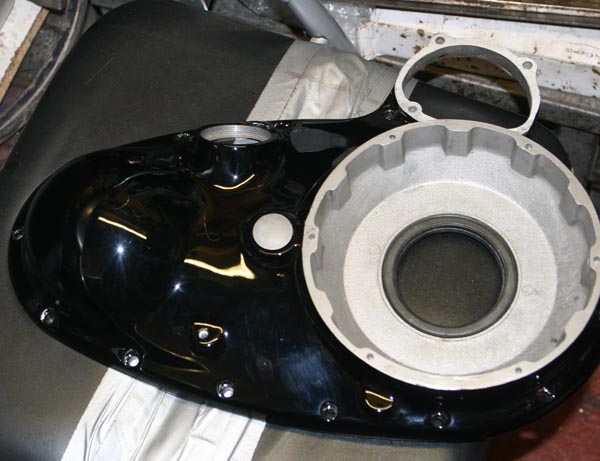
I originally etch primed and 2-pack painted this and other engine castings about 15 years ago, and have kept them wrapped and packed in clean rags ever since. Unpainted area is the clutch cavity. If I say so myself the black finish against the crisp casting looks awesome
Fitting Cover
So, to the final task was to fit the primary drive cover. First thing to do (and one I was quietly looking forward to) was to actually unpack the cover from the box it had been residing in, along with many other of the engine covers, since I painted them about 15 years ago. This casting was a very good example of why I paid such a sizeable sum for what was effectively a large box of bits when I first purchased the bike back in the 1980’s. Although the bits made up almost a complete bike, the majority of the revolving parts and fittings were rough and needed replacement – but the castings were superb. Both the seller and myself knew this and it was definitely why the purchase appealed to me – I like to replace any engine consumables not spot on anyway when I am restoring a bike, but there is nothing to beat good castings, and this particular casting was a really good example of Vincent craftsmanship at its best – beautiful crisp lines and a beautiful finish, both inside and out. I had already done all the heavy leg work 15 years ago, first slightly roughing up the outer casting, to give purchase, then etch priming with a special 2-part alloy etch primer. Then it was masked off and numerous coats of 2-pack gloss black were applied before cutting back. If I say so myself, seeing it again was very pleasing to the eye. The only job still to do was to fit the large PD26 oil seal. This seal achieves two purposes. Primarily, as the name suggests, it is there to stop oil seeping out of the primary chaincase into the clutch cavity. However, it also serves a minor secondry purpose, which is to keep the primary sprocket centralised once the clutch carrier is removed. I gently tapped the new oil seal into the chaincase cover and smeared grease around the lip of the seal and it was then ready to fit. Having also lightly smeared 3 Crown silicon sealer around the gasket face of the sizeable cover, it was then just a case of gently removing the clutch carrier, supporting the rear chain sprocket as best I could and then gingerly fitting the primary cover, while trying carefully to feed the rear sprocket through the large seal, without trapping and splitting the lip of the seal. With this done and the primary case lined up, I was then able to add a couple of the stainless hex fitting screws, and relax a bit, so that the clutch shoe carrier could be added again, to line up the sprocket and take the excess pressure off the seal. Once I had added and tightened up all the screws, wiped the excess sealant away and added the drain plug, all I had to do was re-check the chain tension and as a final touch add the HRD inspection plug and new washer (a much shallower one fitted here, rather than the deep ones fitted to the heads), then finally I could sit back and admire the finished job – at long last the Vincent engine, in all its shiny black beauty was beginning to look like that of a Black Lightning!
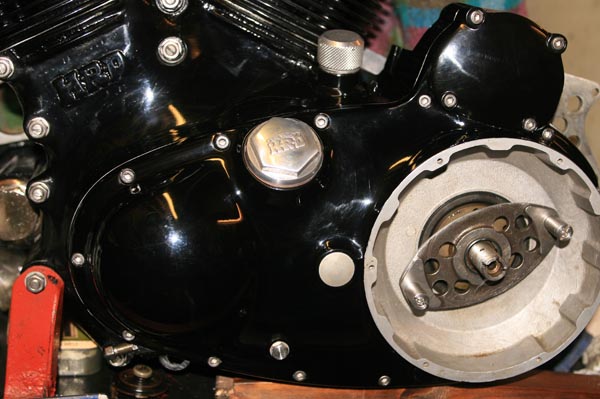
Primary drive assembly complete and cover fitted. Notice original satin finish blanking plug fitted in centre and oil drain plug at bottom centre. HRD inspection cap is iconic!